Automatic Deadweight Load Cell Calibration Instrument for Improved Force Calibration Results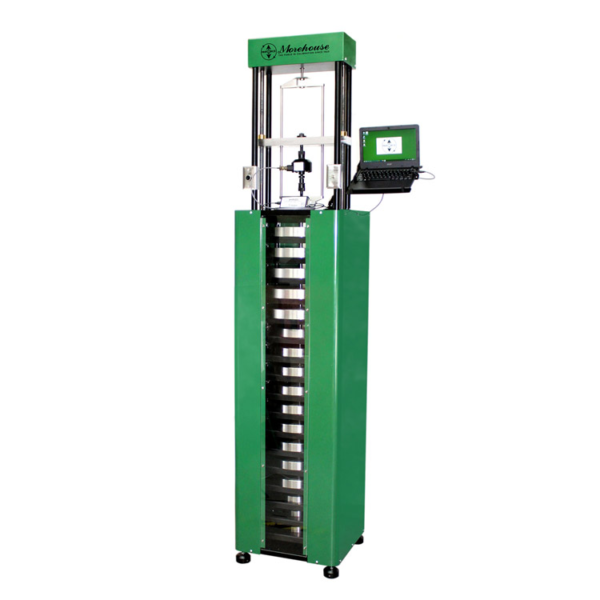
Figure 1: Morehouse 1,000 lbf Automatic Deadweight Load Cell Calibration Machine
Deadweight Load Cell Calibration Machine used to calibrate load cells may vary from ones with the lowest overall uncertainty such as deadweight force standard machines sometimes called primary standards to single or multiple transducer machines. Some labs may even use a Universal Testing Machine, or a homemade press to calibrate load cells. This post is to discuss the benefits of using an automated deadweight machine.
We will discuss what a well-built deadweight machine should be as not all deadweight machines are built the same. We will discuss some of the various types of recognized force machines and their benefits and disadvantages. Typically, a homemade press or a Universal Testing Machine is not recognized as a suitable machine for calibrating load cells to the typical accuracies required by most industries. The examples of machines cited come from Euramet cg-4 representing commonly accepted force machines.
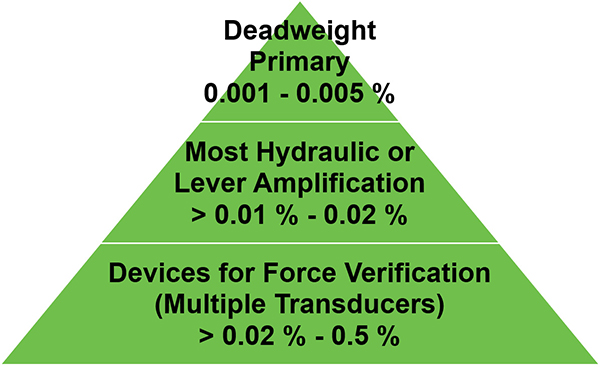
Figure 2: Typical Force CMC's
Deadweight Force Machines or Primary Force Standard (CMCs as low as 0.001 % of applied force) – a deadweight force applied directly without intervening mechanisms such as levers, hydraulic multipliers, or the like, whose mass has been determined by comparison with reference standards traceable to the International System of Units (SI) of mass. (Section 3.1.2 of ASTM E74-18) The weights are corrected for the effects of local gravity where the machine is used, air buoyancy, and material density.
The equation to adjust weights for force is as follows:
Force = M x g / 9.80665 m/s2 (1 – d/ D)
Where M = mass of weight, g = gravity at a fixed location, d = air density, and D = material density
Deadweight Force Machines
Deadweight machines are the most accurate method for calibrating load cells. When the overall accuracy of the load cell matters it is highly recommended that deadweight standards are used to perform the calibration. These machines are capable of calibrating ISO 376 Class 00, ASTM E74-18 Class AA verified range of forces, AS 2193 Class AA, and other force measuring devices requiring the utmost accuracy. Note: If ASTM Class AA is required, a deadweight machine is the only standard suitable to calibrate the ASTM E74 Class AA verified range of forces.
Expanded Uncertainty must be better than 50 ppm to assign a Class AA verified range of forces. All new Morehouse automatic deadweight machines have Expanded Uncertainties of better than 0.002 % of the applied force. The actual design of the deadweight machine must include several factors. These will usually include a rigid design and making sure the actual weights are machined and designed properly to bring to weight.
Having weights that are machined properly with enough adjust cavities to bring the mass to the proper corrected value is imperative to any well-made deadweight machine. If the weights are not machined with a good surface finish, have become corroded or are made of cast iron, it is very difficult to achieve 0.005 % of applied force as other error sources such as corrosion can change the actual weight. The stability of the weights can be problematic with such materials causing large errors over time.
With Morehouse machines, especially those that use stainless steel, where it has been proven by NPL in England through studies that austenitic stainless-steel masses show the mass is likely to be stable to better than 0.2 ppm over a period of ten years the stability would be of little concern. Different manufacturers have built all kinds of machines that may not be adequate or may have shortcomings when it comes to the overall design of the machine. Therefore we have made a recommendation list of attributes found in well-built deadweight machines.
Additional things a deadweight primary standard machine should have:
- The machine should be capable of loading and unloading all weights individually and automatically
- Weights shall be applied and removed at a rate to minimize the effects of shock loading
- Timing profiles for each weight should be set to ensure stable loading and to comply with standards such as ISO 376 which states in section 7.4.3 “The time interval between two successive loadings shall be as uniform as possible, and no reading shall be taken within 30 s of the start of the force change.”
- The yoke should be designed with a radius at each level to eliminate the sticking of the weights and to center them when applied.
- The stage beam or where the unit under test (UUT) is fixtured should be designed parallel to the machine and be rigid enough to ensure minimal bending occurs.
- The actual yoke should be designed to accept various size force measuring instruments of varying capacities.
- The yoke should be overdesigned as to not fatigue and break with years of service.
- Each level of the machine and yoke should have enough clearance to allow each weight to clear and allow some deflection of the unit under test so that the applied weights never touch the top or bottom supports when they are hanging.
- The machine should be designed so that each level can be kept parallel and torsion kept to a minimum.
- All weights should be designed with corrosion-resistant material. Stainless steel is the preferred material as it is not magnetic and is corrosion-resistant. These weights should also be arranged top down with the largest weights at the top of the deadweight stack.
Morehouse has completely redesigned our automatic deadweight to have all the above. The Morehouse Automatic Deadweight Machine is more rigid, has more room between weights, and has conical lifters so the weights can be lowered by low-pressure air bladders to eliminate shock loading, we use new designs to ensure the yoke will not twist apart as all threaded parts naturally want to unthread. The weight compliments are often designed to eliminate unnecessary hysteresis errors and allow weights not to have to be cycled off and then back on again to get to the necessary force point. It is very important when following a decremental loading profile as all points must be taken from the maximum force point.
For example, on a 10,000 N load cell requiring descending loading points at 10 % increments. It may not be acceptable to load the cell to 10,000 N and then remove a 3000 N weight to then apply a 2000 N weight to obtain the 9,000 N force point as the timing of the weight removal may cause an additional error in the load cell output that will not replicate actual use.
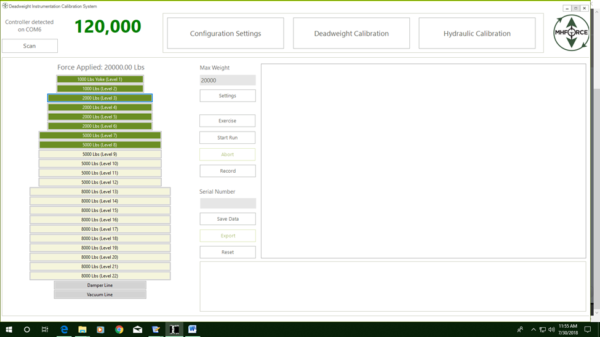
Figure 3: Actual Screenshot of Morehouse Deadweight Automation Software
The control of the machine is very important if calibrating to the ISO 376 standard which states in section 7.4.3 "The time interval between two successive loadings shall be as uniform as possible, and not reading shall be taken within 30 s of the start of the force change”. ISO 376 recognizes the importance of timing, and Morehouse has performed several timing tests which showed significant differences in output depending on the timing.
Morehouse has designed a new automated control that features a programmable controller with a touchscreen used for manual mode, and the end-user can set timing and loading sequences including data capture. Automated data capture routines can take hundreds of samples over a defined period of time. This can lead to better results in that weights tend to mimic a pendulum and taking multiple readings results in an average value that best represents the output of the device being calibrated. Plus timing profiles ensure consistency that an operator may not be able to do manually. Also, all data can easily be exported to your current calibration software or the machine's USB communication port can be used to work with LabVIEW and other programs.
If you are accredited to ISO/IEC 17025 and calibrate force measuring instruments, an Automatic Deadweight machine is going to have the lowest possible uncertainty which will lower the Test Uncertainty Ratio on the force measuring instrument and give the calibration laboratory the best chance to be within the guard banded acceptance limits as required.
When making a statement of conformance per ISO/IEC 17025:2017 Section 7.8.6.1 which states “When a statement of conformity to a specification or standard for test or calibration is provided, the laboratory shall document the decision rule employed, taking into account the level of risk (such as false accept and false reject and statistical assumptions) associated with the decision rule employed and apply the decision rule”. Simply put Morehouse Deadweight Machines are for those concerned with measurement risk and maintaining a 4:1 Test Uncertainty Ratio (T.U.R.) on the force-measuring instruments with a tolerance of 0.05 % or better.
Lever amplification force standard machines (CMCs as low as 0.01 %of applied force) - In a lever amplification machine, a deadweight force is amplified using one or more mechanical lever systems, increasing the force by a factor approximately equal to the ratio of the lever arm lengths.
From time to time we get requests for lever deadweight machines. Overall, we have not found a lever machine to be a cost-effective solution for most of the deadweight requests up to 50 kN or around 11,250 lbf. Lever systems generally have several components that need to be the appropriate dimensions. There are errors associated with maintaining the dimension of the lever or arm as changes in temperature will affect the overall dimensions, quite often, there is friction, and it can be difficult to account for elastic distortions. The systems can be difficult to control. The alignment of the force-measuring device and getting the system aligned with the force-measuring device's measuring axis can be tricky. Moveable parts may contribute to reproducibility errors, and if knife edges are used, they can wear.
If built right, the lever machine is the second most accurate machine to calibrate force measuring devices. However, that is a big “if” and most labs will often opt for deadweight machines for 50 kN and under and purchase a Universal Calibrating Machine for higher forces where the applications or measurements needed are less critical. The difference in price between a lever system and a system with several transducers is often at least five times higher, and the difference in CMCs between the machines can be less than 0.01 % of the applied force.
Hydraulic amplification force standard machines (CMCs as low as 0.01 %of applied force). In a hydraulic amplification machine, a deadweight force is amplified using a hydraulic system with piston/cylinder assemblies of different effective areas, increasing the force by a factor approximately equal to the ratio of the two areas.
Morehouse has some customers who have taken our Universal Calibrating Machine and applied an amplification system. If done right, the stability of the hydraulics can be improved. The downside is the cost to do this generally outweighs the benefits. For example, the UCM may have an Expanded Uncertainty of 0.01 % with the right setup whereas a system with multiple force transduces can achieve 0.02 %. Typically, they have pressure differences throughout the hydraulic circuity caused by hydraulic fluid flow and vertical height.
Temperature can affect the area ratio causing thermal expansion at different rates and pressure drops can also occur. There will be some pressure distortion in the piston/cylinder assembly. The control system may have some instability caused by any friction in the piston/cylinder, and it is often quite difficult to set the initial zero force point.
Hydraulic Amplification Machines are a good fit for calibrating load cells needing an ASTM E74 class A verified range of forces.
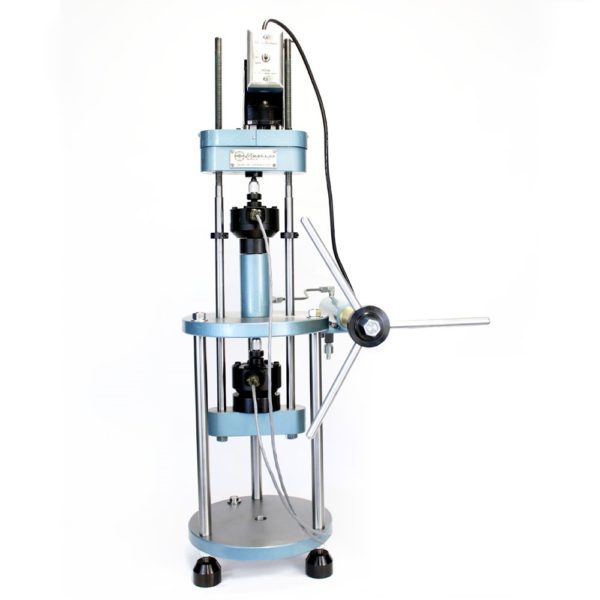
Figure 4: Morehouse 30,000 lbf UCM
Multiple transducer system force standard machines (CMCs as low as 0.02 %of applied force). These machines are based on using several reference force transducers, individually calibrated in a standard force machine and then loaded in parallel. The generated force is calculated as the sum of the forces being measured by the individual transducers. Morehouse manufacturers several machines that fall into this category. These machines include Universal Calibrating Machines (UCM), Benchtop Calibrating Machine (BCM), and the Portable Calibrating Machine (PCM).
Morehouse has written several articles on these machines. We have written and presented on the uncertainties achievable with the proper transfer machines Typically, Universal Calibrating machines are the most affordable and recognized machine to perform calibrations on several force measuring devices. The most important part is choosing the best possible load cells. These load cells or reference standards, when used in the machine, should always be calibrated by deadweight primary standards. These machines are often very versatile allowing for calibration of smaller to large instruments of varying sizes and capacities. The system is controlled hydraulically and can be automated.
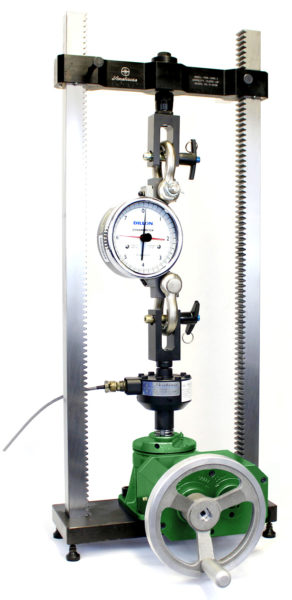
Figure 5: 10,000 lbf benchtop machine
A Morehouse Universal Calibrating Machine when used with several load cells can achieve CMCs as low as 0.02 % of applied force and can typically be used down to 1 % of the capacity of the machine. The machines are designed to be well aligned so as not to introduce eccentric forces. These machines do have an error associated with side loading, but if the proper load cells such as Morehouse Ultra-Precision Shear web cells are used as standards, then the error contribution for side load sensitivity is less than 0.0625 inches which is an error of about 0.003 % or 30 ppm. When compared against a testing machine or other devices labs may use, the Universal calibrating machine should have a magnitude of at least ten times more accurate than using a well-controlled testing machine. Of course, this assumes that the other machines are not specifically built for force applications. For instance, our PCM and Benchtop are manufactured with the appropriate rigidity, parallelism, control, and adapters to achieve 0.02 % of the applied force.
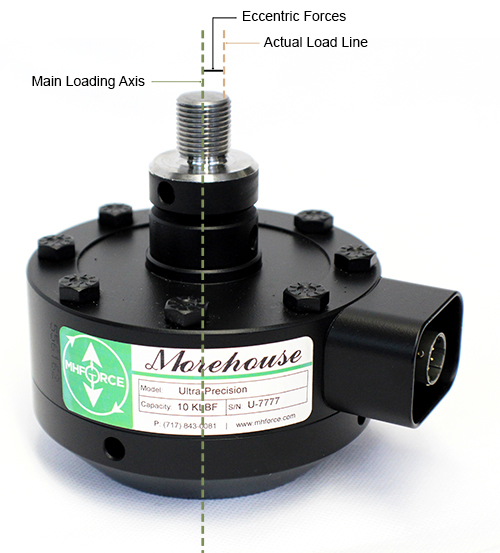
Figure 6: Morehouse Load Cell Depicting Eccentric Forces
Adapters
Let us not forget adapters. Using the proper adapters to keep the load line pure or free from eccentric forces is the key to any calibration. Even the most accurate machine in the world cannot overcome an instrument being calibrated with the wrong adapters. Several people fail to realize the true importance of adapters. For this reason, we have written a technical paper detailing several types of instruments and the appropriate adapter. For more information, download our paper here.
Deadweight Load Cell Machine - Conclusion
If you have the funds and want to calibrate items with very stringent accuracy requirements, an automatic deadweight machine is the best choice to calibrate force measuring devices with uncertainties at least ten times better than any automated or non-automated UCM. Other options may include outsourcing your calibrations to Morehouse which has several automatic deadweight machines up to 120,000 lbf or NIST which can calibrate using deadweight up to 1,000,000 or 4.4 MN. If accuracy is a bit less critical and the reference standard can have an Expanded Uncertainty of over 0.01 % of applied then a Morehouse UCM may be a good fit, or if there is not enough volume of work, Morehouse can calibrate instruments up to 2,250,000 lbf or 10 MN. However, no matter what you do, if you fail to use the appropriate adapters, the measurement errors will far exceed the required tolerances. Please read our technical paper on these error sources as the wrong top adapter can produce a 0.3 % error on a load cell that would otherwise calibrate to better than 0.02 %. Morehouse has a full machine shop and will make the appropriate adapters as needed. We take great pride in educating our customer base and working with our customers to the best of our ability to improve their measurement results and reduce their measurement uncertainty.
To learn more, watch our video on the Morehouse Deadweight Machine – The most accurate way to calibrate a load cell.
I take great pride in our knowledgeable team at Morehouse, who will work with you to find the right solution. We have now been in business for over a century and have a focus to be the most recognized name in the force business. That vision comes from educating our customers on what matters most and having the right discussions. Morehouse will not commit to providing a system if we cannot meet your expectations.
If you enjoyed this article, check out our LinkedIn and YouTube channel for more helpful posts and videos.
Everything we do, we believe in changing how people think about force and torque calibration. We challenge the "just calibrate it" mentality by educating our customers on what matters, and what causes significant errors, and focus on reducing them.
Morehouse makes simple-to-use calibration products. We build awesome force equipment that is plumb, level, square, and rigid, as well as provide unparalleled calibration service with less than two-week lead times.
Contact us at 717-843-0081 to speak to a live person or email info@mhforce.com for more information.
#Deadweight Load Cell Calibration


