Guidance on Uncertainty Budgets for Force Measuring Devices Part 4. Calculating Uncertainty for ISO 376 Uncertainty Analysis
ISO 376 Uncertainty Analysis Introduction:
All calibration laboratories accredited to ISO/IEC 17025 are required to submit uncertainty calculations for the Calibration and Measurement Capability uncertainty claims included in the scope of accreditation. The assumptions made for the determination of the uncertainty budgets, if any, must be specified and documented. A2LA accredited and enrolled calibration laboratories shall calculate measurement uncertainties using the method detailed in the ISO “Guide to the Expression of Uncertainty in Measurement” (GUM)1.
ISO 376 Uncertainty Analysis Purpose:
The purpose of this blog is to provide guidance for determining the proper contributors of parameters for force measuring devices that should be taken into consideration when developing uncertainty calculations that support Calibration and Measurement Capability (CMC) uncertainty claims made on a scope of accreditation. This guidance document also serves as a means for labs to be compliant with section 6.8 of A2LA R205 – Specific Requirements. Calibration Laboratory Accreditation Program. Finally, for instruments that are calibrated in accordance with ISO 376:2011, it goes beyond R205 to include sections in ISO 376:2011 that should be considered for determining CMCs.
ISO 376 Uncertainty Analysis General Guidance:
Note: It is recommended that Euramet cg-4 should be followed for anyone not having to comply with A2LA document R205. Morehouse has a CMC Excel spreadsheet to help labs calculate CMCs in accordance with A2LA R205 and ISO 376 which can be found here
Type A Uncertainty, Contributors
1) Repeatability of the Best Existing Device
2) Repeatability and Reproducibility
Type ABNormal
3) Combined Uncertainty from ISO 376 Annex C which includes contributions for calibration force (reference standard uncertainty), repeatability, reproducibility, resolution, creep, zero drift, reversibility, temperature, and interpolation.
Type B Uncertainty Contributors
4) Resolution of the Best Existing Device
5) Reference Standard Stability
6) Environmental Factors
7) Other Error Sources
All uncertainty contributors should be combined, and the Welch-Satterthwaite equation should be used to determine the effective degrees of freedom for the appropriate coverage factor for a 95 % confidence interval.

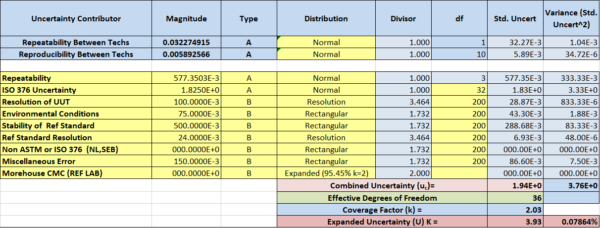
Table 1 Example of a Single Point Uncertainty Analysis for Devices Calibrated in Accordance with the ISO 376 Standard using the Morehouse CMC sheet
Note: Force Measuring Devices Calibrated in Accordance with the ISO 376 standard are continuous reading devices, and any uncertainty analysis should be conducted on several test points used throughout the loading range. There are Excel spreadsheets available for calculating CMC from Morehouse.
ISO 376 Uncertainty Analysis Data to Support Table 1
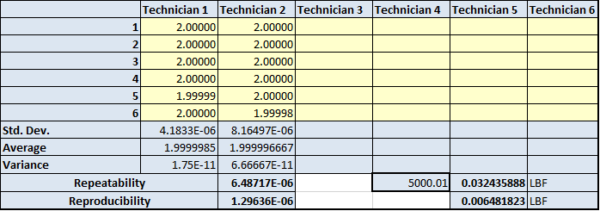
Repeatability and Reproducibility – This should only need to be performed once per every parameter on the scope of accreditation.

Repeatability Data – Data needs to be taken for various test points throughout the loading range. This example only shows one data point. Calculations should be run for several data points throughout the loading range.

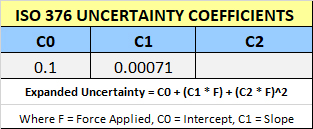
Combined Uncertainty from ISO 376 Annex C which includes contributions for calibration force (reference standard uncertainty), repeatability, reproducibility, resolution, creep, zero drift, reversibility, temperature, and interpolation. All Morehouse ISO Certificates have coefficients to enter the ISO 376 uncertainty into the program

At each calibration force, F, a combined standard uncertainty, uc, expressed in units of force, is calculated from the readings obtained during the calibration. These combined standard uncertainties are plotted against force, and a least-squares fit covering all the values is calculated. The coefficients of this fit are then multiplied by the coverage factor k = 2 to give an expanded uncertainty value, U, for any force within the calibration range. The form of the fitted line (e.g. linear, polynomial, exponential) will depend on the calibration results. This line equation should be used to derive the uncertainty per point and additional contributors to uncertainty should be considered. We are calling this the ISO 376 Uncertainty and have reduced the number to a standard uncertainty to use the Welsh-Satterthwaite formula.
Resolution of Unit Under Test (Best Existing Device) = 0.1 FORCE UNITS
Environmental Factors +/- 1-degree C was used, and this is found on the manufacturer's specification sheet. The temperature effect is 0.0015 percent per degree C. If the reference laboratory controls the temperature to within +/- 1 degree, the contribution formula is Force Applied * Temperature Specification per 1 degree = Environmental Error. 5,000 Force Units * 0.0015 % = 0.075 FORCE UNITS- +/- 1-degree C was used, and this is found on the manufacturer's specification sheet. The temperature effect is 0.075 FORCE UNITS
Reference Standard Stability – This is calculated per point, and 0.01 % change between the same 5000 FORCE UNITS calibration point was used which corresponded to 0.5 FORCE UNITS.
Other Error Sources – In this example the alignment of the force transfer machine 1/16th inch measured off the centerline of the load cell (From the specification sheet side load sensitivity 0.05 % * 0.0625 = 0.003 % = 0.15 FORCE UNITS). Other Error Sources could include contributors associated with using different indicators if the device is calibrated with a different indicator that was used for calibration.
Reference Standard Uncertainty – The lab performing the calibration of this device used deadweight primary standards with a CMC of 0.002 % of applied. This number was figured into the ISO 376 uncertainty per Annex C, and therefore the value for the reference is in the ISO 376 Uncertainty line above. The ISO 376 Uncertainty at 1 standard deviation is 1.825 Force Units at the 5000 Force Units test point.
Indicator – If the force measuring device is not used with the same indicator that was used for calibration an additional error source will need to be accounted for and measurement traceability for the indicator will have to be verified.
ISO 376 Uncertainty Analysis - Conclusion
This concludes what should be considered when calculating force CMCs with ISO 376.
Download the Morehouse CMC Excel Sheet and follow the directions. The sheet makes calculating CMC in accordance with ISO 376 very simple.
If you enjoyed this article, check out our LinkedIn and YouTube channel for more helpful posts and videos.
Everything we do, we believe in changing how people think about force and torque calibration. Morehouse believes in thinking differently about force and torque calibration and equipment. We challenge the "just calibrate it" mentality by educating our customers on what matters, and what causes significant errors, and focus on reducing them.
Morehouse makes our products simple to use and user-friendly. And we happen to make great force equipment and provide unparalleled calibration services.
Wanna do business with a company that focuses on what matters most? Email us at info@mhforce.com.
#ISO 376 Uncertainty Analysis - Conclusion


