The New Dimension to Resolution: Can it be Resolved?
Our last blog, Device Resolution and the Impact on Consumer Risk, described why best practices should be followed for conformity assessments rather than drafting individual test protocols and standards. How should manufacturers and calibration laboratories correctly calculate both uncertainty and risk on equipment?
Risk, Conformity Assessment, and the Decision Rule
ISO/IEC 1702:2017 addresses how to account for risk: "When a statement of conformity to a specification or standard for test or calibration is provided, the laboratory shall document the decision rule employed, taking into account the level of risk (such as false accept and false reject and statistical assumptions) associated with the decision rule employed and apply the decision rule."[1]
Some end-users may not understand the decision rule and what it means for them. Are they comfortable with a conformity assessment that does not include all necessary uncertainty contributors, such as the device's resolution? Do they only want a statement that says "Pass" with a sticker that allows them to use the device to make measurements? Are they aware of the potential risks?
Perhaps the end-user is well-versed in risk and chooses to follow ANSI/NCSL Z540.3 clause 5.3b. Maybe their purchase order requests that the ANSI/NCSL Z540.3 standard be followed and the decision rule specified. This would be the better—or safer—scenario, but it is not the guaranteed scenario.
Contributors in the TUR Calculation
Many decision rules require a TUR calculation. The formula's ratio includes a numerator and a denominator. ANSI/NCSL describes, "For the numerator, the tolerance used for Unit Under Test (UUT) in the calibration procedure should be used in the calculation of the TUR. This tolerance is to reflect the organization's performance requirements for the Measurement & Test Equipment (M&TE), which are, in turn, derived from the intended application of the M&TE. In many cases, these performance requirements may be those described by the Manufacturer's tolerances and specifications for the M&TE and are therefore included in the numerator."[2]

Figure 1: Example of a TUR Formula (Adapted from the ANSI/NCSL Z540.3 Handbook)
In most cases, the numerator is the UUT Accuracy Tolerance. The denominator is slightly more complicated. Per the ANSI/NCSL Z540.3 Handbook, "For the denominator, the 95 % expanded uncertainty of the measurement process used for calibration following the calibration procedure is to be used to calculate TUR. The value of this uncertainty estimate should reflect the results that are reasonably expected from the use of the approved procedure to calibrate the M&TE. Therefore, the estimate includes all components of error that influence the calibration measurement results, which would also include the influences of the item being calibrated except for the bias of the M&TE. The calibration process error, therefore, includes temporary and non-correctable influences incurred during the calibration such as repeatability, resolution, error in the measurement source, operator error, error in correction factors, environmental influences, etc."[3]
This definition of the TUR denominator aligns very closely with ILAC P14:09/2020, which states, "Contributions to the uncertainty stated on the calibration certificate shall include relevant short-term contributions during calibration and contributions that can reasonably be attributed to the customer's device. Where applicable, the uncertainty shall cover the same contributions to uncertainty that were included in the evaluation of the CMC uncertainty component, except that uncertainty components evaluated for the best existing device shall be replaced with those of the customer's device. Therefore, reported uncertainties tend to be larger than the uncertainty covered by the CMC."[4]
The TUR formula in Figure 1 is an adaptation with the denominator clarified for current practices. Some may contend that resolution is accounted for with repeatability studies. However, if repeatability is equal to zero, then the UUT's resolution must be considered.
ILAC P14: 09/2020 addresses when the UUT's resolution needs to be included by stating, "When it is possible that the best existing device can have a contribution to uncertainty from repeatability equal to zero, this value may be used in the Evaluation of the CMC. However, other fixed uncertainties associated with the best existing device shall be included."[5]
To correctly calculate TUR, many in the metrology community believe the formula in Figure 1 comprises the minimum contributors that should be included in the denominator for CPU. The formula includes the ratio of UUT Accuracy Tolerance, which manufacturers often request as the accuracy specification, compared against the expanded uncertainty of the calibration process.
At a minimum, the expanded uncertainty should include the uncertainty of the measurement process (labeled as CMC, though it is the CMC Uncertainty Component), as well as the UUT's resolution. There are some instances in which the UUT's repeatability is substituted with that of the best existing device used for calibration, as referenced in ILAC P-14: 09/2020.
Not accounting for the UUT's resolution can result in an increased risk to the end user unless the same resolution is accounted for in the CMC uncertainty component.
The Effect of UUT Resolution on Risk & Uncertainty
One necessary contributor to the TUR denominator is the resolution of the UUT. The importance of UUT resolution to total risk is shown in Figure 2. The risk starts to increase quite dramatically as the resolution increases.
As the resolution of the device increase, so does the overall uncertainty. Figure 3 shows the relationship between resolution and Expanded Uncertainty. When the resolution is 0.001 kgf, it is insignificant. At 0.01 kgf, it is 11.52 % of the overall budget, and when raised to 0.05 kgf, it becomes dominant.
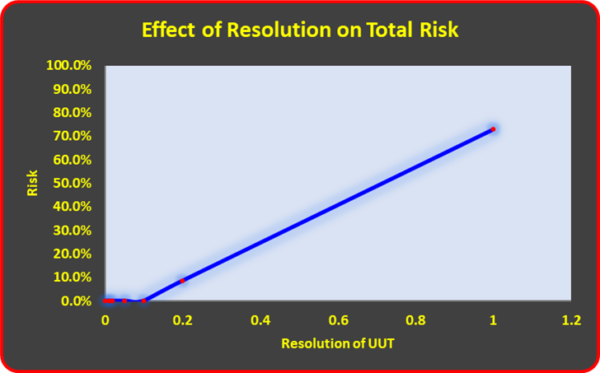
Figure 2: Resolution and the Effect on Total Risk Using a 1 000 kgf Morehouse Load Cell and Varying the Indicator Resolution (No repeatability)
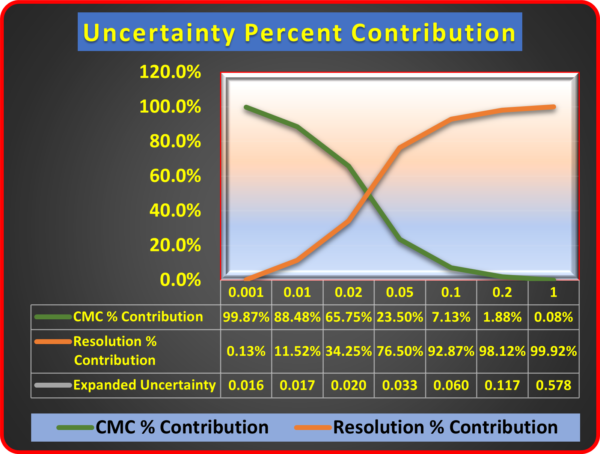
Figure 3: Resolution as a percentage of the Total Measurement Uncertainty Using a 1000 kgf Morehouse Load Cell and Varying the Indicator Resolution.
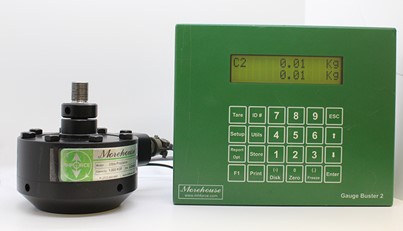
Figure 4: Morehouse Load Cell and Gauge Buster (UUT Example), which is used to Measure Force
Since a device with too coarse resolution will increase the measurement uncertainty, some in the Industry have created workarounds. An example of these workarounds is found in terminology such as Test Uncertainty or Test Value Uncertainty. Test Value Uncertainty was first introduced by ISO 14253-5:2015, which defines it as "measurement uncertainty associated with a test value."[6]
ISO clarifies Test Value Uncertainty by stating:
- The test value uncertainty is not a measure of the performance of the indicating measuring instrument under test; the performance is captured by the test values.
- The test value uncertainty is commonly used in the application of decision rules.
- The test value uncertainty is usually controlled by and is the responsibility of the tester, who usually provides and uses the test equipment. See 7.4 when alternative test equipment is provided by the tester counterpart (3.14).
- The test value uncertainty does not include any definitional uncertainty due to the possible non-uniqueness of test values in a permissible test instance. By agreement on the test protocol, the test is valid for any permissible test instance, for each of which a unique test measurand applies (see 3.4 Note 1 to entry).
- The test value uncertainty reveals neither the effectiveness of a test protocol in assessing a metrological characteristic nor the reproducibility of a test value over different permissible test instances.[6]
It is important not to confuse CPU with Test Value Uncertainty. They are two different concepts. CPU and TUR calculations include contributors from the UUT that the Test Value Uncertainty does not. If adhering to the common practice of requesting a TUR > 4:1 (other guides and standards may recommend different minimum ratios) before making a statement of conformity, then the proper formula for TUR must be followed. Realizing the problem with other guides and standards, JCGM 106:2012_E states, "Care has to be taken when such rules are encountered because they are sometimes ambiguously or incompletely defined." [7]
TUR cannot be the ratio of the Manufacturer's accuracy tolerance to the reference standard uncertainty, per ANSI/NCSL Z540.3 and ILAC-G8:09/2019. Figure 5 shows a comparison of what happens to TUR when the resolution is considered and when it is not.
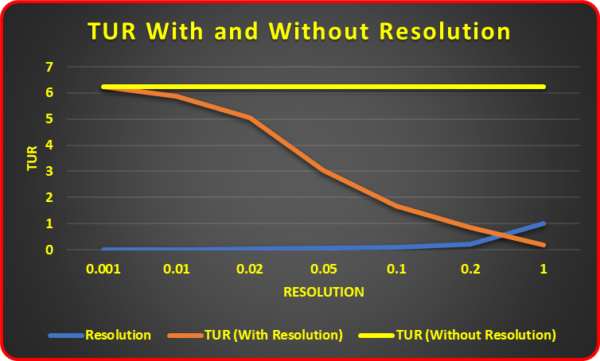
Figure 5: TUR with and without UUT Resolution
When the resolution is considered, the TUR starts at 6.25:1 with a UUT resolution of 0.001 kgf and then declines to 0.17:1 with a UUT resolution of 1.0 kgf. When the resolution is not accounted for, the TUR ratio stays at 6.25:1 regardless of the resolution. If a calibration laboratory uses the Test Value Uncertainty, then the UUT's resolution could be ignored in the conformity assessment.
Outdated Practices Lead to Higher Risk
Test Accuracy Ratio (TAR) is an outdated calculation that is not sustainable. It is the ratio of the accuracy tolerance of the unit under calibration to the accuracy tolerance of the calibration standard used.
TAR was created by Jerry Hayes and Stan Crandon in the 1950s. However, as Scott M. Mimbs points out in his paper, Measurement Decision Risk – The Importance of Definitions, "When Hayes allowed the use of a ratio between the tolerances of the subject of interest and the measuring equipment, the idea was supposed to be temporary until better computing power became available, or a better method could be developed."[8]
Mimbs also describes the difference between TAR and TUR in detail. He proposes that early definitions of the TUR's denominator were not well defined, which led to inconsistent applications: "The denominator for the ANSI/NCSL Z540.3 TUR is explicitly defined, thus providing better uniformity in the application of the TUR."[8] For a Critique of 4:1 TUR Requirement, refer to NCSLI RP-18 clause 3.5.2 [9]
Many in the metrology community have invalidated TAR because it does not align with metrological traceability practices. Since the Test Value Uncertainty does not include essential uncertainty components such as the UUT resolution, it is more in unison with the outdated TAR.
As noted, TAR is not sustainable. Figure 6 shows how a 4:1 TAR works for process measurements traced back to SI units through the BIPM. In the TAR example on the left, the NMI would need a measurement process that is 256 times greater than the process measurements used in the general Industry.
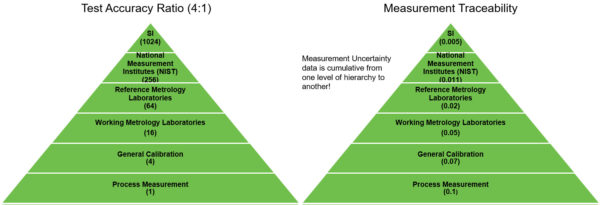
Figure 6: TAR versus TUR, illustrating how TAR is not sustainable
Mimbs provides an example of a digital micrometer using a TAR 25:1 ratio. Comparing this example with the definition of TUR found in the ANSI/NCSL Z540.3 Handbook produces a 1.5:1 ratio for the same measurement. Consequently, Mimbs concludes that computing power today is powerful enough to define risk correctly. The details are clearly defined in the ANSI/NCSL Z540.3 Handbook.
Shifting Less Risk to the Industry
Consider manufacturers and calibration laboratories that fail to correctly calculate both uncertainty and risk on equipment used to test medical equipment, airplanes, cars, and bridges. How will you feel when you schedule your next surgery, sit in a traffic jam on a bridge, or experience mechanical problems on your next flight?

Figure 7: Risk Considerations in a Traffic Jam on a Bridge
Will you feel confident that measurements were performed correctly and, when applied, will keep you safe—or will you worry about your safety? How do you feel now knowing that someone may have failed to calculate and apply measurement decision risk correctly? Having to question if the people making the measurements may have understated the calibration measurement process uncertainty does not boost confidence.
We need an ethical approach to calibration that avoids shifting more risk to the Industry and ultimately mitigates global consumer's risk. When original equipment manufacturers (OEMs) influence standards-making committees to draft test protocols, more risk is transferred to the Industry.
The metrology community must recognize mandatory policy documents such as ILAC-P14 and guidance documents such as the ANSI/NCSLI Z540.3 Handbook. These documents correctly define the calibration process measurement uncertainty used for calibration.
To learn more, watch our video Minimize your Force and Torque Measurement Risk.
References
1. ISO/IEC 17025:2017 "General requirements for the competence of testing and calibration laboratories," clause 7.8.6.1
2. ANSI/NCSL Z540.3 Handbook "Handbook for the Application of ANSI/NCSLI 540.3-2006 - Requirements for the Calibration of Measuring and Test Equipment."
3. ANSI/NCSL Z540.3 Handbook "Handbook for the Application of ANSI/NCSLI 540.3-2006 - Requirements for the Calibration of Measuring and Test Equipment."
4. ILAC P-14:09/2020, "Policy for Uncertainty in Calibration," clause 5.4
5. ILAC P-14:09/2020, "Policy for Uncertainty in Calibration," clause 4.3 note 2
6. ISO 14253-5:2015
7. JCGM 106:2012_E clause 3.3.15 "Evaluation of measurement data – The role of measurement uncertainty in conformity assessment."
8. Measurement Decision Risk – The Importance of Definitions, by Scott M. Mimbs
9. NCSLI RP-18 – Estimation and Evaluation of Measurement Decision Risk
If you enjoyed this article, check out our LinkedIn and YouTube channel for more helpful posts and videos.


