Does Resolution Need to be in an Uncertainty Budget?
There’s a question I’ve heard asked more often than it should be: "Does resolution need to be in an uncertainty budget?"
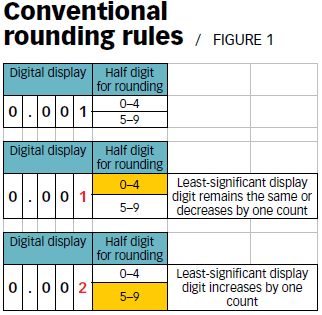
If the device’s digital resolution displays the least significant digit increment as a single digit from zero to nine, it is assumed that it somehow increments or decrements by a single digit. This assumption is based on the "invisible digit" to the right of the least-significant digit.
by Dilip Shah
Most of this article was originally published in measure to measure
The invisible digit
If this invisible digit is in the range of zero to four, the least-significant digit will remain the same or decrease by one digit. If it is in the range of five to nine, it increases the least-significant digit by one count. This is similar to conventional rounding rules we learned in early math classes (see Figure 1).

The Guide to Uncertainty of Measurement (GUM) suggests that you take half of this display resolution and treat it as a rectangular distribution.1 For example, if the = 0.000 288 7 (note that the numbers shown have a space after three digits to comply with SI, or metric system, conventions).2
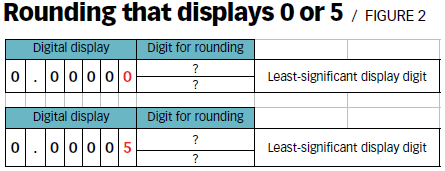
What if the least-significant digit increments by a count of five? For example, if the digital micrometer displays on an inch scale, the resolution is 0.000 05 inches. That means the least-significant digit will display as a zero or five (see Figure 2).
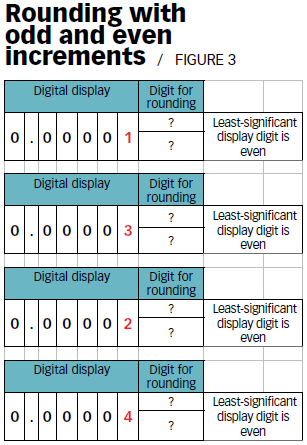
Unless the manufacturer of the device provides information on how the least-significant digit increments or decrements, you may have to determine how to estimate the uncertainty contributed by this kind of resolution. The GUM states that you can always treat a contributor as a rectangular distribution and divide it by a square root of three. The resolution’s uncertainty in this example is = 0.000 028 87. In other scenarios, a device’s resolution may increment in odd numbers or even numbers (see Figure 3).3

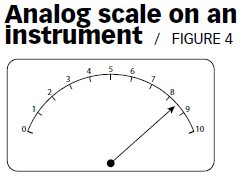
In thinking about resolution, you also must consider analog displays. The best resolution a device can get between two major indication lines is half the distance between the lines (see Figure 4). In other words, if the analog display’s pointer is between eight and nine, the best value you could resolve on that measurement is 8.5.

Some might ask, "Should this be treated like a digital display and state that the estimated uncertainty is = 0.288 7? Or should this uncertainty be = 0.577 74?"
In most cases, the best an analog display can read is usually a half digit when it interpolates between divisions in an analog display. You might need to take additional readings and calculate the repeatability contributor in this case.4
Without an invisible digit
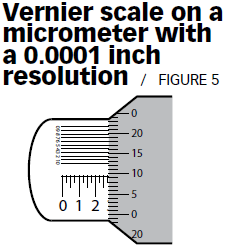
Let’s examine another scenario of the Vernier micrometer. Using the Vernier scale on a micrometer, you can resolve your measurement to 0.000 1 inches. How should this uncertainty for the micrometer resolution be estimated? There is no trailing invisible digit after the 0.000 1-inch resolution. In this case, the resolution uncertainty is best estimated at = 0.000 057 735.
Because the resolution is one of the contributors to a device’s uncertainty budget, its overall contribution may be significant or insignificant compared with other contributors. In the end, you can only read the display indication on the panel meter (see Figure 5). If the uncertainty contributed by the display resolution is insignificant, it will not matter in the overall uncertainty. If it is significant, it may contribute significantly to the overall uncertainty. This may be examined by the individual contributor’s percentage contribution.

For example, because a 0.001 digital display resolution has uncertainty due to the resolution that is dominant in an uncertainty budget, it is not practical to state the measurement as: 5.135 ± 0.000 577 35 (measurement result ± uncertainty due to resolution). The display resolution is essentially going to be the uncertainty (or 0.001). That’s because this is what the end user is going to see when he or she is taking measurements: 5.135 ± 0.001 (measurement result ± uncertainty due to resolution).
Resolution treatment
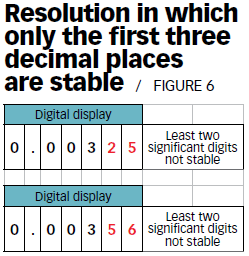
Treating resolution measurement uncertainty from different units of measurement from the same device also requires maintaining two separate measurement uncertainty budgets.5, 6 It also is important to treat resolution as it is defined in international Vocabulary of Metrology—Basic and General Concepts and Associated Terms (VIM): "[The] smallest change in a quantity being measured that causes a perceptible change in the corresponding indication."7 If a device has a five-decimal resolution and only the first three decimal places are stable, the device’s resolution is essentially 0.001 (see Figure 6).

The GUM can only provide general guidance on the estimation of uncertainty. If each contributor is important to your measurement process, it is essential that you conduct rigorous measurement-analysis studies to understand your measurement process rather than blindly accepting what is stated in a publication and applying it with a shotgun approach.
Measurement uncertainty analysis helps analyze a measurement-decision risk. Overestimating the uncertainty provides false negatives, while underestimating the uncertainty provides false positives. Both have costs for the consumer and supplier of calibration services. ISO 9001:2015 says organizations must assess risk in their business operations, and the ISO/IEC 17025 standard also is being revised to emphasize assessing measurement-decision risk. It’s time to treat your instrument resolution with more resolve.
References and notes
- Joint Committee for Guides on Metrology (JCGM), Evaluation of Measurement Data—Guide to the Expression of Uncertainty in Measurement, first edition, section F.2.2.1, "The Resolution of a Digital Indication," 2008.
- Ibid.
- For more information on assessing other display-resolution scenarios, read Philip Stein’s "Measure for Measure: All You Ever Wanted to Know About Resolution," Quality Progress, July 2001, pp. 141-142.
- For additional guidance on interpolation, read Philip Stein’s "Measure for Measure: Careful Interpolation Yields Useful Information," Quality Progress, January 2000, p. 67.
- Dilip Shah, "Measure for Measure: Best of Both Worlds," Quality Progress, July 2011, pp. 54-56.
- Dilip Shah, "Measure for Measure: Keep Your Resolution," Quality Progress, March 2011, pp. 56-58.
- JCGM, International Vocabulary of Metrology—Basic and General Concepts and Associated Terms (VIM), third edition, 2012.
Dilip Shah is president of E = mc3 Solutions in Medina, OH. He is the chair of ASQ’s Measurement Quality Division and past chair of ASQ’s Akron-Canton Section. Shah, an ASQ fellow, is also co-author of The Metrology Handbook (ASQ Quality Press, 2012), and an ASQ-certified quality engineer, auditor and calibration technician.
Additional information and exception to this article are found in ASTM E74-13a provided by Henry Zumbrun in an attempt to agitate the great Mr. Shah
Dilip wrote a fantastic piece on resolution. If you are calibrating in accordance with ASTM E74-13a, the rules do change a bit as ASTM allows estimation to 1/10 of a scale division. Per ASTM E74-13a section 7.2.2, "The resolution of an analog type force-measuring instrument is determined by the ratio between the width of the pointer or index and the center to center distance between two adjacent scale graduation marks. Recommended ratios are 1/2, 1/5, or 1/10 .A center-to-center graduation spacing of at least 1.25 mm is required for the estimation of 1/10 of a scale division. To express the resolution in force units, multiply the ratio by the number of force units per scale graduation. A vernier scale of dimensions appropriate to the analog scale may be used to allow direct fractional reading of the least main instrument scale division. The vernier scale may allow a main scale division to be read to a ratio smaller than that obtained without its use."
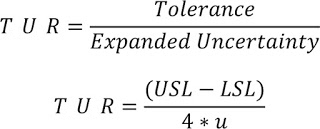
PS. This article on resolution is the first in our blog series on Understanding and Lowering Your Measurement Risk. This involves knowing how to calculate Test Uncertainty Ratios. To understand T.U.R., one must understand standard uncertainty, and to understand standard uncertainty, one must understand resolution. The equation for T.U.R. is as follows:

The equation for standard uncertainty is as follows:

CMC = Calibration and Measurement Capability. This should be found on the calibration report.
Res = This is the resolution of the Unit Under Test (UUT) The divisor for resolution will either be 3.464 or 1.732. - From Dilip's article, you should know what divisor to use.
Rep = Repeatability of the Unit Under Test (UUT)
Expanded Uncertainty - Typically 2 times the standard uncertainty. The appropriate k value should be used to ensure a coverage probability of 95 %.
This will all be explained in our next blog on Measurement Risk.
Does Resolution Need to be in an Uncertainty Budget? - Conclusion
If you enjoyed this article, check out our LinkedIn and YouTube channels for more helpful posts and videos.
We believe in changing how people think about force and torque calibration in everything we do. Morehouse believes in thinking differently about force and torque calibration and equipment. We challenge the "just calibrate it" mentality by educating our customers on what matters and what causes significant errors, and focus on reducing them.
Morehouse makes our products simple to use and user-friendly. We also happen to make great force equipment and provide unparalleled calibration services.
Do you want to do business with a company that focuses on what matters most? Email us at info@mhforce.com.
