Converting mV/V Load Cell Signals to Engineering Units: Understanding Load Cell Sensitivity and Signal Conversion.
Load cells, integral in measuring force, operate based on strain gauge technology. These devices provide millivolts per volt (mV/V) output, proportional to the excitation voltage. This mV/V sensitivity is crucial, as it determines the load cell's response to force.
When force is applied, the load cell's internal Wheatstone bridge, consisting of strain gauges, alters its resistance. The digital indicator then measures this resistance change visually or numerically. The most accurate way to capture this data is in mV/V format, a method superior to others due to its ratiometric nature. This approach involves measuring the voltage output and dividing it by the supplied voltage, leading to precise force calculations.
The Limitations of Linear Calibration Methods
Traditional calibration methods involve capturing span or point data and applying a linear equation, typically y = mx + b, where 'm' represents the slope and 'b' is the y-intercept. However, this linear approach can be problematic due to the inherent non-linearity in load cells, as indicated by specifications on non-linearity. This discrepancy is the difference between the output at a specific load and the corresponding point on a linear graph between the minimum and maximum load. Such linear calibration methods, therefore, introduce bias and measurement error, failing to account for factors like stability, thermal effects, and loading conditions.
A more sophisticated and accurate calibration method involves using the least-squares method of using polynomial equations fitted to calibration data. This approach, frequently employed in standards like ASTM E74 and ISO 376, minimizes measurement error and bias by fitting the calibration curve more closely to the actual load cell output.
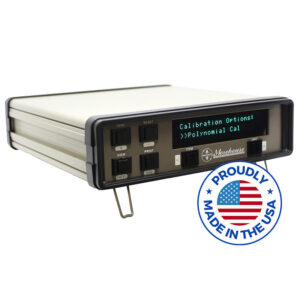
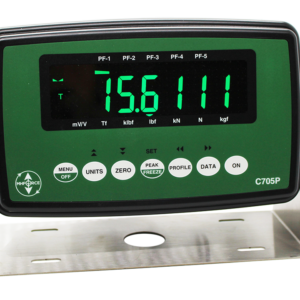
Innovations in Digital Indicators: The 4215 Plus and C705P using mV/V and calibration coefficients
The advancements in digital indicators, demonstrated by the 4215 Plus and C705P, signify a pivotal evolution in force measurement technology. These models are not just tools but examples of the transition from traditional to modern calibration methods, infusing practical application into theoretical concepts of load cell signal conversion.

The 4215 Plus and C705P stand out for their standalone functionality, eliminating the need for additional software, load tables, or computers. This design choice significantly streamlines the force measurement process, enhancing user-friendliness and practicality. Their ability to function independently benefits professionals requiring efficient and accurate force measurements in diverse settings.
The storage capacity of these indicators also speaks to their versatility. The 4215 Plus can store up to 28 load cell calibrations, making it suitable for applications demanding a wide range of calibration capabilities. Meanwhile, the C705P, being more affordable and able to store 5 calibrations, is ideal for field calibrations. This feature caters to the varying needs of different industry sectors, allowing for flexibility and ease in calibration processes.

A key innovation in these indicators is using B coefficients to predict load cell deflection values based on the mV/V reference data. This approach significantly minimizes measurement error compared to traditional span calibration methods, which are prone to significant bias due to the non-linear behavior of load cells. By adopting this advanced calibration technique using the mV/V values, the 4215 Plus and C705P ensure greater accuracy and reliability in measurements, marking a departure from less accurate models to more sophisticated, precise instruments.
The 4215 Plus and C705P introduction also bridges the gap between theoretical calibration methods and practical industry applications. These indicators are technological embodiments of scientific principles, addressing the limitations of linear calibration and offering technologically advanced and scientifically sound solutions.
For industry professionals, these indicators are not just new products but are targeted solutions that enhance accuracy and efficiency in force measurement. They address specific challenges faced in various scenarios, making them valuable assets in professional settings. The 4215 Plus and C705P represent a significant upgrade for those looking to improve their measurement processes.
Calibration in mV/V and Conversion with Minimal Error
In these advanced indicators, calibrations are performed in mV/V and converted to various force units such as grams-force (gf), pounds-force (lbf), kilograms-force (kgf), kilonewtons (kN), newtons (N), and tons (t). This conversion process, guided by the polynomial equations, ensures high accuracy with minimal additional error. When these units undergo recalibration, new equations are generated and updated directly in the indicators, removing the need for further adjustments and reducing calibration costs.
Consider a Morehouse Calibration Shear Web Load Cell with a non-linearity specification better than 0.05% of full scale. Using mV/V values for calibration, the actual non-linearity can be significantly lower, demonstrating the precision of this method. However, it's crucial to account for additional error sources like stability, drift, environmental conditions, and differences in loading conditions. These factors can substantially affect the overall accuracy of the system.
For instance, using a 2-point span calibration in scenarios where values are programmed at specific force intervals can reveal significant instrument bias or error. The difference between calculated and applied force values illustrates this bias, which can be as high as 3.2 lbf (around 0.08% of applied force) in certain cases. This error contrasts with the near-zero error achieved using polynomial equations and B coefficients.
Advanced Calibration Techniques and Software Integration using mV/V
Many digital indicators, including the 4215 Plus and C705P, offer USB, IEEE, RS232, or other interfaces for seamless computer integration. This capability enables regression analysis methods for calibrating the indicators, often resulting in more accurate characterizations of the force measuring system. Unlike linear equations, these methods employ higher-order equations to minimize errors and closely replicate the actual behavior of the load cell.
Using coefficients, often labeled as A0, A1, A2, A3, etc., in these equations allows for a more precise determination of the load cell's response. These coefficients are crucial in capturing the non-linear behavior of the load cell, adhering to the highest standards of metrology, such as ASTM E74 and ISO 376.
For optimal accuracy, it's recommended to use a digital indicator like the 4215 Plus or C705P, coupled with an ASTM E74 calibration and software that converts mV/V values to engineering units.
For more insights into force and torque calibration, metrology, and load cell reliability, explore our comprehensive blog.
-Henry Zumbrun, Morehouse Instrument Company
About Morehouse Instrument Company
We believe in changing how people think about force and torque calibration in everything we do. This includes setting expectations on load cell reliability and challenging the "just calibrate it" mentality by educating our customers on what matters and what causes significant errors.
We focus on reducing these errors and making our products simple and user-friendly. This means your instruments will pass calibration more often and produce more precise measurements, giving you the confidence to focus on your business.
Companies around the globe rely on Morehouse for accuracy and speed. Our measurement uncertainties are 10-50 times lower than the competition. We turn around your equipment in 7-10 business days so you can return to work quickly, saving you money.
When you choose Morehouse, you're not just paying for a calibration service or a load cell. You're investing in peace of mind, knowing your equipment is calibrated accurately and on time.
Contact Morehouse at info@mhforce.com to learn more about our calibration services and load cell products. Email us if you ever want to chat or have questions about a blog. We love talking about this stuff.
# mV/V


