Understanding Global Risk in Simple Terms
In the world of engineering and product design, there's a concept that Henry Petroski discusses in his book, "To Engineer is Human: The Role of Failure in Successful Design."
He suggests that engineers and companies might become complacent when things are going well.
They might not take the necessary precautions, and this could lead to significant problems.
This phenomenon might happen in the metrology community today, specifically when evaluating global risk.

So, what exactly is a global risk?
Global consumer risk refers to the probability that a test measurement on any product results in an incorrect pass determination, which means someone says something is good when it is not.
This is also known as unconditional PFA or consumer risk.
Global Risk also refers to the probability that a test measurement on any product results in an incorrect fail determination, which means someone says something is bad when it is good.
This is also known as the unconditional PFR or producer risk.
Global risk considers the test measurement probability distribution and the probability of encountering a product at that measured value.
It's important to note that global risk cannot be calculated without specifying a distribution of values for the product, which is obtained from prior knowledge and measurements.
In simple terms, most people worry more about the probability that their equipment will not meet the required standards and will be accepted based on a future measurement result.
This can be a significant issue, mainly when the product is used when safety is crucial.
One example might be the potential consequences if an aircraft's weight is miscalculated due to inaccurate measurements, causing the center of gravity to be off.
When labs don't correctly calculate this risk or loosen their restrictions, they create a potential danger wherever this equipment is used.
A good example would be not looking at the overall reliability of their equipment, which means not adjusting calibration intervals or widening specifications to meet their reliability targets.
An Example Where Reliability may not be Considered
Remember when we said this might be happening in the metrology community?
This is what Morehouse has observed on several occasions. A customer sends in a load cell system with a tolerance limit; we calibrate the device, it fails calibration, and we adjust it.
The calibration interval is kept at one year, and the same thing happens the following year.
After five calibration cycles, the result is five failures out of five calibrations for a reliability target of 0 %.
When this equipment is used near the end of the calibration cycle, does anyone think what is being calibrated may be within tolerance?
It's like a ticking time bomb waiting to cause problems.
How to Calculate Global Risk
A step-by-step guide on how to calculate global risk:
- Understand the Concept: One part of Global risk is the probability that a test measurement on any product results in an incorrect pass determination. It's also known as the PFA or consumer risk. The other part is that an incorrect fail is reported (Probability of False Reject), also known as producers risk.
- Identify the Test Measurement Probability Distribution: This is the likelihood of different outcomes in a measurement. This distribution is a fundamental part of calculating global risk.
- Identify the Probability of Encountering a Product at That Measured Value: This is another crucial factor in calculating global risk. It's the likelihood of coming across a product with a specific measured value.
- Specify a Distribution of Values for the Product: Global risk cannot be calculated without this. This distribution is obtained from prior knowledge and measurements of the product.
- Integrate the Joint PDF: This is the joint Probability Density Function of the test measurement and the PDF of the unit under test. This integration is a mathematical process that combines these two factors to calculate global risk.
- Apply the Formula: The formula for calculating global consumer and producer risk is found in JCGM 106 section 9.5.2.2 "For a measured value in the acceptance interval and a value of Y outside the tolerance interval, the global consumer's risk is
 For a measured value outside the acceptance interval and a value of Y within the tolerance interval, the global producer's risk is
 Note: Please refer to JCGM 106 as there is a lot more than just this formula, as in a real-world scenario, the desired level of risk is likely going to be chosen based on acceptance limits, cost analysis, and uncertainty.
7. Interpret the Result: The resulting value is the global risk, which represents the likelihood of incorrectly accepting a product based on the test measurement.

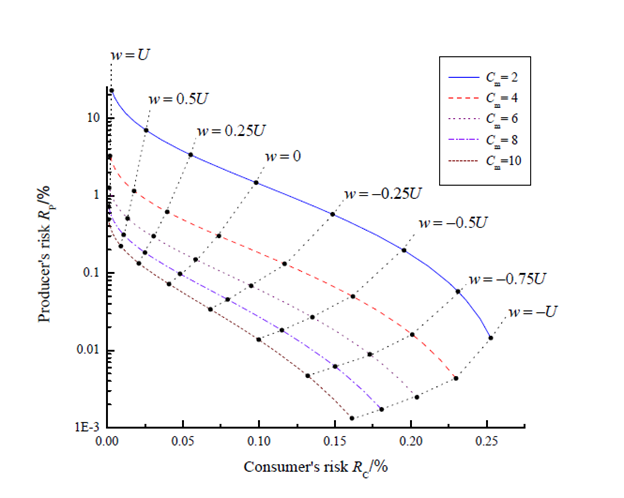
8. To reduce the probability of an incorrect accept/reject decision, you might want to invest in better equipment to reduce the uncertainty. The above figure shows varying levels of measurement uncertainty and how risk is lower with higher measurement capability index ratios (the Measurement Capability Index is similar to TUR).
Remember, calculating global risk is a complex process that requires a deep understanding of probability and statistics.
Ensure you have the correct data and understand the process before calculating global risk.
Morehouse has additional blogs on Specific and Global Risk that can be found here.
Reducing Your Measurement Risk
Bad measurements can lead to big problems. Just think about some of the disasters due to poor decision-making.
The BP oil refinery explosion in Texas, the Hubble telescope's focus issue, the Space Shuttle explosion, a Stealth Bomber crash, Cox Health's overdosing of 152 cancer patients, Paris Trains, and another BP oil rig disaster are all examples of tragedies that could have been prevented with better measurement practices.
The 2016 film Deepwater Horizon is an excellent film showcasing how a blowout caused an explosion killing 11 people and a catastrophic oil leak.

So, how can we avoid these issues? Here are five simple rules to reduce your measurement risk:
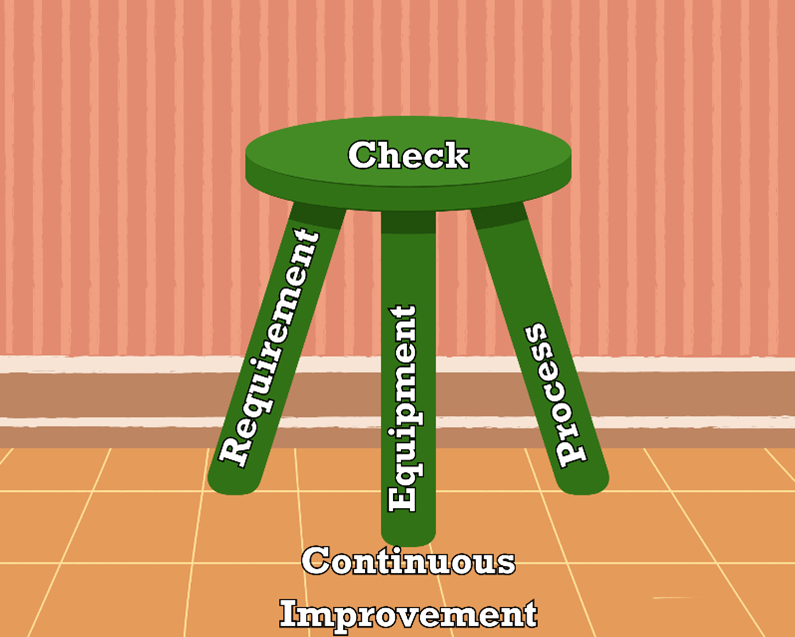
- Understanding the Right Requirements: This first rule involves knowing what is needed to accomplish the task. The more accurate the system, the higher the costs to procure the equipment and calibrate it. Buying the wrong equipment will often lead to more frequent calibrations that will often cost more. The recommendation before any purchase is to discuss the intended purchase with those calibrating it. Technicians often will know what equipment frequently fails calibration.
- Purchasing the Right Equipment: Not all tools are created equal. Make sure you're using the right equipment for the job. Using the wrong equipment can lead to inaccurate measurements and more significant problems. So, always ensure that your equipment suits the task at hand.
- Have the Right Processes – This rule requires a training program and proof of training (records) to validate the individuals calibrating or using the equipment. A process should be in place that ensures all aspects of the standards are being carefully satisfied in the calibration process. Use Proper Adapters and ensure the instrument's calibration matches how it is used in the field or lab.
- Check Your Work: Technicians are human, and humans make mistakes. Always double-check your measurements to make sure they're accurate. It's easy to overlook a small error, but that small error can have big consequences. So, take the time to verify your work.
- Stay Vigilant: Don't let success make you complacent. Always be on the lookout for potential risks and take the necessary precautions to prevent them. It's easy to let your guard down when things are going well, but that's when mistakes can happen. So, stay alert and stay safe.
The first three requirements are the legs of the stool. If one is neglected, it will be hard to sit on the stool. Checking the work helps ensure accuracy. The floor or support structure is continually improving to keep everything in place.
A tremendous foundational tool is a measurement assurance program based on control charts and a well-laid-out Proficiency Test or Inter Laboratory Comparison plan.
Remember, it's better to be safe than sorry.
Following these rules can help reduce your measurement risk and prevent potential disasters. It's all about being proactive and taking the necessary steps to ensure accuracy and safety.
After all, the goal is to create products that work well and are safe to use.
If you enjoyed this content, check out our LinkedIn and YouTube channels for more helpful posts and videos.
Everything we do, we believe in changing how people think about force and torque calibration. We challenge the "just calibrate it" mentality by educating our customers on what matters and what causes significant errors, and focus on reducing them.
Automating force calibration will increase repeatability and help reduce measurement uncertainty.
Morehouse makes simple-to-use calibration products. We build awesome force equipment that is plumb, level, square, and rigid and provide unparalleled calibration service with less than two-week lead times.
Contact us at 717-843-0081 to speak to a live person or email for more information.
# Global Risk
Global Risk References
- JCGM 106:2012 Evaluation of measurement data – The role of measurement uncertainty in conformity assessment
- ILAC G8:09/2019 Guidelines on Decision Rules and Statements of Conformity
- To Engineer is Human: The Role of Failure in Successful Design, by Henry Petroski


