Converting an mV/V Load Cell Signal into Engineering Units: Why This May be the Most Accurate and Cost-Effective Way to Use a Calibration Curve
Most bridge-based sensors typically specify a rated output Sensitivity (R.O.) shown in Figure 1 below. This Rated Output is generally found under Electrical specifications. It is usually in mV/V, where mV/V is the ratio of the output voltage to the excitation voltage required for the sensor to work.
Most load cells are strain gauge-based sensors that provide a voltage output that is proportional to the excitation voltage. Many feature four strain gauges in a Wheatstone bridge configuration. When force is applied, the relative change in resistance is what is measured by the indicator. The load cell signal is converted to a visual or numeric value by a “digital indicator.”
When there is no load on the cell, the two signal lines are at equal voltage. As a load is applied to the cell, the voltage on one signal line increases very slightly, and the voltage on the other signal line decreases very slightly. The difference in voltage between the two signals is read by the indicator.
Recording these readings in mV/V is often the most accurate method for measurement. The reason it is the most accurate method is that many meters on the market can handle ratiometric measurements. They can measure the input in mV and divide that measurement by the actual voltage being supplied.
For instance, we could have an mV measurement of 40.1235 mV and an excitation measurement of 9.9998 V. When displaying in mV/V; one would have 4.01243 mV/V. Many meters that do not handle ratiometric measurements; they have some internal counts that get programmed at the time of calibration. These meters still read the change in resistance; they require programming or points to be entered that correspond to force values.
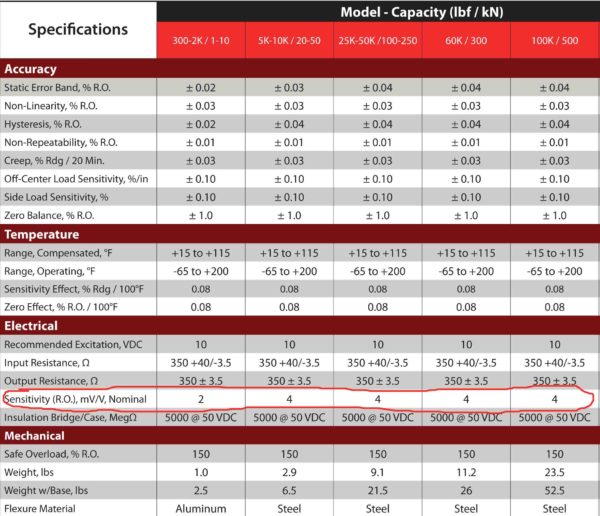
Figure 1 Morehouse Precision Shear Web Load Cell Specification Sheet
Programming a Load Cell System via Span Points
Most indicators will allow the end-user to span or capture data points. Several indicators offer many ways of programming points. Most of which are going to use some linear equation to display the non-programmed points along the curve or line.
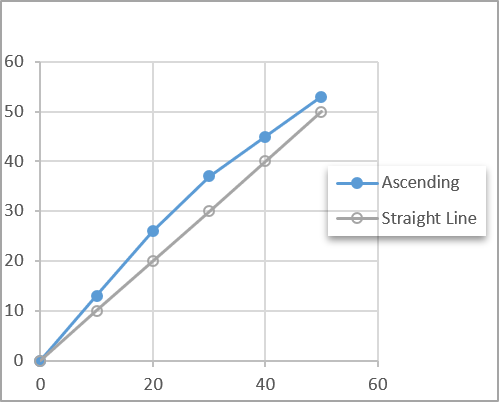
Figure 2 mV/V Load Cell Curve Versus a Straight Line
I guess that almost everyone is familiar enough to remember Algebra and drawing a straight line between two points. One would typically find the slope of the line, which could predict other points along the line. The common formula of y = mx + b, where m designates the slope of the line, and where b is the y-intercept, that is, b is the second coordinate of a point where the line crosses the y-axis.
The main issue with this approach when programming a load cell is that the meter and load cell are going to have some deviations from the straight line. A good indication of how much possible deviation is the Non-Linearity that is also found on the load cell specification sheet in Figure 1. Non-Linearity is defined as the algebraic difference between the OUTPUT at a specific load, usually the largest applied force, and the corresponding point on the straight line drawn between MINIMUM LOAD and MAXIMUM LOAD.
There are other factors such as stability, thermal effects, creep recovery and return, and the loading conditions when the points are captured that will influence the bias of each point. The programming of these meters is going to follow a linear approach. Some will have a 2-pt span, some 5-pts, and some even more. They may try to draw a straight line through all the points, or they may try and segment several lines. In all cases, there will be additional bias created from this method as the force measuring system will always have some non-linear behavior.
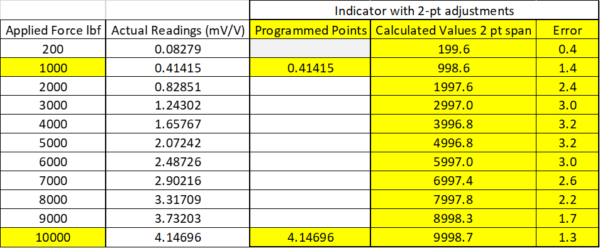
Figure 3 Programming an Indicator with a 2-pt Span Calibration
Figure 3 above is an example of a Morehouse Calibration Shear Web Load Cell with a Non-Linearity specification of better than 0.05 % of full scale. In this example, the actual Non-Linearity is about 0.031 % using mV/V values and 0.032 % when using calculated values, which is well below the specification. However, one should never claim the device is accurate to 0.032 %, as this is a short-term accuracy that was achieved under the ideal conditions.
Often, an end-user will see the results above and make a claim that the system is accurate to a number such as 0.05 % and believe they are going to maintain it. However, the end-user must account for additional error sources such as stability/drift, reference standard uncertainty that was used to perform the calibration, resolution of the force measuring device, repeatability, and reproducibility of the system, the difference in loading conditions between the reference lab and how the system is being used, environmental conditions, and the difference in adapters. All of which can drastically increase the overall accuracy specification.
As a rule, accuracy is influenced by how the system is used, the frequency of calibration, the non-linearity of both the load cell and meter, as well as thermal characteristics. In addition, what the reference lab achieves is short-term and does not include the stability of the system or adapters, which are often the most significant error sources. More information on adapters can be found here.
Note: Several manufacturers claim specifications that use higher-order math equations for non-linearity to achieve unrealistic specifications. Especially when programming a meter with these values. We generally find button or washer-type load cells to have specifications that are very difficult to meet.
Figure 3 is an example of a 2-pt span calibration. Values are programmed at 1000 and 10,000 lbf. These values can often be entered into the meter or captured during setup with the force measuring system under load. In the above example, one can see the instrument bias or error. Instrument Bias is defined in section 4.2 of JCGM 200:2012 as the average of replicate indications minus a reference quantity value. When we talk about bias, we are talking about the difference between the calculated values minus the applied force values. In the above example, the worst error is 3.2 lbf, which is around 0.08 % of applied force when 4000 lbf is applied.
Using Least Squares Method
Many indicators do not allow the end-user to enter anything other than span points. They do not allow the use of the “best-fit” or least-squares method. However, many indicators do have USB, IEEE, RS232, or other interfaces that will enable computers to read and communicate with the indicator.
When software can communicate with an indicator, a method of regression analysis can be used, which often better characterizes the force measuring system. This method of regression analysis begins with a set of data points to be plotted on an x- and y-axis graph. The term “least squares” is used because it is the smallest sum of squares of errors. This method will contain a formula that is a bit more complex than a straight line. The formula often uses higher-order equations to minimize the error and best replicate the line.
Figure 4 below shows a plot from the actual readings in mV/V and fit to a 3rd-order equation. Instead of using the equation for a straight line (y=mx+b), we have two formulas to solve for both force and response. These are Response (mV/V) = A0 + A1(Force) + A2(Force)^2 + A3(Force)^3 and Force (lbf) = B0 + B1(Response) + B2(Response)^2 + B3(Response)^3 when substituting these values with that in the equation shown on the line in figure 4 we are solving for Force when we know the Response, we would use B0 = 0.0614, B1 = 2415, B2 = -1.4436, B3 = 0.17379, thus the formula becomes Force(lbf) = 0.0614+ 2415(Response) +-1.4436(Response)^2 + 0.1379 (Response)^3. These are often called coefficients. They are often labeled as (A0, A1, A2, A3) or (B0, B1, B2,B3). A0 or BO would determine the point at which the equation crosses the Y-intercept, while the other coefficients determine the curve.
Many force standards allow curve fitting of a 3rd degree and limit the maximum degree fit to a 5th degree. The most recognized legal metrology standards for using Coefficients are ASTM E74 and ISO 376. ASTM E74 Standard Practices for Calibration and Verification for Force-Measuring Instruments are primarily used in North America, while ISO 376 Metallic materials — Calibration of force-proving instruments used for the verification of uniaxial testing machines are used throughout much of Europe and the rest of the world. More information on these two standards can be found here.
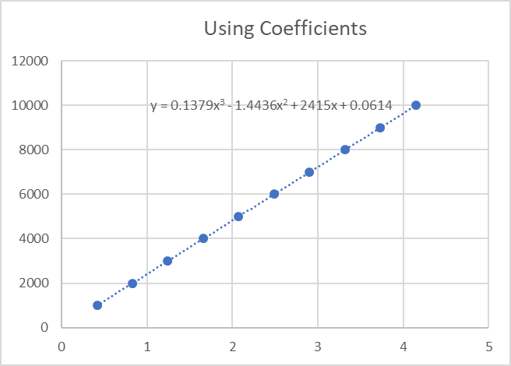
Figure 4 Graph of a 3rd Order Least Squares Fit
When the equation in Figure 4 is used on the actual readings, the values calculated using the coefficients are very close to the applied force values. The bias or measurement error is around 0.1 lbf. I believe 0.1 lbf is less than the 3.2 lbf error, as shown using a 2-pt span calibration.
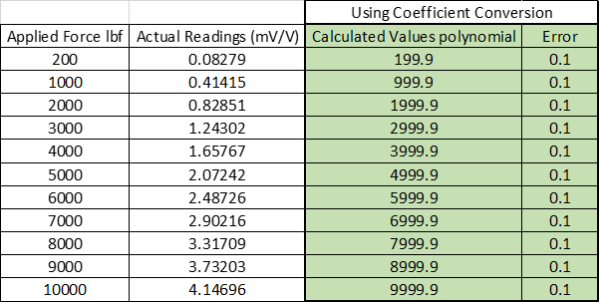
Figure 5 Bias or Measurement Error When Using Coefficients
The overall difference in the errors between these two methods is quite high. Figure 6 below best summarizes these errors. One process produces an almost exact match, which is 0.001 % of full scale, while the other is 0.032 % of full scale. The worst point at 4,000 lbf has a difference of 3.06 lbf, or 2413 %. The question is, what method do you think meets your needs? The process of using coefficients will often require additional software and a computer. The 2-pt adjustment will not. There are other considerations relating to calibration.
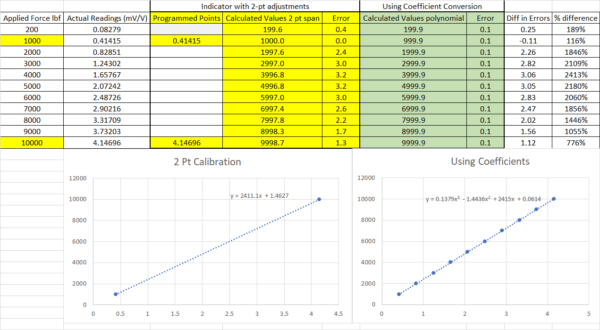
Figure 6 Difference Between 2-pt Span and Coefficients on the Same Load Cell
An indicator like the 4215 Plus can store and use calibration coefficients to solve for Force. This is a good option when additional software is a concern.
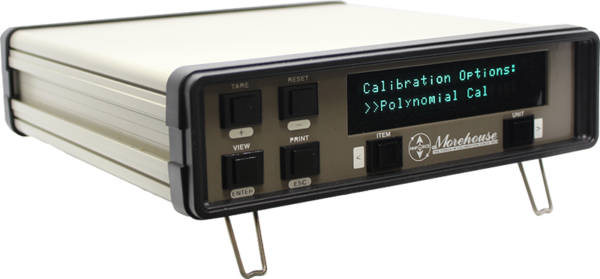
Figure 7: Morehouse 4215 Plus with Polynomial Screen to Enter B Coefficients
Calibration Differences
One of the more significant differences is with calibration. Any force-measuring system is going to drift over time. The typical expectation of our customers is tweaking the units sent in for calibration, which is an attempt to minimize the bias.
However, from the man who dropped his marbles, tweaking may not be good practice. Edward Deming has said, "If you can't describe what you are doing as a process, you don't know what you're doing."
If one is always adjusting the values or processes, it tends to become more out of control. It becomes more challenging to spot trends, which is an ISO/IEC 17025 requirement. Section 7.7.1 states, “The laboratory shall have a procedure for monitoring the validity of results. The resulting data shall be recorded in such a way that trends are detectable and, where practicable, statistical techniques shall be applied to review the results.”
With a span calibration that requires adjustments at every calibration interval, are trends truly detectable? When coefficients are used, the reference laboratory is merely reading the Actual Reading mV/V values at the time of each calibration. It is much easier to establish the baseline or monitor the results based on units that are rarely adjusted.
Adjustments could happen if an indicator fails or a simulator is used to standardize the meter. Though that is another error source relating to the electrical side. If the indicator and load cell are paired and stay together as a system, this point is moot.
It is highly recommended that one keeps their load cells and meter paired from one calibration to the next. When the reference laboratory reads and reports in mV/V using the least-squares method, one's “As Received” calibration becomes the same as the “As Returned.” The end-user is given a new set of coefficients to use. The mV/V values are recorded and can be monitored. The new coefficients will likely account for any drift that has happened and bring the force-measuring system back to having a much lower bias than the span calibration.
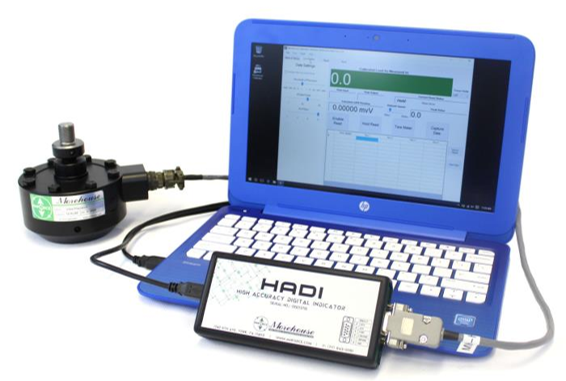
Figure 7 Morehouse Load Cell System with Software
Morehouse software complies with ISO 376, ASTM E74, and E2428 requirements and eliminates the need to use load tables, excel reports, and other interpolation methods to ensure compliance with these standards. NCSLI RP-12 states in section 12.3, “The uncertainty in the value or bias always increases with time since calibration.”
When the drift occurs, the indicator needs to be reprogrammed, and most quality systems require an "As Received" calibration, then, the indicator needs to be reprogrammed, and an "As Returned" calibration is performed. The actual level of work results in calibration costs that are much higher than they need to be.
Morehouse developed our HADI and 4215 systems with software to avoid the excess costs as the coefficients used in the software are based on mV/V values and the "As Received" and "As Returned" calibrations are the same with the end user only needing to update the coefficients in the software. The software allows for conversion from mV/V to lbf, kgf, kN, N and reduces the overall cost for the customer while meeting the quality requirements in ISO/IEC 17025:2017
Suppose additional software is a concern or problematic. In that case, we have a 4215 plus model that can store and use calibration coefficients that have a minimal error compared with traditional methods such as spanning multiple points.
Using mV/V Load Cell Calibration Data and Entering Those Values into the Meter
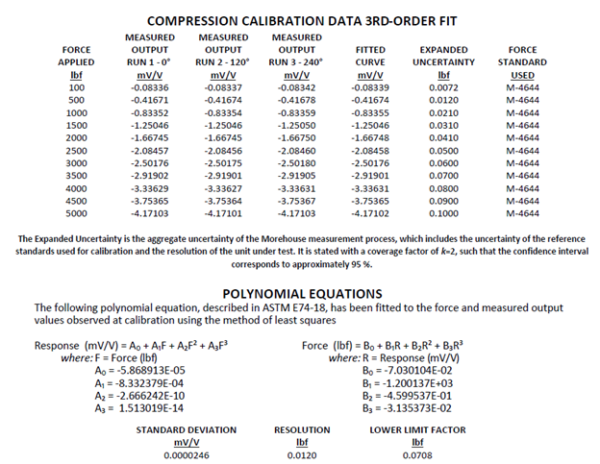
Figure 8 Calibration Report for a 5,000 lbf load cell
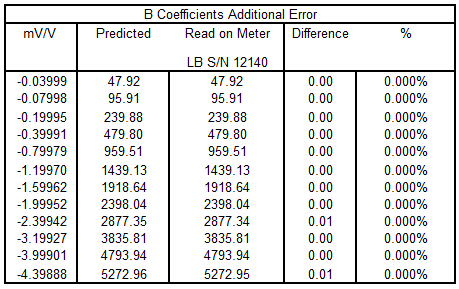
Figure 9 5,000 lbf Morehouse Load Cell B Coefficient Error
Since this article was first published, we have done more testing on various scenarios using the formula for B coefficients embedded into a 4215 meter. We have developed an algorithm into the meter to display force values using the B coefficients in the above figure. When tested, the error from predicted was almost zero as there were some slight rounding errors as shown above. We know some people in the industry take the calibration reports and then enter mV/V into the meter. Thus, we decided to follow the same steps using a 5-pt and 2-pt calibration.
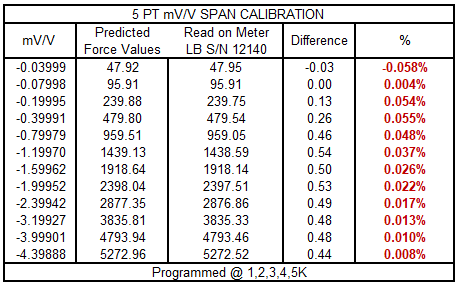
Figure 10 5-PT mV/V Load Cell Output Values Entered into the 4215 Meter
When we entered values programmed at 20 % increments and the corresponding mV/V values, the error on a device one expects to be better than 0.07 lbf (the ASTM LLF) is much higher at almost all test points. So the main issue here is if the end-user assumes they can do this and maintain the same uncertainty, they are mistaken.
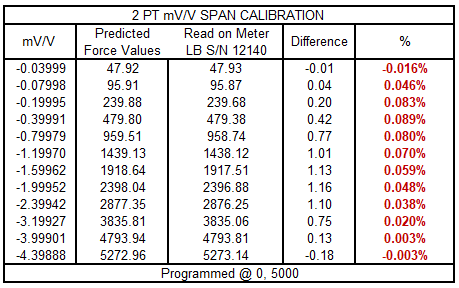
Figure 11 2-PT mV/V Load Cell Output Values Entered into the 4215 Meter
The errors change quite a bit when one elects to use just a 2-pt span. We discussed this earlier, though here is another example where the values are better the closer one gets to capacity and deviate quite a bit throughout the range. Thus, I would argue that a 5-pt calibration is superior, though still significantly flawed compared with the coefficients in the formula for the calibration report.
mV/V Span Conclusion
Suppose the end goal is the best accuracy available. In that case, the recommendation will be a 4215 or HADI indicator, an ASTM E74 calibration, and software to convert mV/V values to Engineering units or a meter that allows coefficients to be entered. In these systems, we specify the accuracy from anywhere of 0.005 % to 0.025 % of full scale. These do not include drift effects, which are usually better than 0.02 % on these systems. For other systems that have a 5 or 10 pt. calibration and a meter is used to span the readings.
We typically do not get better than 0.1 % of full scale if the calibration frequency is one year and have had several systems that can maintain 0.05 % of full scale on a six-month or less calibration interval. Taking a calibration report in mV/V and entering the mV/V values into the meter carries additional error that is very different to quantify based on the randomness of the points selected, and the error can vary. The actual results will vary on how much the system is used and on the individual components of the system.
If you have additional questions on mV/V load cell span calibration or our 4215-plus meter, please contact us at info@mhforce.com. We are here to help you improve your force and torque measurements.
If you enjoyed this article, check out our LinkedIn and YouTube channel for more helpful posts and videos.
Everything we do, we believe in changing how people think about force and torque calibration. Morehouse believes in thinking differently about force and torque calibration and equipment. We challenge the "just calibrate it" mentality by educating our customers on what matters and what causes significant errors, and focus on reducing them.
Morehouse makes our products simple to use and user-friendly. And we happen to make great force equipment and provide unparalleled calibration services.
Wanna do business with a company that focuses on what matters most? Email us at info@mhforce.com.
#mV/V Load Cell


