Making a Statement of Compliance: The 3 Main Reasons Calibration Laboratories Fail to Get Things Right
Making a statement of compliance introduction. About a year after turning 40, I bought a pair of reading glasses. After another year, I started noticing a decrease in my overall vision and figured I needed to visit an eye doctor. I went to an ophthalmologist to have my eyes tested, and the doctor said my vision was fine.
However, I was still unable to see well, so I decided to seek a second opinion—this time, from an optometrist. The optometrist informed me that I needed glasses. What a relief, I thought. Problem solved. I paid $600.00 for two new pairs of glasses. When I put my new glasses on, I noticed a slight change in my vision, but everything in the distance remained blurry. Clearly (or rather unclearly), something wasn’t right. I decided to make an appointment with my wife’s ophthalmologist—for a third opinion—only to find out I had a cataract in my right eye.
If my calibration lab is like my first ophthalmologist, the technicians will not spot any problems and will make the mistake of passing the instrument. The operator may doubt the equipment after calibration; they may even buy additional adapters, grounds, cables, or other devices to try to stabilize the instrument or improve its performance. In the worst-case scenario, the lab may continue to make measurements for the next year or two and later find out that every single instrument they calibrated needs to be recalled. Can anyone imagine recalling two years’ worth of work?
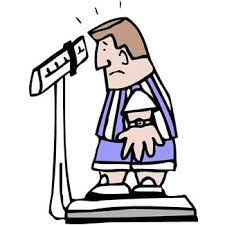
We as a metrology community have several standards available to safeguard against this type of error. Unfortunately, those standards do not always protect us from calibration laboratories making bad measurements. I once heard an amusing story about a man who calibrated scales by using himself as a comparator. He would wake up in the morning, weigh himself, and then calibrate other scales based on his bathroom scale. He ran a very reasonably priced scale calibration service by doing this.
Eventually, no one could compete with his prices; however, when people got skeptical, his tactics were exposed. There are many labs that do not follow the standards or that take shortcuts. These are the labs to avoid at all costs. Other labs do not understand metrological traceability, measurement uncertainty, and measurement risk. Some of these are well-known labs with accreditation. Some of them claim accuracies by just reporting how well a device can be linearized without testing the repeatability.
I am hoping to help anyone reading this to understand the three most important components of any measurement system. It should not matter if the laboratory is accredited or not. Anyone making measurements should understand and follow these three guidelines.
- Metrological Traceability
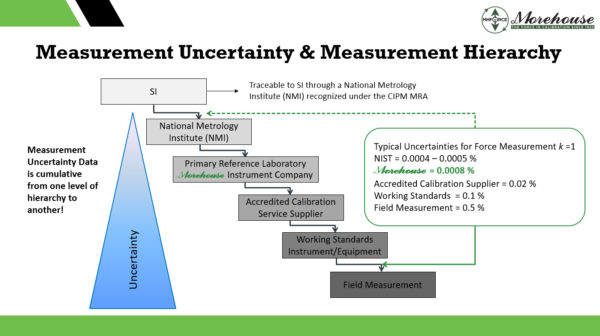
Metrological Traceability: Property of a measurement result whereby the result can be related to a reference through a documented unbroken chain of calibrations, each contributing to the measurement uncertainty. The pyramid below shows exactly this. The further away from an NMI, the larger the measurement uncertainty becomes.
There are several laboratories that just ask for measurements to be traceable to NIST and completely ignore measurement uncertainty. These labs should not be capable of calibrating anything as without metrological traceability; they will have no idea how capable they are to make the measurements requested.
- Measurement Uncertainty, Uncertainty of Measurement, Uncertainty
Measurement Uncertainty – See JCGM 100:2008 🙂
Measurement Uncertainty: Non-negative parameter characterizing the dispersion of the quantity values being attributed to measurement and based on the information used.
The above says it all does it not? Measurement Uncertainty is anything used in the measurement process that could cast doubt on the validity of the measurement. It consists of several contributors and steps. Putting these contributors together is often done by labs with an Uncertainty Budget. This is often done by putting together a Calibration and Measurement Capability (CMC), specifically, we are discussing the Calibration and Measurement Capability Uncertainty Parameter which is part of the CMC.
Per A2LA R205 Section 6.8.1 “Every CMC uncertainty shall take into consideration the following standard contributors, even in cases where they are determined to be insignificant, and documentation of the consideration shall be made:
Repeatability (Type A), Resolution, Reproducibility, Reference Standard Uncertainty, Reference Standard Stability, Environmental Factors
Note: It should be noted that scope components such as resolution, may also contribute to other components such as repeatability. Therefore simply combining all the components on an equal basis could result in an overstatement of the measurement uncertainty.
A Measurement Uncertainty budget should be developed using the following:
- Uncertainty Sources – See above
- Type of Uncertainty (A or B)
- Type of Distribution and Divisor which usually is normal, rectangular, triangular, resolution, or “U-shaped.” The resolution may be rectangular or divided by the square root of 12. For more information on resolution, we recommend UKAS M3003.
- Sensitivity Coefficient (if any).
- Effective Degrees of Freedom that can be derived using the Welch-Satterthwaite equation
- Coverage Factor for the appropriate level of confidence required.
Labs failing to calculate measurement uncertainty properly will not be able to calculate T.U.R. and therefore will not be able to make a statement of compliance such as whether an instrument passes or fails calibration.
- Failure to understand T.U.R. and Measurement Risk
Measurement risk - ANSI/NCSLI Z540.3-2006 defines Measurement decision risk as the probability that an incorrect decision will result from a measurement.
If the calibration provider is accredited, it needs to follow the requirements per ISO/IEC 17025. ISO/IEC 17025 requires the uncertainty of measurement to be taken into account when making statements of conformity.
This is where everything gets interesting. Several manufacturers specify accuracies where no laboratory in the world could pass the instrument when T.U.R. is calculated. One of these laboratories is a manufacturer of aircraft scales. Let’s look at this in greater detail after we discuss T.U.R. (Test Uncertainty Ratio)
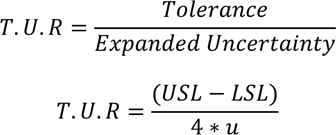
Section 3.11 of ANSI/NCSL Z540.3 defines Test Uncertainty Ratio (TUR) as, “ The ratio of the span of the tolerance of a measurement quantity subject to calibration to twice the 95% expanded uncertainty of the measurement process used for calibration."
– NOTE: This applies to two-sided tolerances.
Section 3.12 then defines tolerance as extreme values of an error permitted by specifications, regulations, etc., for a given measuring instrument, test, or measurement application.
Formulas for calculating T.U.R.

Aircraft Scale Example: Accuracy of ±0.1% of Reading Specified by Manufacturer
- Toluut = 10 lbf (USL – LSL)/2
- CMC = Various CMCs used.
- Ures = 10
- Urep = 10
Using the formula above, we can generate Expanded Uncertainty and T.U.R.
The Expanded Uncertainty is calculated by using the formula in the denominator.

Looking at the numbers above, it becomes apparent that a T.U.R. of 0.480 is the best possible. At the 10,000 lbf point, it is impossible for any calibration laboratory to make a statement of compliance.
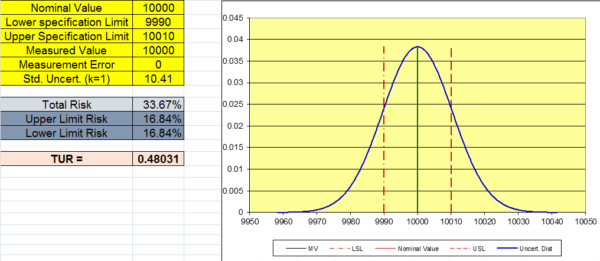
When we graph this using 10.41 as the Std Uncertainty, we can observe the total risk is 33.67 %. This means if we use a reference standard with a CMC of 0.02 %, or better we have a 66.33 % chance of the instrument being “in-tolerance”. This is not quite the 95 % required by the ISO or almost any other standard. It is worth mentioning that these calculations assume the instrument reads 10,000 lbf.
The graph below shows a typical scenario where the lab performing the calibration records 10,010 lbf when 10,000 lbf is applied and does not adjust it. The total risk grows to 52.74 % as shown in the graph below.
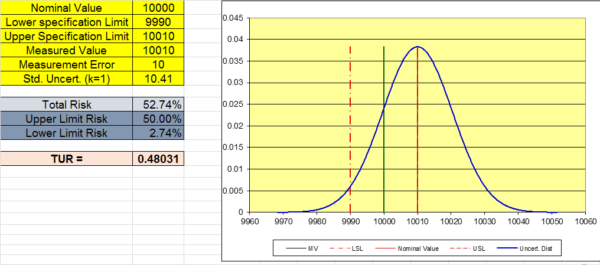
Many labs get things wrong. They assume the accuracy is 0.1 % of reading and call a measurement of 10,010 “in-tolerance”. When there is a 50 % chance, it is not. The reference laboratories CMC, the Resolution of the UUT, the Repeatability of the UUT, and the location of the measurement are all critical in calculating risk.
Looking at this example, the only way we can meet a 4:1 TUR is to raise the tolerance. If the CMC of the reference laboratory is 0.025 %, the tolerance would have to be increased to about 0.85 % of reading at the 10,000 lbf test point to achieve a TUR of 4:1

Some of these scales may be repeatable better than 10 lbf. Even If the repeatability were perfect, we would still need to raise the tolerance to about 0.26 % to minimize risk and achieve a TUR of better than 4:1. This example shows the resolution is too dominant and that a 4:1 T.U.R. is not possible to obtain at a tolerance of 0.1 % of applied force.

How to lower the risk (PFA) by reducing the uncertainty.
- Use better equipment with a lower resolution and better repeatability; e.g. higher quality load cell or deadweight primary standards for force measurement, or raise the existing equipment’s tolerance to a level that yields a TUR of better than 4:1.
- If possible, use a better calibration provider with a Calibration and Measurement Capability (CMC) small enough to reduce the measurement risk.
- Pay attention to the uncertainty values listed in the calibration report issued by your calibration provider. Make sure to get proper T.U.R. values for every measurement point (but pay attention to the location of the measurement.
I hope anyone reading this has a better understanding of the measurement process and what is needed to make a statement of compliance. A clear metrological traceability chain, calculating measurement uncertainty correctly, and evaluating measurement risk using the formulas in this blog.
Let Morehouse issue proper certificates with statements of compliance using everything discussed in this post. Our equipment is traceable to SI units with calibration directly by NIST (force) or NPL(torque) We have force calibration equipment and processes to meet requirements from 0.0016 % of applied force and ensure tolerances are met with the lowest amount of measurement risk.
To learn more, watch our video Minimize your Force and Torque Measurement Risk.
Making a statement of compliance 3 must-haves Metrological Traceability, Measurement Uncertainty, and Measurement Risk - Conclusion
If you enjoyed this article, check out our LinkedIn and YouTube channel for more helpful posts and videos.
Everything we do, we believe in changing how people think about force and torque calibration. Morehouse believes in thinking differently about force and torque calibration and equipment. We challenge the "just calibrate it" mentality by educating our customers on what matters and what causes significant errors, and focus on reducing them.
Morehouse makes our products simple to use and user-friendly. And we happen to make great force equipment and provide unparalleled calibration services.
Wanna do business with a company that focuses on what matters most? Email us at info@mhforce.com.


