Load Cell Terminology
In the last Back-to-Basics blog, I covered Measurement Uncertainty. As I continue to cover basic concepts for beginners, this blog details some common load cell terms typically found on a load cell specification sheet.
In this post, I will cover Non-Linearity, Non-Repeatability, Hysteresis, and Static Error Band. There are several more terms regarding the characteristics and performance of load cells. However, I chose these four because they are the most common specifications found on certificates of calibration.
Broken out individually, these terms can help you select the right load cell for an application. Some of these terms may not be as important today as they were years ago because there are better meters available that overcome poor specifications. One example is non-linearity. A meter capable of multiple span points can significantly reduce the impact of a load cell's non-linear behavior.
The meanings of these terms are described in detail below.
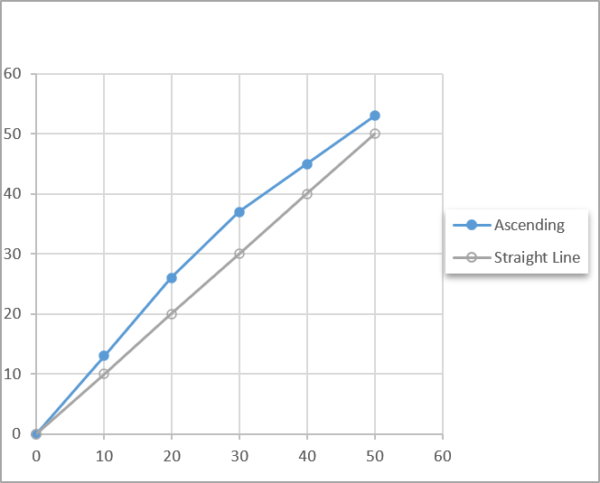
Non-Linearity: The quality of a function that expresses a relationship that is not one of direct proportion. For force measurements, non-linearity is defined as the algebraic difference between the output at a specific load and the corresponding point on the straight line drawn between the outputs at minimum load and maximum load. Normally it is expressed in units of % of full scale. It is normally calculated between 40 - 60 % of full scale.
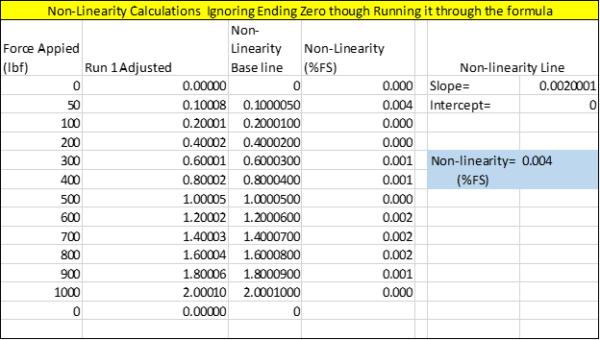
Non-Linearity is one of the specifications that would be very important if the indicating device or meter used with the load cell only has a two-point span, such as capturing values at zero and capacity or close to capacity. The specification gives the end-user an idea of the anticipated error or deviation from the best fit straight line. However, if the end-user has a meter capable of multiple span points and uses coefficients from an ISO 376 or ASTM E74 type calibration, then the non-linear behavior can be corrected, and the error significantly reduced.
One way to calculate non-linearity is to use the slope formula or manually perform the calibration by using the load cell output at full scale minus zero and dividing it by force applied at full scale and 0. For example, a load cell reads 0 at 0 and 2.00010 mV/V at 1000 lbf. The formula would be (2.00010-0)/ (1000-0) = 0.002. This formula gives you the slope of the line.
From here, plot the non-linearity baseline as shown below using the formula of force applied * slope + Intercept or y = mx +b. If we look at the 50 lbf point, this becomes 50 * 0.0020001 +0 = 0.100005. Thus at 50 lbf, the non-linearity baseline is 0.100005.
To find the non-linearity percentage, take the mV/V value at 50 lbf minus the calculated value and divide that by the full-scale output multiplied by 100 to convert to a percentage. Thus, the numbers become ((0.10008-0.100005)/2.00010) *100) = 0.004 %.

Hysteresis: The phenomenon in which the value of a physical property lags changes in the effect causing it. An example is when magnetic induction lags the magnetizing force. For force measurements, hysteresis is often defined as the algebraic difference between output at a given load descending from the maximum load and output at the same load ascending from the minimum load.
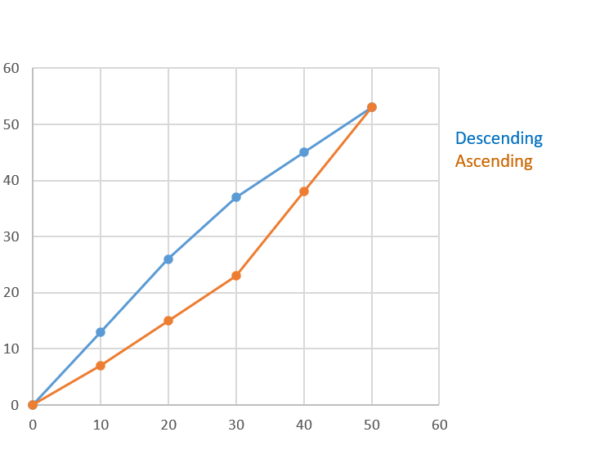
Hysteresis is normally expressed in units of % full scale. It is normally calculated between 40 - 60 % of full scale. The graph above shows a typical hysteresis curve where the descending measurements have a slightly higher output than the ascending curve.
If the end-user uses the load cell to make descending measurements, then they may want to consider the effect of hysteresis. I say consider because there is another term that may better apply to using a load cell to make ascending and descending measurements. That term is static error band, which is defined below.
Errors from hysteresis can be high enough that if a load cell is used to make descending measurements, then it must be calibrated with a descending range. The difference in output on an ascending curve versus a descending curve can be quite significant. For example, a very good Morehouse 100K precision shear-web load cell had an output of -2.03040 on the ascending curve and -2.03126 on the descending curve. Using the ascending-only curve would result in an additional error of 0.042 %.
At Morehouse, our calibration lab sampled several instruments and recorded the following differences.

Load cells from five different manufacturers were sampled, and the results were recorded. The differences between the ascending and descending points varied from 0.007 % (shear web type cell) to 0.120 % on a column type cell. On average, the difference was approximately 0.06 %. Six of the seven tests were performed using deadweight primary standards, which is accurate within 0.0016 % of the applied force.
Non-Repeatability: The maximum difference between output readings for repeated loadings under identical loading and environmental conditions. Normally this is expressed in units as a % of rated output (RO). Non-repeatability tells the user a lot about the performance of the load cell. It is important to note that non-repeatability does not tell the user about the load cell's reproducibility or how it will perform under different loading conditions (randomizing the loading conditions). At Morehouse, we have observed numerous load cells with good non-repeatability specifications that do not perform well when the loading conditions are randomized or the load cell is rotated 120 degrees as required by ISO 376 and ASTM E74.
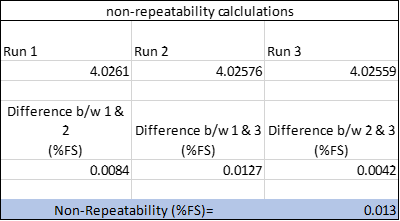
The calculation on non-repeatability is straightforward. First, compare each observed force point's output and run a difference between those points. The formula would look something like this: Non repeatability = ABS(Run1-Run2)/AVERAGE(Run1, Run2,Run3)*100 or =ABS(4.0261-4.02576)/AVERAGE(4.0261,4.02576,4.02559)*100. Do this for each combination as shown below and then take the maximum of the three calculations.

Static Error Band: The band of maximum deviations of the ascending and descending calibration points from a best-fit line through zero output. It includes the effects of non-linearity, hysteresis, and non-return to minimum load. Normally it is expressed in units of % of full scale.
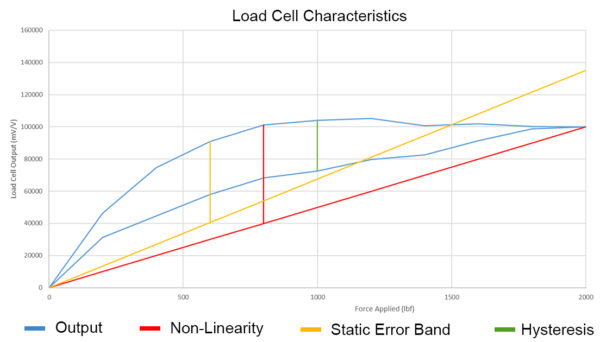
Static error band might be the most exciting term. If the load cell is always used to make ascending and descending measurements, then this term best describes the load cell's actual error from the straight line drawn between the ascending and descending curves. Earlier I noted that the end-user might want to consider the effects of hysteresis, that is unless they are using the load cell described above, because static error band would be the better specification to use. The end-user could likely ignore non-linearity and hysteresis and focus on static error band as well as non-repeatability.
However, we find that many calibration laboratories primarily operate using ascending measurements and on occasion may request descending data. When that is the case, the user may want to evaluate non-linearity and hysteresis separately. When developing an uncertainty budget, use different budgets for each type of measurement, i.e., ascending and descending.
What needs to be avoided is a situation we see frequently occur. A load cell is calibrated following a standard such as ASTM E74 and adding additional uncertainty contributors for non-linearity and hysteresis. ASTM E74 has a procedure and calculations that, when followed, uses a method of least squares to fit a polynomial function to the data points. The standard uses a specific term called the Lower Limit Factor (LLF), which is a statistical estimate of the error in forces computed from a force-measuring instrument's calibration equation when the instrument is calibrated following the ASTM E74 practice.
To learn more about load cell creep, check out our blog here.
In our next Back-to-Basics blog, I will cover types of load cells.
Back-to-Basics series:
- Force Calibration and its Importance
- How a Transducer Measures Force
- Compression and Tension Force Calibration
- Calibration versus Verification
- Measurement Uncertainty
- Load Cell Terminology
- Types of Load Cells
- Load Cell Troubleshooting
- Load Cell Indicator Basics
- Force Measurement Glossary of Terms
I take great pride in our knowledgeable team at Morehouse, who will work with you to find the right solution. We have been in business for over a century and focus on being the most recognized name in the force business. That vision comes from educating our customers on what matters most, and having the right discussions relating to force calibration basics so that everyone speaks the same language.
If you enjoyed this article, check out our LinkedIn and YouTube channel for more helpful posts and videos.
Everything we do, we believe in changing how people think about force and torque calibration. We challenge the “just calibrate it” mentality by educating our customers on what matters, and what causes significant errors, and focus on reducing them.
Morehouse makes simple-to-use calibration products. We build fantastic force equipment that is plumb, level, square, rigid and provide unparalleled calibration service with less than two-week lead times.
Contact us at 717-843-0081 to speak to a live person or email info@mhforce.com for more information.


