Load Cell Calibration: What Does “Traceable to NIST” Really Mean?
Load cells have various applications across several fields, from verifying the correct amount of stamping press force to testing rocket thrust stands. They are so common that almost everyone owns several in some shape or form, whether they realize it or not. Load cells are found in your car, bathroom scale, and almost any digital weighing device. They are used in the test and measurement, automation, material testing, auto, aerospace, nuclear, and medical industries, to name a few.
Important Considerations for Proper Load Cell Calibration
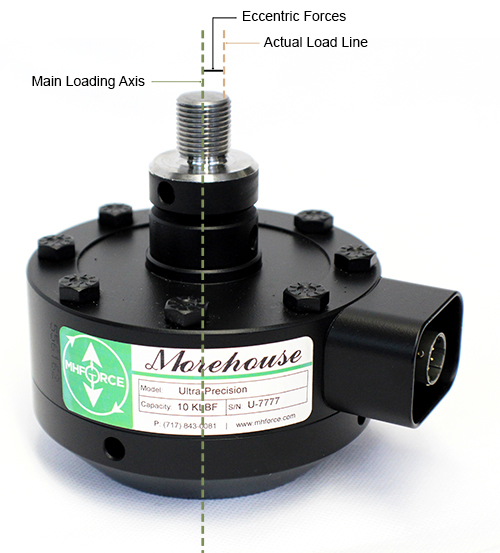
For a load cell to read correctly, it must be calibrated at some point in its life, either after installation in a consumer product or on a more frequent basis if it is a standard to disseminate the unit of force through several applications and industries. When maintained with regular calibration, a load cell can accurately measure tension or compression forces, also known as weight or strain. The key to properly calibrating a load cell starts with keeping the line of force pure and free from eccentric loads (Figure 1).

Figure 1: Morehouse Load Cell Showing the Importance of Keeping the Line of Force Free from Eccentric Forces
Another factor for proper calibration involves using the appropriate loading frames or masses. The technician performing the calibration must understand the mechanical properties of the load cell and use the proper adapters to keep the line of force pure, which provides a consistent measurement of strain. When measuring weight, typically a mass calibration is required.
For this measurement, the load cell should be calibrated by a mass that was compared with reference mass standards traceable to the International System of Units (SI). When measuring force, the load cell should be calibrated using measurement standards traceable to the SI through a National Metrology Institute (NMI) recognized under the CIPM MRA. This recognition is necessary as some NMIs cannot provide traceability. A good example is NIST which is not recognized by the CIPM MRA for torque, thus claiming traceability to SI units for torque through NIST is not possible.
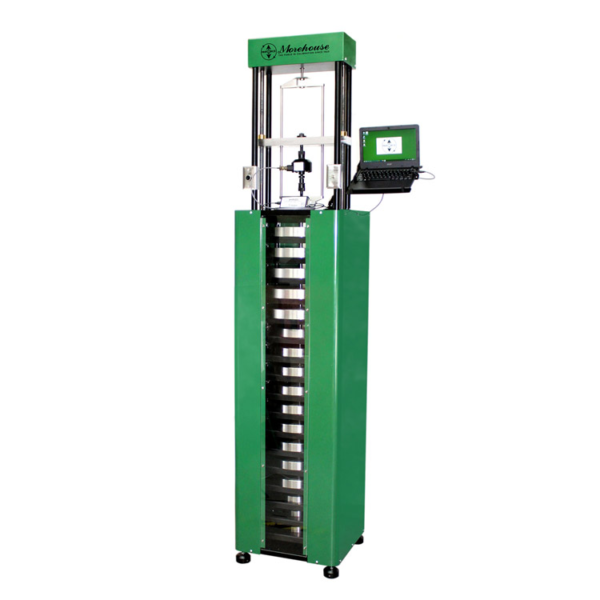
Lastly, a load cell should derive its traceability through deadweight primary standards (Figure 2). A deadweight primary standard is defined by ASTM as “a deadweight force applied directly without intervening mechanisms such as levers, hydraulic multipliers, or the like, whose mass has been determined by comparison with reference standards traceable to the International System of Units (SI) of mass.”1 The weights are corrected for the effects of local gravity where the machine is used, air buoyancy, and material density. Both mass and force applications use strain gauge load cells, hydraulic load cells, pneumatic load cells, or a transducer, which converts one type of energy to another.

Figure 2: Morehouse Deadweight Machine Calibrating a Load Cell in Tension
Metrological traceability and its effect on load cell calibration
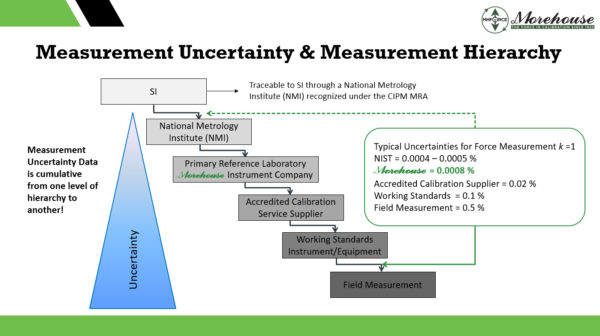
The International Vocabulary of Metrology (VIM) defines metrological traceability as the “property of a measurement result whereby the result can be related to a reference through a documented unbroken chain of calibrations, each contributing to the measurement uncertainty.”2 The International System of Units (SI) is at the top of the measurement hierarchy pyramid (Figure 3).
The next tier in the pyramid is a National Metrology Institute (NMI) such as the National Institute of Standards and Technology (NIST), which is recognized by the International Committee for Weights and Measures (CIPM) and has derived its capability from these base SI units of better than 0.0005 %. Per the NIST website, "Metrological traceability3 requires the establishment of an unbroken chain of calibrations to specified reference measurement standards: typically national or international standards, in particular realizations of the measurement units of the International System of Units (SI). NIST assures the traceability to the SI, or to other specified standards, of measurement results that NIST itself provides, either directly or through an official NIST program or collaboration. Other organizations are responsible for establishing the traceability of their own results to national reference standards maintained by NIST or to other specified reference standards. NIST has adopted this policy statement to document the NIST role with respect to traceability."3

Figure 3: Load Cell Calibration Traceability Chain from Morehouse Force Training
The next tier in the pyramid is a primary reference laboratory, like Morehouse Instrument Company. Traceability to SI units is validated by NIST calibrations on our several deadweight force machines. NIST provides metrologically traceable force transducer calibrations to SI units by applying a relatively known force using deadweight primary standards. NIST has the capability to perform compression or tension calibration from 44.5 N to 4.448 222 MN (10 lbf to 1 000 000 lbf) in one of their six deadweight machines with a standard uncertainty of the applied force from 0.0004% to 0.0005 %.
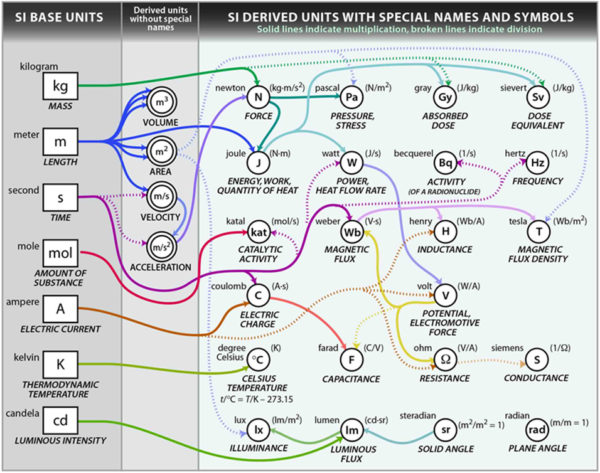
NIST uses deadweight machines and derives its traceability to SI units. Figure 4 shows that force is derived from the base units of mass, distance, and time. Using these base units, the CIPM/BIPM defines 1N as the force required to accelerate one kg to one meter per second per second in a vacuum.

Figure 4: SI Base Units Chart from NIST
Morehouse deadweight machines are used to calibrate other load cells or strain gauge sensors from 0.44 N to 533.79 kN (0.1 lbf to 120,000 lbf) with a known standard uncertainty of 0.0008 %. Those load cells or strain gauge sensors are used as reference standards in various force machines.
Force machines manufactured by Morehouse such as a hydraulic force calibration system, mechanical force calibration system, and deadweight calibrators are plumb, level, rigid, square, and have low torsion. At the accredited calibration service provider tier, Morehouse uses load cell reference standards above 533.79 kN to 10 MN (120,000 to 2,250,000 lbf) that are calibrated by NIST in their deadweight machines. Our calibration capability at this level can vary from 0.005 % of applied force to 0.02 %, depending on the exact force point generated.
Morehouse uses these load cells to calibrate other force-measuring devices, often used at the working standards level of the pyramid. At this tier in the pyramid, traceability is at least two tiers away from NIST and the measurement uncertainty and capability will often exceed 0.1 % of applied force. Therefore, a “traceability to NIST” claim is not substantiated.
Some calibration laboratories claim traceability to SI through an undocumented chain of traceability, each contributing to the measurement uncertainty. These standards are commonly used to make field measurements on testing machines, which often achieve a measurement uncertainty of 0.5 % of the applied force. The machines are used to test numerous products, varying from the ripeness of an apple to the strength of a block of concrete.
Traceability is not to NIST
It is essential to have a chain of traceability in which uncertainty is propagated correctly. However, traceability is not to NIST. When calibrating load cells, many laboratories fail to get the metrology aspects correct and improperly state “NIST traceable master standards” or “traceability to NIST”. At Morehouse, we have seen all sorts of incorrect usage of NIST traceability.
So the next time you see a “NIST traceable” statement, question it, as that statement is not correct! You should also ask how far away the lab is from NIST in regard to metrological traceability. It is always essential to make sure you are getting the calibration you need and to look at the lab’s measurement capability uncertainty on their scope of accreditation. Per NIST, "Emphasizes that traceability alone does not signify or guarantee fitness for purpose, because this typically requires that the uncertainty associated with a measured value or calibration be sufficiently small to satisfy a particular measurement need."4
At Morehouse, our certificate of calibration states: “This calibration was performed using measurement standards traceable to the SI through a National Metrology Institute (NMI) such as the United States National Institute of Standards & Technology (NIST).”
What does “Traceable to NIST” really mean? - Conclusion
I take great pride in our knowledgeable team at Morehouse, who will work with you to find the right solution. We have been in business for over a century and have a focus on being the most recognized name in the force business. That vision comes from educating our customers on what matters most and having the right discussions even when it's pointing out proper terminology such as traceability to SI through an NMI on the load cell calibration certificate.
If you enjoyed this article, check out our LinkedIn and YouTube channel for more helpful posts and videos.
Everything we do, we believe in changing how people think about force and torque calibration. We challenge the "just calibrate it" mentality by educating our customers on what matters and what causes significant errors, and focus on reducing them.
Morehouse makes simple-to-use calibration products. We build awesome force equipment that is plumb, level, square, rigid, as well as provide unparalleled calibration service with less than two week lead times.
Contact us at 717-843-0081 to speak to a live person or email info@mhforce.com for more information.
1 Section 3.1.2 of ASTM E74-18
2 VIM section 2.41: https://jcgm.bipm.org/vim/en/2.41.html
3 NIST website: NIST Policy on Metrological Traceability
4 NIST website: https://www.nist.gov/traceability/supplementary-materials-related-nist-policy-metrological-traceability#unbroken-chain_cal
# traceable to nist


