Understanding ISO 376 Morehouse Calibration Certificates
Morehouse takes exceptional pride in complying with several published standards. We hold ourselves accountable, raise the standard, and put a lot of effort into making the world safer. We are writing this article to help those who might not understand the ISO 376 standard. We have conducted webinars and training on the standard. They are available on our website. An article titled Understanding ISO 376 is available here. A guidance document titled “ISO 376 Guidance and Uncertainty Measurements Relating to Force Equipment” is available here, and a webinar “ISO 376 Explained” can be found here.
We have found that though all these resources are available, our customers still have some questions regarding our ISO 376 calibration certificates and some calculations. This article is guidance to highlight some common questions regarding the certificates. Particularly the calculations. Almost everything else is covered in detail in the above links or the ISO 376 Standard.
Morehouse ISO 376 Calibration Certificate
Let’s start with Page 1
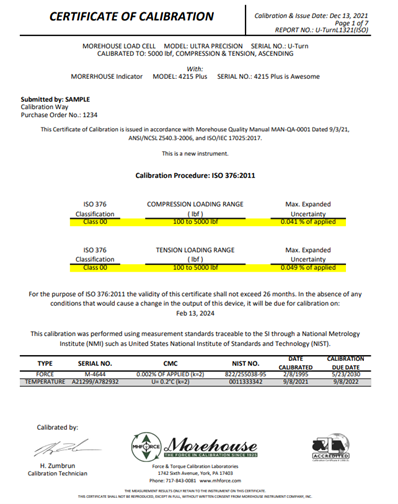
The highlighted area lists the Class of the force-proving instrument for the loading range. The range is found by using Table 2 in the ISO 376 standard below. The force-proving instrument is classified accordingly if the various errors are below the maximum set in table 2 for the Class.
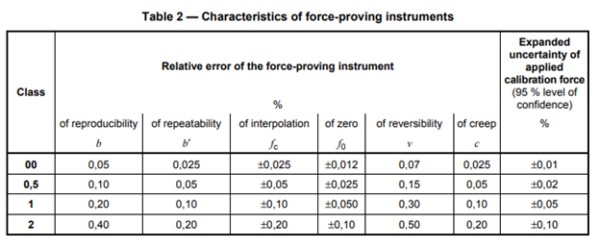
Page one of the Morehouse certificate for the Morehouse Ultra-Precision load cell shows a loading range of 100 – 5000 lbf for the highest Class the ISO 376 standard has, Class 00. If any of the relative errors for these parameters were higher than what is allowed for the Classification of Class 00, the Class would resort to the Class based on the table. It is possible to have a load cell meet all but one of the criteria for Class 00 and be classified as a much lesser class. Maybe the load cell has a lousy zero return, and that number alone turns what would be a Class 00 to a Class 2. We will show this in greater detail later.
Max Uncertainty of 0.041 % of applied force. This number is more difficult to prove since rounded numbers are found on the certificate. The Expanded Uncertainty is found by taking the square root of the sum of the squares and multiplying that number by a coverage factor of k = 2.

Page 2 has the Raw Data Measured Output. This data can be used to recreate your own ISO 376 data or prove the formulas if one wants to run the data through the various equations in the ISO 376 standard.
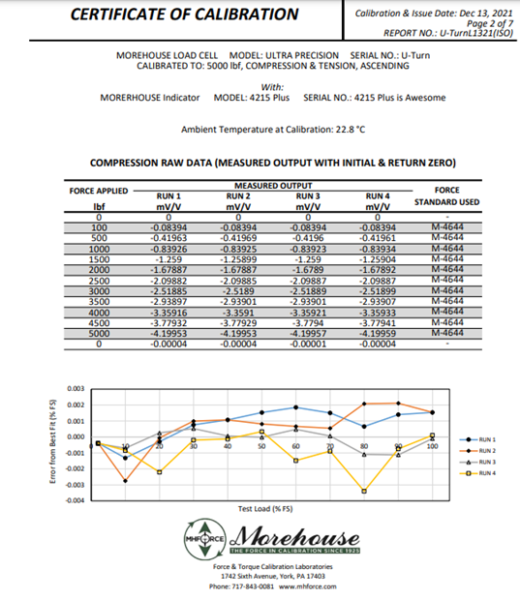
The bottom graph displays the deviations compared against the calculated values from the calibration curve as a percentage of full scale. Morehouse uses a percentage of full scale here as the deviations when graphed, often are too small to graph and visually look like a straight line.
Page 3 has reduced data fitted curve data using a polynomial equation found on the certificate. Morehouse reports two polynomial equations. These can be calculated in excel by using the Linest functions. We list equations to solve for both Force and response as the coefficients to solve for Force can be used in many programs to solve for Force. The Morehouse 4215 plus indicator can have the coefficients programmed into the indicator to solve for Force. This is unique to the Morehouse indicator, as other manufacturers only use multiple span points. The B coefficients solve for force values when the response (what the meter reads is known). The advantages of using this method are that the interpolation errors are significantly reduced as a calibration curve characterizes force-proving instruments better than segmented lines or a line (span calibrations). Sometimes the errors can be reduced by a factor of 10 x or higher. Therefore a 10 lbf error is reduced to less than 1 lbf when a polynomial equation is used. Other Morehouse software programs use the B coefficients as well.
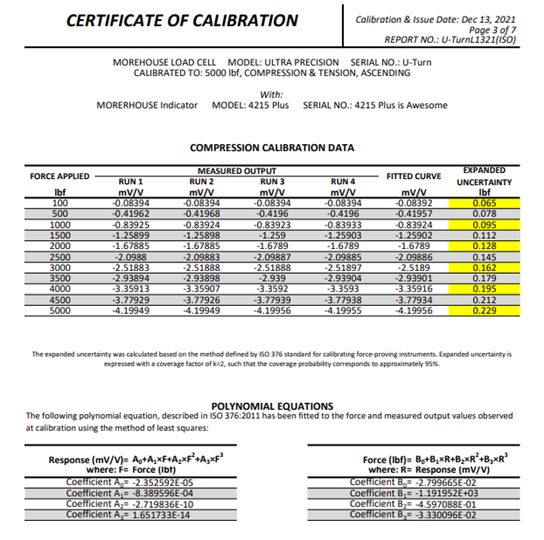
The Expanded Uncertainty is calculated by recommendations in section C.1.10.3 of the ISO 376 Standard.
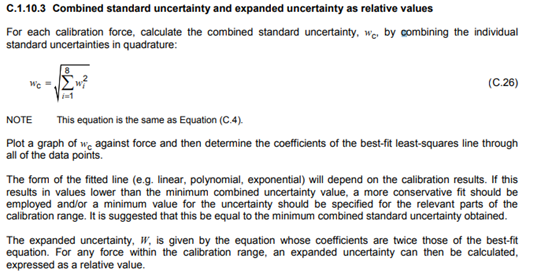
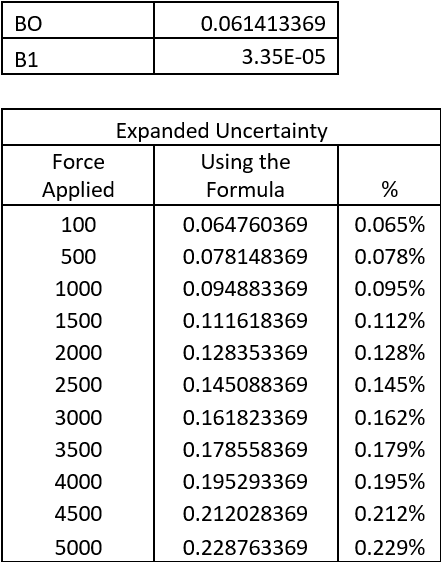
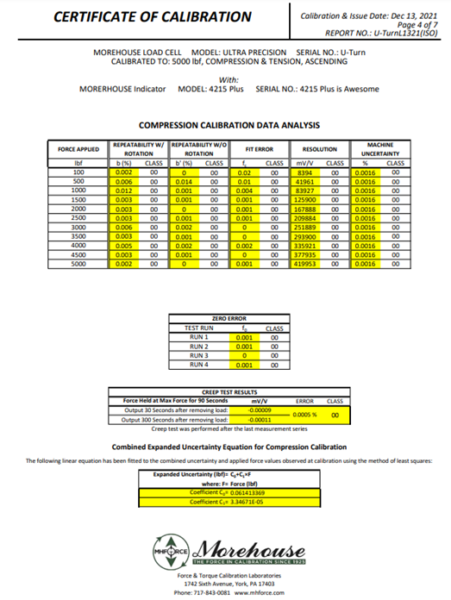
Morehouse typically will use a linear equation to calculate expanded uncertainty. The linear equation is reported on page 4 of the certificate. It is a simple y = mx + b equation.
If we use the equation B0+B1 * Force Applied, we will get the values in the table below. To convert to %, we then divide the calculated values by the Force applied and format the cells as a %. If you are not using Excel, you will multiply by 100 to get the %.
Page 4 has the complete data analysis and various errors that are rounded to significant figures. The ISO 376 standard covers the calculations of these errors in section 7.5. The exception is the resolution which is covered in sections 7.2 – 7.3. The ISO 376 standard is available to purchase here.
Since this force-proving instrument was Compression and Tension, the following three pages are Tension Data. They contain information about Tension which is similar to pages 2-4 only with the tension data.
Understanding ISO 376 Morehouse Calibration Certificates Conclusion
Morehouse wants to help educate our customer base on what we do and how we do it. We are always looking to improve our capabilities and yours. Knowledge is power. We hope this article has helped you in Understanding ISO 376 Morehouse Calibration Certificates. Please continue to check out our blogs and the documents and tools section of our website for information guaranteed to help you start making better measurements.
If you enjoyed this article, check out our LinkedIn and YouTube channel for more helpful posts and videos.
I take great pride in our knowledgeable team at Morehouse, who will work with you to find the right solution. We have been in business for over a century and focus on being the most recognized name in the force business. That vision comes from educating our customers on what matters most and having the proper discussions relating to force calibration basics so that everyone speaks the same language.
Everything we do, we believe in changing how people think about Force and torque calibration. We challenge the "just calibrate it" mentality by educating our customers on what matters, and what causes significant errors and focusing on reducing them. I
n addition, Morehouse makes simple-to-use calibration products. We build fantastic force equipment that is plumb, level, square, rigid and provide unparalleled calibration service with less than two-week lead times.
Contact us at 717-843-0081 to speak to a live person or email info@mhforce.com.
#ISO 376
#ISo 376 Calibration Standard


