How to Comply with ILAC P14 when Reporting Expanded Uncertainty
ILAC P14 is a mandatory policy document for calibration laboratories accredited to the ISO/IEC 17025 standard. How can a laboratory ensure that expanded uncertainty is reported in compliance with ILAC Policy Measurement Uncertainty in Calibration, ILAC P14?
In ILAC P14, section 5 relates to calibration certificates. The summarized criteria are:
- Measurement Uncertainty shall be reported in compliance with the GUM
- The measurement result should be reported as y ± U, or U / |y|, and the coverage factor and coverage probability shall be stated.
- The expanded uncertainty shall be given to, at most, two significant digits, and proper rounding rules applies.
- Contributions to uncertainty shall include relevant short-term contributions that can reasonably be attributed to the customer's device.
- Uncertainty reported shall not be less than the measurement uncertainty described by the CMC.
- The Measurement Uncertainty shall be presented as the same unit as that of the measurand or in a term relative to the measurand (e.g., percent)
Below are three examples of how Morehouse calculated expanded uncertainty at the time of calibration and reported it in compliance with ILAC P14. For the examples presented here, we focus on section 5.4 of ILAC P14:09/2020:
“Contributions to the uncertainty stated on the calibration certificate shall include relevant short-term contributions during Calibration and contributions that can reasonably be attributed to the customer's device. Where applicable the uncertainty shall cover the same contributions to uncertainty that were included in the evaluation of the CMC uncertainty component, except that uncertainty components evaluated for the best existing device shall be replaced with those of the customer's device. Therefore, reported uncertainties tend to be larger than the uncertainty covered by the CMC. Contributions that cannot be known by the laboratory, such as transport uncertainties, should normally be excluded in the uncertainty statement. If, however, a laboratory anticipates that such contributions will have a significant impact on the uncertainties attributed by the laboratory, the customer should be notified according to the general clauses regarding tenders and reviews of contracts in ISO/IEC 17025.”
To replicate the results found on a Morehouse Certificate of Calibration, use this Excel template.
Example 1: 50,000 lbf Tension Link
The relevant short-term contributions to uncertainty are:
- The uncertainty of the reference standard used for calibration
- The resolution of the tension link
- The repeatability of the tension link
Typically, the resolution of a tension link is dominant and does not show any deviation. Normally customers do their own repeatability studies in their applications. Thus, we are limited to contributions 1 and 2.

Figure 1: Expanded Uncertainty for a 50,000 lbf Tension Link
The inputs to calculate our expanded uncertainty at the time of calibration are:
- The uncertainty of the reference standard: 0.0016 % of applied force
- The resolution of the tension link: 10 lbf
This uncertainty does not include any contribution from bias. Therefore, the end-user must calculate the additional error for any bias. They could apply 50,040 lbf to generate 50,000 lbf of force, use an equation, or account for the bias by other acceptable means.
Additional uncertainty contributions from varying pin size are also not accounted for. Morehouse will use the pins sent in with the device or use the manufacturer's recommended pin size. We have observed errors up to 20 times that of a manufacturer's specifications from not using the right size pin.

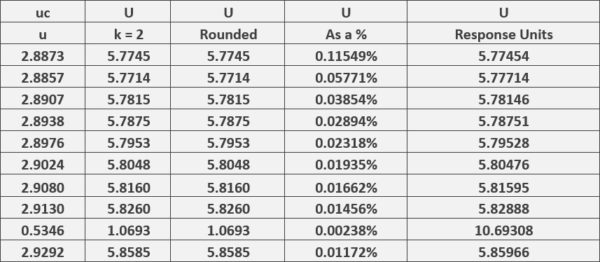
Figure 2: Expanded Uncertainty of 50,000 lbf Tension Link at the time of Calibration
The columns in the uncertainty table are:
- uc = Standard Uncertainty
- U = Expanded Uncertainty with a coverage factor of 2 for approximately 95 % Confidence, in this case, it would be 95.45 %, as the degrees of freedom are quite high.
- The next columns are U rounded to whatever significant figures are typed in and what is reported on our certificates under Expanded Uncertainty, U converted to a percentage, and U as response units, which is the force applied multiplied by U as a %.
More information on degrees of freedom and uncertainty calculation can be found in our blog How to Develop an Uncertainty Budget for a Morehouse Calibrating Machine.
Example 2: 50,000 N Load Cell
The load cell is submitted for a 10-PT calibration. The relevant short-term contributions to uncertainty are:
- The uncertainty of the reference standard(s) used for calibration
- The resolution of the load cell
- The repeatability of the load cell at the time of calibration
- The uncertainty of our voltage reference (0 if a meter was sent in with the load cell for calibration)
In this example, we used our Fluke 8508 and our Deadweight Primary Standard.

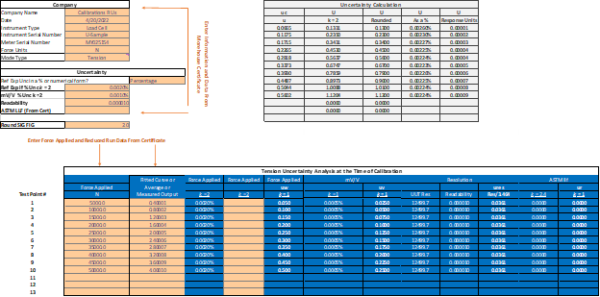
Figure 3: Expanded Uncertainty for a Load Cell with a 10 PT Calibration
The inputs to calculate our expanded uncertainty at the time of calibration are:
- The uncertainty of the reference standard: 0.0016 % of applied force
- The resolution of the load cell: 0.0361 N
- The Fluke meter used for calibration: 0.001 % of applied force
- The resolution of the load cell: 0.0361 N

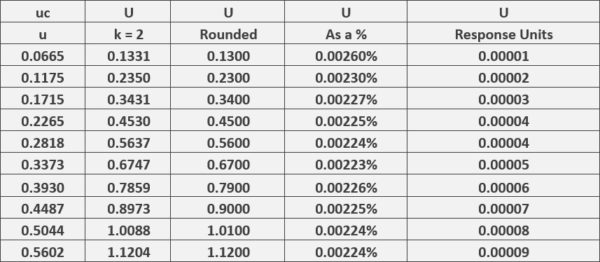
Figure 4: Expanded Uncertainty of 50,000 N Load Cell at the time of Calibration
The columns in the uncertainty table are:
- uc = Standard Uncertainty
- U = Expanded Uncertainty with a coverage factor of 2 for approximately 95 % Confidence; in this case, it would be 95.45 %, as the degrees of freedom are quite high.
- The next columns are U rounded to whatever significant figures are typed in and what is reported on our certificates under Expanded Uncertainty, U converted to a percentage, and U as response units, which is the force applied multiplied by U as a %.


Figure 5: Expanded Uncertainty of 500 lbf Load Cell calibrated in accordance with the ASTM E74 Standard
Example 3: 500 lbf Load Cell
The load cell is calibrated in accordance with ASTM E74. The relevant short-term contributions to uncertainty are:
- The uncertainty of the reference standard(s) used for calibration
- The resolution of the load cell
- The reproducibility condition of the load cell is defined as the ASTM lower limit factor (LLF)
- The uncertainty of our voltage reference (0 if a meter was sent in with the load cell for calibration
This is a case where the calibration is performed following the ASTM E74 standard. The standard is very descriptive in how to calculate the LLF. The LLF can be thought of as the reproducibility of the load cell calibrated. I like to call it the expected performance of the load cell when used under the same conditions. As soon as conditions are changed, like using different adapters, different temperatures, different setups in machines that are not as plumb, level, square, rigid, and have low torsion as our deadweight machines, the results will change. [1]

Figure 6: Individual Contributors for an ASTM E74 Calibration
In this example, we need to refer to our appendix for the ASTM E74 calibrations. We are calling out various inputs such as the uncertainty of the force applied, our multimeter, the resolution of the device at each force point, and the lower limit factor LLF. It is recommended to pair the load cell with an indicator and calibrate as a system.
It is possible that the expanded uncertainty reported might not contain contributions from the LLF. Morehouse follows ILAC-P14 and replicates the same practices that NIST uses in the calibration certificates appendix. All older certificates do not include the LLF in the expanded uncertainty calculation. Newer certificates in 2022 include this information because the LLF is the expected performance of the device as described above.

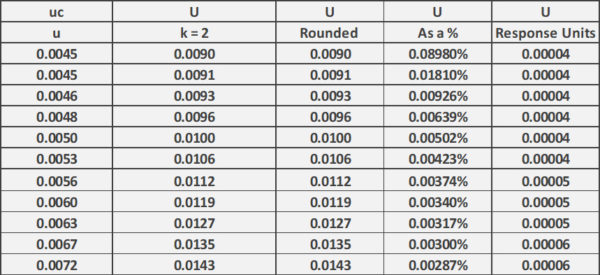
Figure 7: Expanded Uncertainty of 500 lbf Load Cell calibrated in accordance with the ASTM E74 Standard at the time of Calibration
Looking at the uncertainty table, we have the following:
- uc = Standard Uncertainty
- U = Expanded Uncertainty with a coverage factor of 2 for approximately 95 % Confidence; in this case, it would be 95.45 %, as the degrees of freedom are quite high.
- The next columns are U rounded to whatever significant figures are typed in and what is reported on our certificates under Expanded Uncertainty. U converted to a percentage, and U as response units which is the force applied multiplied by U as a %.
At Morehouse, we educate our customers and provide tools to explain how to comply with ILAC P14 when reporting Expanded Uncertainty and how we calculate Measurement Uncertainty and comply with the published requirements from both A2LA and NVLAP.
I take great pride in our knowledgeable team at Morehouse, who continue to work with everyone, clarify complex topics, and provide tools to make you better. Tools like the Excel spreadsheet that can be used to calculate expanded uncertainty at the time of calibration.
If you enjoyed this article, check out our LinkedIn and YouTube channel for more helpful posts and videos.
We have been in business for over a century and focus on being the most recognized name in the force business. That vision comes from educating our customers on what matters most, and having the proper discussions relating to force calibration concepts so everyone uses the proper methods and math.
Everything we do, we believe in changing how people think about force and torque calibration. We challenge the "just calibrate it" mentality by educating our customers on what matters, what causes significant errors, and focus on reducing them.
In addition, Morehouse makes simple-to-use calibration products. We build excellent force equipment that is plumb, level, square, rigid and provide unparalleled calibration service with less than two-week lead times.
Contact us at 717-843-0081 to speak to a live person or email info@mhforce.com for more information.
[1] We have several blogs on ASTM E74 that can be found at here. Additional reading on adapters can be found here.


