

How to Calibrate an Analog Dynamometer: Set it up the Way it is Used

Pictured above is a 10 000 lbf Analog Dynamometer in a Morehouse 10 000 lbf BCM.
An analog dynamometer has no electronics to trust and no digital display to read for you. It has a spring element, a mechanical linkage, and a dial. You load it in tension, the element deflects, and a needle sweeps across a scale. Simple, rugged, and still everywhere in rigging, aircraft, and material-handling work.
That simplicity is exactly why calibrating one well takes care. There is no averaging, no filtering, and no digital resolution to fall back on. The number is whatever a person reads off a dial, so the calibration has to control both the force applied and the way the dial is read.
Here is how to calibrate an analog dynamometer so the certificate means something, from building the setup to reading the dial.
Understand what you are calibrating
An analog dynamometer, often called an AP dynamometer, measures force through mechanical deflection and reports it on an analog dial. Because it is a tension instrument, it loads through its two end fittings, and because it is mechanical, it carries a few error sources that a load cell does not:
- Resolution is limited by the dial. You can only read to a fraction of a graduation, so the smallest division sets a floor on how well you can resolve force.
- Reading is subject to parallax. Where your eye sits relative to the needle changes the number, so a consistent viewing position matters.
- Hysteresis is mechanical and real. The needle reads differently on the way up than on the way down, so the direction of loading is part of the result.
None of this makes the instrument bad. It makes the setup and the procedure the whole game.
Build the tension setup
An analog dynamometer is calibrated in tension in a machine that can apply and hold a smooth, controllable force. On a Morehouse Mechanical Cable Tensiometer Calibrator (PCM-2MD-T1) , Benchtop Calibrating Machine (BCM), or Mechanical Tensiometer Calibrator, the setup runs: tension member to clevis to clevis pin with roller to the dynamometer, mirrored on the opposite side, with the reference standard load cell in the same load string.
Two details in that stack carry most of the accuracy. The clevis and clevis pin reproduce how the dynamometer is actually loaded, and the pin with a roller lets the instrument hang square and self-center rather than binding against one side of the clevis. That matters because a dynamometer loaded off-axis reads its own bending as force.
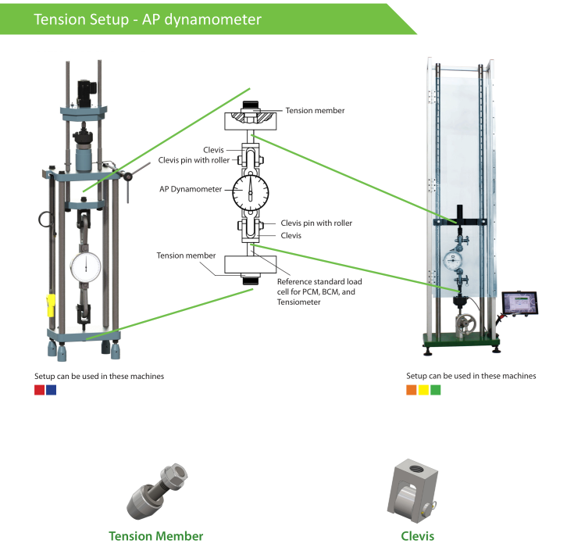

Tension setup for an AP dynamometer: tension member, clevis, and clevis pin with roller, with the reference standard in the load string.
A bench option for lower capacities
For dynamometers at or below 2 000 lbf (8.9 kN), the Mechanical Tensiometer Calibrator (PCM-2MD-T1) is purpose-built for this work. A screw jack replaces hanging deadweights and gives fine, continuous force control, which is exactly what you want on a low-capacity mechanical instrument where a stack of weights would risk overload. The standard reference is a Morehouse Ultra-Precision shear-web load cell read by a HADI or model 4215 indicator, for a typical system uncertainty of 0.02 % of applied force, and an all-around shatter-resistant shield encloses the working volume.
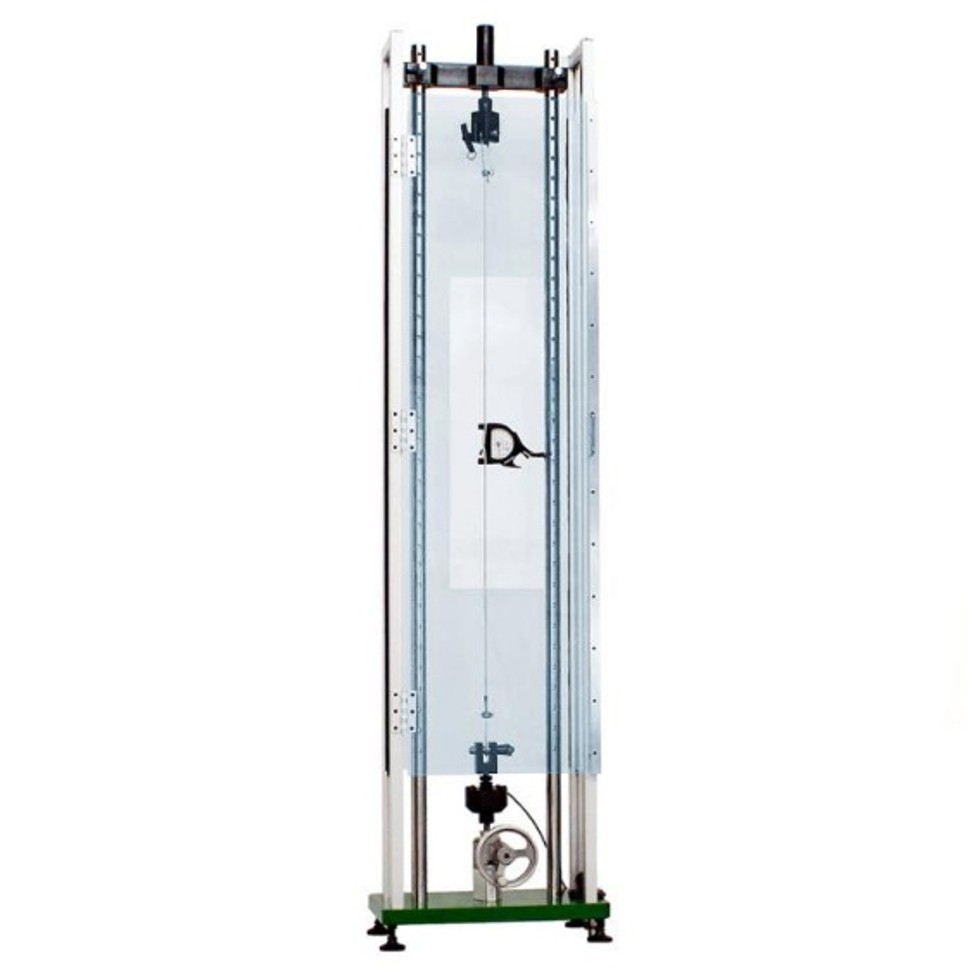
Morehouse Mechanical Tensiometer Calibrator (PCM-2MD-T1), a bench platform for instruments up to 2 000 lbf (8.9 kN) including cable tensiometers using cables up to 5 feet in length.
Run the calibration
With the instrument mounted and the load line square, the procedure is disciplined and repeatable:
- Exercise the instrument first. Apply a full-capacity load at least 3 times before recording data. This works the mechanical linkage, settles the spring element, and stabilizes the readings you are about to take.
- Choose the points. Calibrate across the range the customer uses, typically in even increments to full capacity, so the dial is characterized where it is read.
- Approach each point the same way. Because the instrument has mechanical hysteresis, hold the loading direction consistent, and if the application uses the dynamometer in both increasing and decreasing directions, calibrate both.
- Read the dial the same way every time. Fix your eye position to control parallax, let the needle settle, and estimate consistently between graduations.
- Record against the reference. Compare each dial reading to the reference standard at the same instant and log the difference.
State the result honestly
An analog dynamometer's certificate must include the same information as any other force certificate. Report the reference forces, the dial readings, and the deviation. Report the expanded uncertainty with its coverage factor and coverage probability, for example, U = 0.5 %, k = 2, approximately 95 % confidence. And if you make a conformity statement, state the decision rule and whether measurement uncertainty was considered. A dial reading without a decision rule tells the end user nothing about the risk they are accepting.
An analog dynamometer will give you decades of honest service if it is calibrated for the way it is used: in tension, square to the load line, on the right pin, exercised before reading, and characterized at the needle's actual position. Control the setup and control the reading, and the dial becomes something you can trust on the job site. If you need a machine sized for your dynamometer or cable and clevis fixtures matched to your instrument, talk to us before your next calibration is due.
If an analog dynamometer has too much measurement uncertainty, or a more user-friendly option is required, Morehouse can provide load cells with wireless adapters for similar weighing applications.
And this is just a small post to raise awareness of how important compression force calibration setups can be. Our force calibration book is over 400 pages and free to download.
About Morehouse
We believe in changing how people think about Force and Torque calibration in everything we do, including, "How to Calibrate an Analog Dynamometer: Set it up the Way it is Used"
This includes setting expectations and challenging the "just calibrate it" mentality by educating our customers on what matters and what may cause significant errors.
We focus on reducing these errors and making our products simple and user-friendly.
This means your instruments will pass calibration more often and produce more precise measurements, giving you the confidence to focus on your business.
Companies around the globe rely on Morehouse for accuracy and speed.
Our measurement uncertainties are 10-50 times lower than the competition, providing you with more accuracy and precision in force measurement.
We turn around your equipment in 7-10 business days so you can return to work quickly and save money.
When you choose Morehouse, you're not just paying for a calibration service or a load cell.
You're investing in peace of mind, knowing your equipment is calibrated accurately and on time.
Through Great People, Great Leaders, and Great Equipment, we empower organizations to make Better Measurements that enhance quality, reduce risk, and drive innovation.
With over a century of experience, we're committed to raising industry standards, fostering collaboration, helping with understanding risk, and delivering exceptional calibration solutions that build a safer, more accurate future.
Contact Morehouse at info@mhforce.com to learn more about our calibration services and load cell products.
Email us if you ever want to chat or have questions about a blog.
We love talking about this stuff. We have many more topics other than, "How to Calibrate an Analog Dynamometer: Set it up the Way it is Used"
Our YouTube channel has videos on various force and torque calibration topics here.

