In the last Back-to-Basics blog, I covered Compression and Tension Force Calibration. As I continue to cover basic concepts for beginners, this blog will cover the differences between calibration and verification.
What is a Calibration?
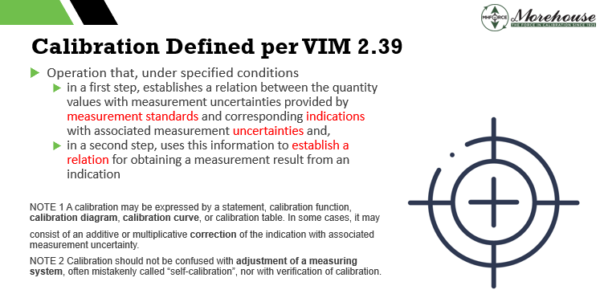
Let me start by stating that there are several definitions of calibration across multiple standards. My favorite definitions are below.
Calibration is the comparison of an unknown (typically referred to as the Unit Under Test or UUT) to a device known within a certain error (typically referred to as the Calibration Standard or Reference Standard) to characterize the unknown. Basically, we are comparing something that we know to some degree of certainty to something that may not be known or that needs to be checked at a time interval to assure drift and other characteristics are kept under control. In simple terms, calibration can be thought of as validation.

The definition from the International Vocabulary of Metrology (VIM) in section 2.39 is interesting in that many people assume calibration is also an adjustment. It is not. The VIM is very clear in Note 2, stating, "Calibration should not be confused with a measuring system, often mistakenly called "self-calibration," nor with verification of calibration." Think about it this way; when you send most instruments to a National Metrology Institute such as NIST, they will only report the value of the device at specific points and the associated measurement uncertainties. Why? Because the end-user can take those values and use those values with the associated measurement uncertainties as a starting point to characterize whatever is being tested. Measurement uncertainty will be explained in the next blog of our Back-to-Basics series.
When an end-user uses a device that was calibrated, it is often under different conditions than when it was calibrated. For example, if Morehouse calibrates a device in one of our deadweight machines known to better than 0.002 % of applied force, and the end-user later uses this device, then the conditions will vary. It is almost certain that their use conditions do not replicate those exactly of the lab performing the calibration. For example, the temperature, rigidity of the machine, and hardness of adapters could vary, and their machine could introduce torsion, etc. These are only a few of several conditions that can impact the results.
Personally, I like to explain that Morehouse calibrates the device and assigns a value that can be considered the expected performance of the device under the same conditions at which it was calibrated. The end-user then varies those conditions, which adds additional measurement uncertainty. Therefore, the end-user can use the calibration data as a starting point in the evaluation of their measurement uncertainty.
What is Verification?
The VIM in section 2.44 defines verification as the provision of objective evidence that a given item fulfills specified requirements. Then the VIM goes on to list several additional examples:
- Example 1: Confirmation that a given reference material as claimed is homogeneous for the quantity value and measurement procedure concerned, down to a measurement portion having a mass of 10 mg.
- Example 2: Confirmation that performance properties or legal requirements of a measuring system are achieved.
- Example 3: Confirmation that a target measurement uncertainty can be met.
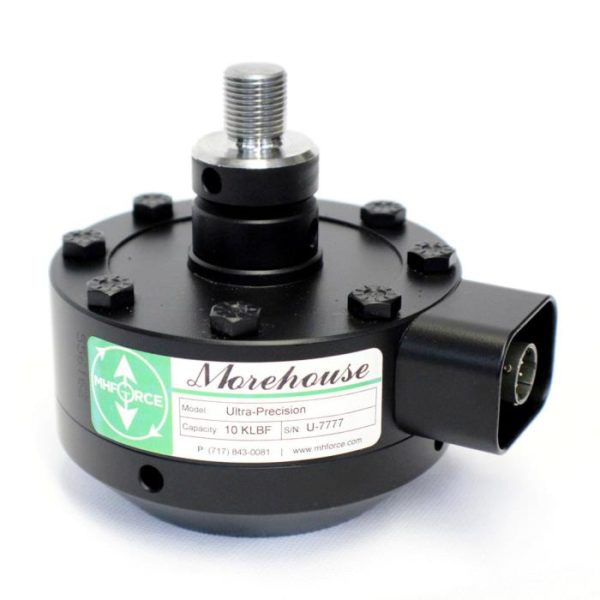
For example, a 10,000-load cell, like the one shown below, is submitted to Morehouse and found to be within ± 5 lbf, as per the customer's required tolerance of 0.05 % of full scale.

In this scenario, verification is more of a conformity assessment and should not be confused with calibration. However, many commercial laboratories perform a calibration by reporting the applied force and the device's corresponding measurement values for calibration. Then they make a conformity assessment, which is a statement to the end-user that the device is within tolerance.
The critical detail here is that to ensure measurement traceability, measurement uncertainties must be reported. You cannot perform a calibration with a statement of verification without reporting the measurement uncertainty. That uncertainty should be considered when making a statement of conformance to a specification.
Therefore, these definitions and examples show how calibration and verification are not the same.
Back-to-Basics series:
- Force Calibration and its Importance
- How a Transducer Measures Force
- Compression and Tension Force Calibration
- Calibration versus Verification
- Measurement Uncertainty
- Load Cell Terminology
- Types of Load Cells
- Load Cell Troubleshooting
- Load Cell Indicator Basics
- Force Measurement Glossary of Terms
If you enjoyed this article, check out our LinkedIn and YouTube channel for more helpful posts and videos.
I take great pride in our knowledgeable team at Morehouse, who will work with you to find the right solution. We have been in business for over a century and focus on being the most recognized name in the force business. That vision comes from educating our customers on what matters most, having the right discussions relating to force calibration basics so that everyone speaks the same language.
Everything we do, we believe in changing how people think about force and torque calibration. We challenge the “just calibrate it” mentality by educating our customers on what matters, and what causes significant errors, and focus on reducing them.
Morehouse makes simple-to-use calibration products. We build fantastic force equipment that is plumb, level, square, rigid and provide unparalleled calibration service with less than two-week lead times.
Contact us at info@mhforce.com for more information.


