Important Aircraft and Truck Scale Calibration Tips
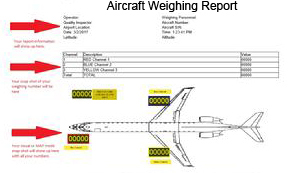
Figure 1: Example of Aircraft Weighing
Aircraft and Truck scales come in all different shapes and sizes and typically serve one purpose, to approximate the weight of an aircraft or truck. Why might that be important? For Aircraft, it's about knowing the center of gravity CG. The center of gravity will influence stability and performance. Different airplanes have specified limits for longitudinal and lateral limits.
If the airplane does not meet these requirements, it will not fly properly. Not operating properly could result in a bad landing, handling problems, exceeding the needed runway length for takeoff, or an all-out crash. Weighing is essential not only with the Aircraft empty but with cargo and fuel. The airplane can have a good CG on takeoff, and the decreased fuel can cause an imbalance to develop into the flight. Knowing the weight is also important as the Aircraft's structural strength limits the maximum weight the Aircraft can safely carry.
For trucks, it's a matter of safety and profitability. Safety will be the biggest concern for most of us as an overweight truck would have the capability to cause severe structural damage over time or immediate damage to bridges and overpasses. Being overweight, which can lead to increased profitability for the company transporting the products, can also interfere with the driver's ability to maneuver quickly, control the truck going uphill or downhill, and stop.
It can result in loss of balance, and busted or blown-out tires due to the pressure of the excess weight, leading to severe accidents. The exact limit of how heavy a truck can vary by state laws and the type and number of axles on the truck. Federal law dictates trucks must weigh below 80,000 lbs.
Now that we've explained why knowing the weight is essential, we can now look at the calibration side and the three things we can do to improve the calibration of these scales.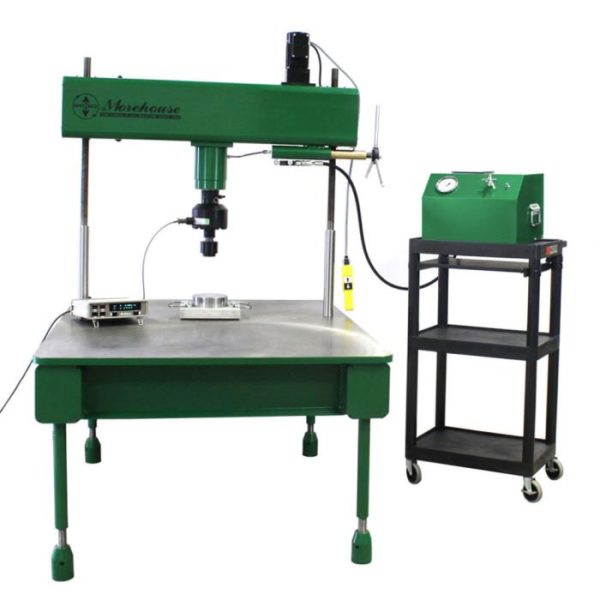
Figure 2: Morehouse Aircraft and Truck Scale Calibrator
First: We can control the equipment we purchase for calibration. To achieve proper calibration, equipment should be used that is plumb, level, square, and rigid. Pictured above in Figure 2 is a Morehouse Aircraft and Truck Scale Calibrator. This new machine was designed to minimize the bending of the top beam and load-bearing table, which had occurred in older Morehouse models and occurs in several non-Morehouse products. The plates are designed to be square and level with custom machining processes and ground to maintain a level surface. If there is an increase in bending or uneven surfaces, the strain elements in the scale will vary. These errors could easily be a magnitude from two to ten times the tolerance.
Also, the right equipment is stable with enough resolution not to have a significant impact on the overall uncertainty. Deadweight machines would be the best, but they are not the most cost-effective and generally are not built to support large scales. Therefore, several load cell transfer standards calibrated by deadweight and used in a machine with fine control will allow the operator to achieve the desired force point. The Morehouse machine can generally apply forces within 0.5 lbf, which can be limited if the proper load cell and indicator combination is not used. On a 10,000 lbf load cell, used with a Morehouse HADI, the resolution of the load cell system would be 0.025 lbf.
The hydraulics and control will vary and can typically be held to 4-8 counts so that the control will vary between 0.01 and 0.02 lbf. A skilled operator can typically control the machine to within four counts or 0.01 lbf on a 10,000 lbf load cell. Stability could be influenced by the adapters and the Unit Under Test (UUT).
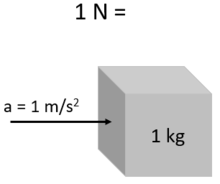
Figure 3: Force Units
Second: We can use the proper units for calibration. We highly recommend calibrating any scale in force units. The scales would be calibrated in lbf, N, or kgf at the site of calibration. Force is mass times acceleration, and calibration in lbf, N would be constant over the planet's surface. If someone calibrated in mass, lb, or kg, and used the scale in a different location, they would have errors from gravity, as well as material and air density. Mass, under almost every terrestrial circumstance, is the measure of matter in an object. Measuring force takes additional factors into account: air density, material density, and gravity. It's the effect of gravity that can produce significant errors when comparing mass and force measurements. Gravity is not constant over the surface of the earth. The most extreme difference is 0.53 % between the poles and the equator (983.2 cm/s^2 at the former compared to 978.0 cm/s^2 at the latter).
A force-measuring device calibrated in one location using mass weights and then deployed somewhere else will produce different strains on the physical element. The resulting measurement errors can be significant. Correcting the difference in force and mass measurements is possible. When a device is adjusted for force measurements, the device will measure force without additional error for gravity correction, air density correction, and so on needed. More information on converting force to mass and formulas can be found in this blog.
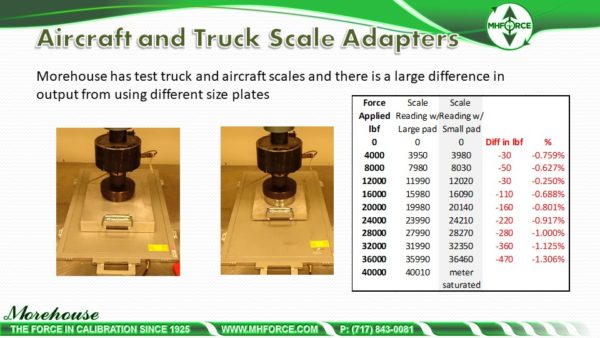
Figure 4 Difference in Adapters
Third: We can control the adapters we use to simulate the footprint of the tires. Aircraft and Truck scale calibration often requires special adapters to simulate a tire contact area with the scale. Scales come in a variety of sizes and have specific tolerances. The problem is that not many calibration laboratories use the right adapters. Not using the proper adapters can result in large measurement errors. When an adapter used is different from the tire footprint on the scale, we have found very large errors. Figure 4 shows the calibration of a scale with a tolerance of 0.1 % of full scale using two different size adapters.
The adapter on the left better simulates the tire of a truck, and the adapter on the right simulates that of an airplane. The difference between the adapters is over 1.3 % on a 0.1 % device. It becomes apparent quickly that this scale, like several others, will not be within the specification if different size tires are used that vary from the footprint of the adapter used during calibration. Therefore, it is imperative that all scales be calibrated with the appropriate adapters to best simulate the application.
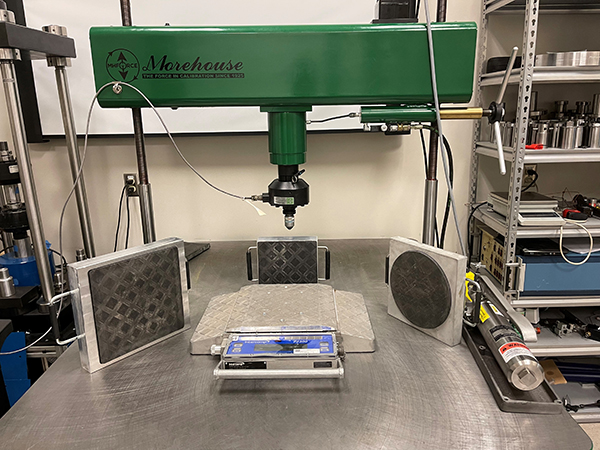
Figure 5: PT300 Scale Tested with 3 Different Size Adapters
Additional Example Figure 5 above shows various adapters Morehouse can make. Our lab decided to test 3 different adapters that closely matched the recommended footprint of 8 x 8 on the same scale and report the results. The adapters all made by Morehouse are shown from left to right as a 12 x 12-inch pad, 8 x 8-inch pad (recommended by the manufacturer), and a 9" round pad Morehouse designed to replicate a tire footprint closely.
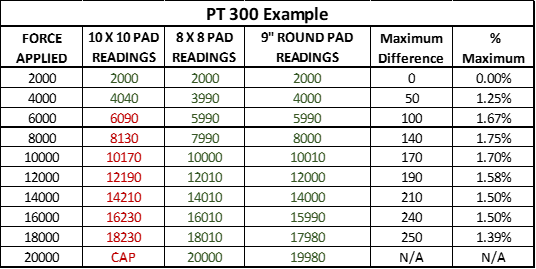
Figure 6: Data from Using the Blocks Pictured Above
The test was performed, and the output was recorded above. Any point shown in green is within the manufacturer's specification of 1 % of the applied load. When using the recommended size adapter, we were able to meet the manufacturer's specification as we were with using the adapter we designed to match the tire footprint. The numbers above, when using a 12 x12 block in red, show a noticeable difference outside of the allowable tolerance. Thus, further supporting that any scale calibration should be done with the proper size adapter.
Conclusion:
The Morehouse Aircraft Scale Calibrator was designed to be the best option for the calibration of aircraft and truck scales of various sizes and capacities up to 60,000 lbf. The scale is designed to be plumb, level, rigid, and square. The transfer of force is typically facilitated through a load cell, and adapters are custom-made to duplicate the footprint of the tires of the airplane or truck the scale will be used to weigh.
The errors associated with not using the proper equipment, units, or adapters can make achieving tolerances impossible.
If you need to certify an instrument within a tolerance of 0.1 % of applied force, you may need to use several standards over the entire measurement range. If the Uncertainty of the measurement is not less than the tolerance required, there will be a significant risk. Most legal metrology, ASTM E617-18, and OIML R111 require uncertainties to be less than 1/3 of the tolerance. Hence, the recommendation is for several load cells.
Measurement uncertainty often includes the reference standard uncertainty, resolution of both the reference and the UUT, environmental conditions, reproducibility, repeatability, stability, and other error sources. If the machine has uneven surfaces or bending, reproducibility and repeatability will vary greatly. Typically, one can maintain a CMC uncertainty component of about 0.02 % to 0.03 % from 20 % of the rated capacity of the load cell in a Morehouse frame.
If a 60,000 lbf load cell can achieve 0.025 % at 12,000 lbf, and a 10,000 lbf load cell can achieve 0.025 % at 2,000 lbf, we could assume that we are meeting the 1/3 requirement on a 0.1 % device using two load cells from 2,000 lbf through 60,000 lbf. If we wanted to do smaller scales, we might decide to add a 2,000 lbf load cell and expand our loading range to 400 lbf through 60,000 lbf while maintaining a better than 0.03 % CMC uncertainty component. Of course, this all depends on several additional factors that are covered in our Uncertainty Propagation paper.
Aircraft and Truck Scale Calibration Tips - Conclusion
If you need to get the most accurate measurement out of your scale and want to minimize this risk, the Morehouse scale press with 2-3 load cell standards and the proper adapters to simulate what is being weighed will meet your calibration needs.
The Calibrator is designed to maintain a high degree of accuracy required for proper scale certification and can be used with all kinds of truck and aircraft scales, as well as Aircraft weighing kits. These can include but are not limited to the following: Intercomp, Jackson Aircraft Weighing (JAWS), GEC, Haenni, Rice Lake, Ohaus, Proform, Brechnell, Sentran, Tanner Racing, Taylor, Road Runner, and more.
Calibrating scales properly is essential to the safety of you or the people you may know. If you want to calibrate aircraft and/or truck scales with minimal errors, please feel free to contact us at 717-843-0081 or at info@mhforce.com.
If you enjoyed this article, check out our LinkedIn and YouTube channel for more helpful posts and videos.
#Truck Scale Calibration #Aircraft Scales #Scale Calibration


