What is Measurement Risk?
What is Measurement Risk - Imagine that a satellite is launched into space and communications are intermittent. This happens because the satellite is wobbling, which causes connectivity problems in the receiver. The cause of the wobbling is identified: it is the result of not using a calibration provider with a low enough uncertainty. The load cells used to measure the amount of fuel stored in the satellite must be almost perfect. However, if a calibration provider does not have the right measurement capability, the load cells will not be accurate enough to make the measurement. In this case, the result is a wobbling satellite requiring significantly more resources to fix the problem.

Understanding What is Measurement Risk
AS9100C defines risk as “[a]n undesirable situation or circumstance that has both a likelihood of occurring and a potentially negative consequence.” It further states that “The focus of measurement quality assurance is to quantify and/or manage the ‘likelihood’ of incorrect measurement-based decisions. When doing so, there must be a balance between the level of effort involved in, and the risks resulting from making an incorrect decision. In balancing the effort versus the risks, the decision (direct risk) and the consequences (indirect risk) of the measurement must be considered."
ANSI/NCSLI Z540.3-2006 defines Measurement decision risk as the probability that an incorrect decision will result from a measurement.
What does this really mean?

All measurements have a percentage of likelihood of calling something good when it is bad and something bad when it is good. You might be familiar with the terms consumer’s risk and producer’s risk. Consumer’s risk refers to the possibility of a problem occurring in a consumer-oriented product; occasionally, a product not meeting quality standards passes undetected through a manufacturer’s quality control system and enters the consumer market.
An example of this would be the batteries in the Samsung Note 7 phone. The batteries can potentially overheat, causing the phone to catch on fire. In this case, the faulty battery/charging system of the phone device was approved through the quality control process of the manufacturer, which was basically a ‘false accept decision.’ If you owned one of these phones, there was a risk of fire and potential damage and injury.
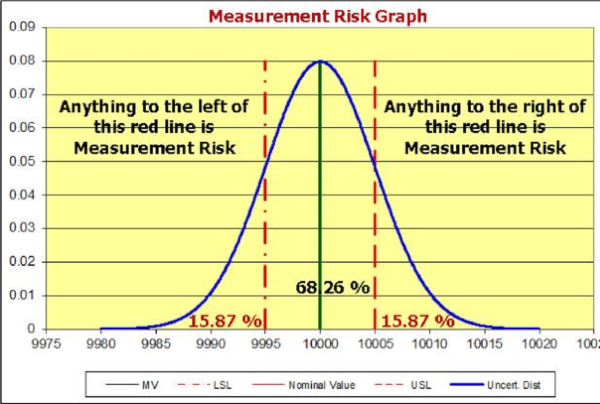
| Graph showing the measurement risk which is the Probability of False Accept(PFA) |
In metrological terms, consumer’s risk is like the false accept risk, or Probability of False Accept (PFA). The biggest difference is that in the metrology field, the false accept risk is usually limited to a maximum of 2 %. In cases where the estimation of this probability is not feasible, there is a requirement for a Test Uncertainty Ratio (TUR) to be 4:1 or greater to ensure lowering the PFA to a low-risk level. So, what does this mean for a metrology laboratory? This means that any lab making a statement of compliance, calling an instrument "in tolerance," must consider measurement uncertainty and properly calculate TUR taking into account the location of the measurement.
In simplistic terms, TUR = Tolerance Required / Uncertainty of the Measurement (@95% confidence interval). If the Uncertainty of the Measurement is not less than the tolerance required, there will be a significant risk of false accept. In simplistic terms, a TUR that produces less than +/- 2 % upper and lower risk would be required to ensure the measurement is valid.
One would not use a ruler to calibrate a gauge block and how to lower your measurement risk
Keys to lowering the measurement risk include replicating how the instrument is used in the field by your calibration provider, having competent technicians, using the right equipment, and lowering overall uncertainties through the calibration provider. There is quite a bit of difference between force measurement labs with CMCs of 0.1 %, 0.05 %, 0.02 %, 0.01 %, 0.005 %, and 0.002 % of applied force. Not using the laboratory with the right capability to meet your requirements is like using a ruler to calibrate a gauge block.
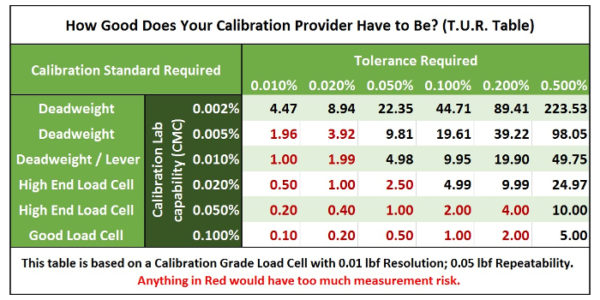
The table above shows the Test Uncertainty Ratios (T.U.R.) that force calibration labs with different calibration capabilities can provide for various levels of required tolerances. The far-left column represents the calibration standard required for force measurements. Deadweight primary standards are often required to achieve CMCs of better than 0.01 % of applied force. A high-end load cell calibrated by deadweights would be required to achieve CMCs of better than 0.05 %. This table indicates the best T.U.R. that the labs can provide for the same load cell at similar conditions. Per this table, only calibration labs with CMCs around 0.02 % or better can calibrate devices with a tolerance of 0.1 %. They may still need to adjust the device to read closer to the nominal value. We will discuss guard banding later.
The table was derived from T.U.R. and uncertainty formulas found in JCGM 100:2008 and ANSI/NCSLI Z540.3-2006. The formulas used to determine T.U.R. and Uncertainty are as follows:
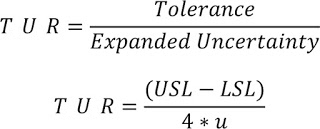
TUR = Test Uncertainty Ratio
USL = Upper Specification Limit
LSL = Lower Specification Limit
u = standard uncertainty
The calculation of TUR for tolerances:
((Upper Specification Limit - Lower Specification Limit))/(4 * Standard Uncertainty)
Note: We are using 4 in both cases assuming k=2, the proper formula would be 2 times whatever the actual k value is for a 95 % confidence interval.
If you are using Excel, you can copy and paste the formula above and substitute the proper values (or cell references).
Combined Standard Uncertainty (u) – The square root of the sum of the squares of all the input quantity uncertainty components.

CMC = Calibration and Measurement Capability. This should be found on the calibration report. More information on what CMC is can be found on our blog here.
Res = This is the resolution of the Unit Under Test (UUT) The divisor for resolution will either be 3.464 or 1.732 (depending on how the UUT least significant digit resolves).
Rep = Repeatability of the Unit Under Test (UUT). Repeatability of UUT must be used if repeatability studies were not previously accounted for in the CMC. If accounted for in the CMC, this would not be required.
Expanded Uncertainty - Typically 2 times the standard uncertainty. However, the appropriate k value should be used to ensure a coverage probability of 95 %, based on the effective degrees of freedom using the Welch Satterthwaite formula.
Is your calibration provider reporting Pass/Fail criteria properly?
If the calibration provider is accredited, it needs to follow the requirements per ISO/IEC 17025. ISO/IEC 17025 requires the uncertainty of measurement shall be taken into account when making statements of conformance.
This translates to minimizing the Probability of False Accept (PFA) by applying a guard banding method. ANSI/NCSLI Z540.3 -2006 Handbook discusses guard banding in section 3.3. Section 3.3 paragraph 2 states "As used in the National Standard, a guard band is used to change the criteria for making a measurement decision, such as pass or fail, from some tolerance or specification limits to achieve a defined objective, such as a 2 % probability of false accept. The offset may either be added to or subtracted from the decision value to achieve this objective."
Examples of calculating measurement risk with guard banding
Assume we are testing a load cell at 10,000 lbf force. The accuracy specification is 0.1 % of reading (or +/- 10 lbf at this force), and the measured value was 9990. Is the device in tolerance? After all, the calibration laboratory applied 10,000 lbf, and the Unit Under test read 9990. The bias is - 10 lbf and the device meets its accuracy specification (Accept decision without taking the uncertainty of measurement into account). The report is issued and the end-user is happy. However, the problem is that the end-user should not be happy.
If the calibration and measurement capability (CMC) of the calibration laboratory using a specific reference standard was not considered, the end-user will not know whether the device meets the accuracy specification required. Basically, this measurement was passed based on the assumption that the calibration providers' reference was perfect and they applied exactly 10,000 lbf to the load cell. However, no measurements are perfect. That is why we estimate the uncertainty of measurement to quantify this “imperfection of the measurement” This is a false assumption that neglected the uncertainty in the calibration provider’s measurement. Let us assume that the standard uncertainty was calculated at 6.5 lbf for k=1.
In the graph below, the item being calibrated would normally be considered "in tolerance" by a large percentage of calibration laboratories since the accuracy specification is 0.1 % of reading or +/- 10 lbf and the measured value was within the accuracy specification at 9990 lbf. There is a 50.1 % chance of the calibration being accepted when it is not in tolerance.
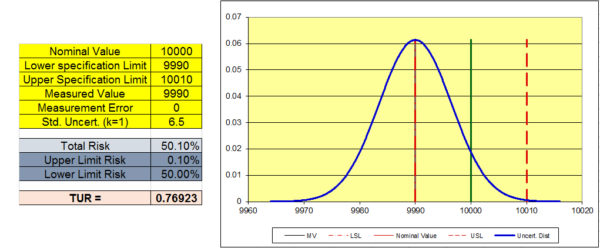
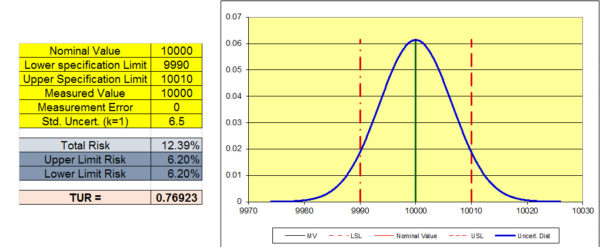
The next graph shows the risk when the measured value of the UUT reads 10,000 lbf. In this scenario, the bias or measurement error is 0. However, there is still a 12.39 % chance that the UUT is not "in tolerance." Simply put, there is too much risk. We need to lower the standard uncertainty to reduce the risk. Note that the TUR remains the same since it is a ratio not dependent on the location of the measurement.
How to lower the risk (PFA) by lowering the uncertainty.
- Use better equipment with a lower resolution and/or better repeatability; e.g. higher quality load cell for force measurement.
- Use a better calibration provider with a Calibration and Measurement Capability (CMC) low enough to reduce the measurement risk.
- Pay attention to the uncertainty values listed in the calibration report issued by your calibration provider. Make sure to get proper T.U.R. values for every measurement point (but pay attention to the location of the measurement.
The formula below can be used to figure out what CMC you would need to maintain a 4:1 T.U.R. You will need to know the resolution and the repeatability of what is being tested.

The last graph shows the same test instrument with a lower Standard Uncertainty. This was a real scenario where an instrument was modified from a 10 lbf resolution to a 2 lbf resolution. The total risk is now 0 and the device will be "in tolerance" with less than 2 % total risk from reading of 9,996 through 10,006 lbf. There are several acceptable methods for applying a guard band to obtain what the measured value needs to be in order to maintain less than 2 % total risk.
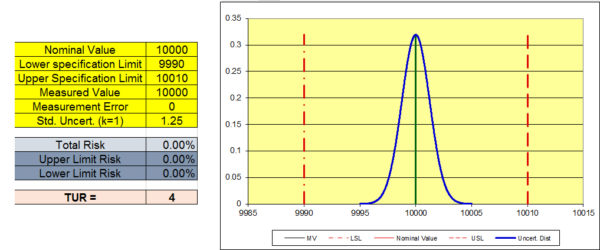
These graphs comply with Method 5: Guard Bands Based on Expanded Uncertainty in the ANSI/NCSLI Z540.3 Handbook and is described in ISO 14253-1, and included in ILAC G8, and various other guidance documents.

After reading this paper, you may be standing at a crossroads and wondering if any of this extra work is necessary. To the left is the same rough path you’ve been traveling all along. This is the path that says, "If it's not broken, why fix it?" You might be thinking that measurement risk has not been an issue before, or you’ll just wait until an auditor questions you about it (or there is a train wreck). Yet, to the right is the road that fewer people realize will help solve their measurement problems today. This road is not more difficult; it's just different from the current way you may be doing things. Choosing to consider the impact of not doing things right—and making the decision to select the best calibration provider—will make all the difference. Choose Morehouse and lower your force and torque measurement risk today! The rest is just putting formulas in place to report and know your measurement risk.
What is Measurement Risk - Conclusion
Our next blog will continue this discussion and focus on three things you can do to lessen your measurement risk.
Everything we do, we believe in changing how people think about force and torque calibration. Morehouse believes in thinking differently about force and torque calibration and equipment. We challenge the "just calibrate it" mentality by educating our customers on what matters and what causes significant errors, and focus on reducing them.
Morehouse makes our products simple to use and user-friendly. And we happen to make great force equipment and provide unparalleled calibration services.
Wanna do business with a company that focuses on what matters most? Email us at info@mhforce.com.
Additional Reading on Measurement Decision Risk
Per NASA NHBK873919-4, "The Role of Measurement Decision Risk: The testing of a given end item attribute by a test system yields a reported in- or out-of-tolerance indication (referenced to the attribute's tolerance limits), an adjustment (referenced to the attribute's adjustment limits) and a "post-test" in-tolerance probability or “measurement reliability.” Similarly, the results of calibration of the test system attribute are a reported in- or out-of-tolerance indication (referenced to the test system attribute's test limits), an attribute adjustment (referenced to the attribute's adjustment limits), and beginning-of-period measurement reliability (referenced to the attribute's tolerance limits).
The same sort of data results from the calibration of the calibration system and accompanies calibrations up through the hierarchy until a point is reached where the item calibrated is itself a calibration standard and, finally, a primary standard with its value established by comparison to the SI. This hierarchical “compliance testing” is marked by measurement decision risk at each level. This risk takes two forms: False Accept Risk, in which non-compliant attributes are accepted as compliant, and False Reject Risk, in which compliant attributes are rejected as non-compliant. The effects of the former are possible negative outcomes relating to the accuracies of calibration systems and test systems and to the performance of end items. The effects of the latter are costs due to unnecessary adjustment, repair, and re-test, as well as shortened calibration intervals and unnecessary out-of-tolerance reports or other administrative reaction."
Per ANSI/Z540.3 Section 3.5, Measurement decision risk is The probability that an incorrect decision will result from a measurement. Discussion and Guidance In many measurements associated with calibrations, a tolerance is given to define what is considered an acceptable performance range. This tolerance itself is one form of decision criteria that is applied to the result of a measurement that may define further actions. As the measurement quantity being calibrated is drawn from some large population with a distribution of values and the calibration process exhibits a degree of measurement uncertainty, the decision itself is subject to error.
For example, if the measured value exceeds the tolerance limits and is declared “out-of-tolerance,” there is some chance that this decision is actually wrong. This type of incorrect decision is called a false reject. The risk (or probability) of making this type of incorrect decision is called false reject risk.
Additionally, if the measured value is within the tolerance limits and is declared “in-tolerance,” there is some chance that this decision is also wrong. This alternative type of incorrect decision is called a false accept. The risk (or probability) of making this type of incorrect decision is called false accept risk.
When viewed as a population, the proportion of the total wrong test decisions to the total number of tests conducted may be considered the measurement decision risk. Typical analyses focus on only part of the risk, such as false accept risk or false reject risk. Each of these are simply the proportion of wrong decisions in the categories of accept or reject decisions, respectively, of the total tested.
Sub-clause 5.3 applies the overall measurement decision risk to the scope of a calibration capability.
Sub-clause 5.3 b) applies this concept to limiting the “probability that incorrect acceptance decisions (false accept) will result from calibration tests” to 2 %.
If you enjoyed this article, check out our LinkedIn and YouTube channels for more helpful posts and videos.
#What is Measurement Risk #Measurement Risk


