What Happens When You Overshoot a Test Point?
Various calibration laboratories use hydraulic, screw, and other force calibration machines where it is difficult not to overshoot a test point. By talking about overshooting a test point, we are referring to loading past the desired point and then letting the creep in the hydraulic system naturally decrease the force point. Overshooting the force point to 2543 lbf, when the test point is 2500 lbf, and waiting several seconds until the reference standard reads 2500 lbf.
Anyone who has operated these hydraulic machines knows that overshooting a point will and can happen. Some automated force systems may even overshoot the test point by up to 20 % of the desired force.
Morehouse decided to test the effects of overshooting a load cell in one of our deadweight frames with a measurement process uncertainty of better than 0.0026 % under controlled conditions. Before we get to those results, we want to be very clear on some things.
- One should always approach the desired test point and not overshoot the test point when incrementally increasing the force. One should not undershoot the test point if performing a descending calibration.
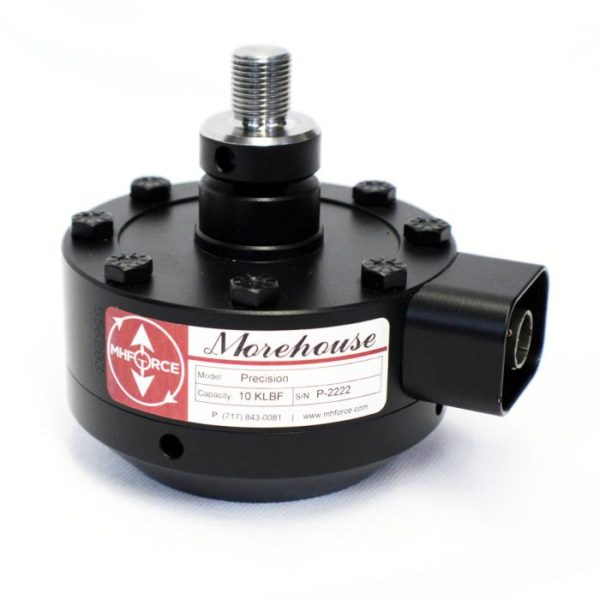
- The data presented is using a Morehouse 5,000 lbf Shear Web Type Precision Grade Load Cell. We cannot assume that all load cells act the same way. We suspect that the shear web type of load cells will all act similarly. A Column, Multi-Column, S-beam, Button, or other load cells may act differently.
- Anyone using a Morehouse Universal Calibrating Machine with Morehouse Auxiliary Screw Pump can control the application of force, and if they do overshoot the test point, it should be less than 4 % of the desired test point. In practice, we find most users overshoot by less than 2 % of the desired test point if they do overshoot it at all.
- One can observe the actual overshoot of automated calibrating machines by watching the control and looking at the calibration certificate. If the setpoint is 5,000 lbf and the mV/V associated with 5,000 lbf is -4.18295, and the machine loads to -4.88490 one would know the machine overshot the test point by 14.4 %.
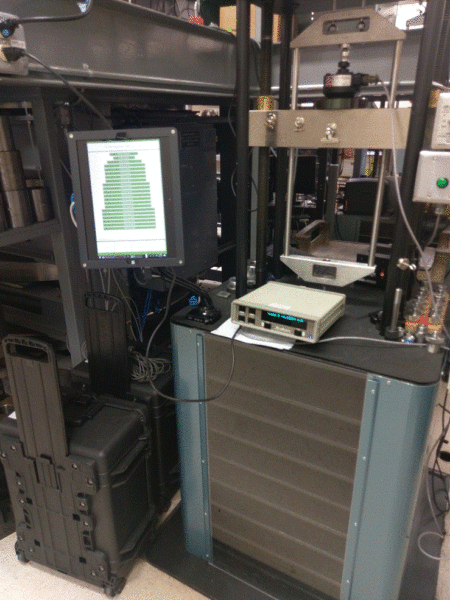
Figure 1 6,600 lbf Morehouse Deadweight Machine with a 4215 meter and Morehouse Precision Load Cell
The Test Plan and Results
We took a Morehouse 5,000 lbf Precision load cell with a 4215 indicator and applied forces in our deadweight frame. We exercised the load cell three times before testing. Our test plan consisted of taking readings at 2500 lbf and 5000 lbf. We then applied 2500 lbf and 5000 lbf and took three sets of readings.
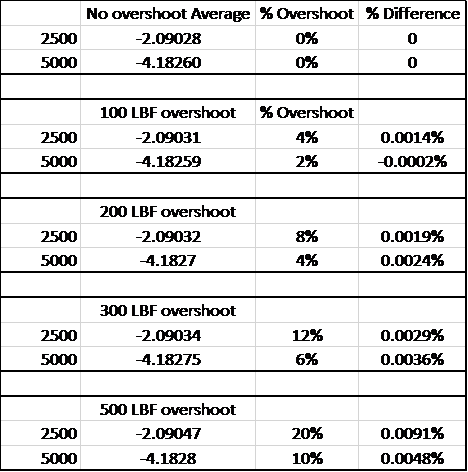
We averaged these three sets of readings and called this the expected output of the load cell at each test point. We then applied an additional 100 lbf to each of these test points and recorded the results. So, we loaded the load cell to 2600 lbf, removed 100 lbf, and recorded the reading at 2500 lbf. The loading sequence presented in the table below is as follows:
0, 2600, 2500 take a reading, 5100, 5000 take reading, 0.
0, 2700, 2500 take a reading, 5200, 5000 take reading, 0.
0, 2800, 2500 take a reading, 5300, 5000 take reading, 0.
0, 3000, 2500 take a reading, 5500, 5000 take reading, 0.
Table 1 Observed Values
Next, we calculated the repeatability error and the expanded uncertainty. We thought this might be important as we needed to quantify the error from just repeating the same three measurements without overshooting the test point. We did this by taking the maximum deviation from the average.
Table 2 Repeatability Data

We then used the repeatability error as we expected the load cell to repeat within this number and subtracted it from the % difference of the average readings minus the observed value when returning to the force point. In summary:
Diff from expected % = (the value observed after returning to the test point – the no overshoot average) / the value observed after returning to the test point)) x 100
Overshoot Error Estimate= (Diff from Expected %) – (Repeatability Error %)
The expanded uncertainty was calculated by multiplying the standard uncertainty by a coverage factor of 2. The appropriate coverage factor for 95 % confidence should be used in an actual uncertainty budget, but we used 2 to get us close to 95 %.

Figure 3 Short-Term Standard Uncertainty Formula (ILAC P-14) of the Measurement in the Morehouse Machine (This would be what we report on a Certificate of Calibration for Expanded Uncertainty)
Table 3 2500 lbf results

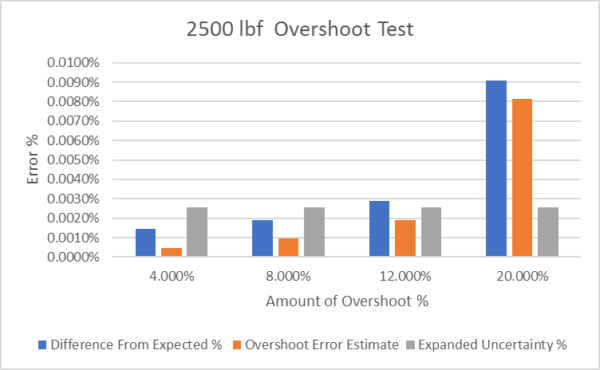
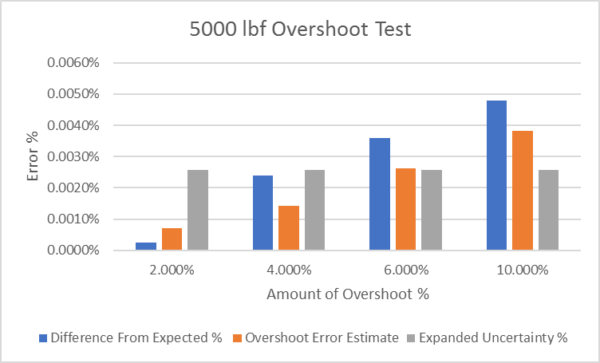
Table 4 5000 lbf results

What Happens When You Overshoot a Test Point? - Conclusion:
Table 5 Uncertainty Analysis

Looking at the data conservatively, it appears that overshooting a test point by under 4 % would not introduce a significant source of error since most Uncertainty budgets for secondary standards are between 0.02 % and 0.05 % of applied force and the maximum overshoot error estimate observed at a 2 % overshoot was 0.0007 %.
We estimate this additional error to be less than 0.0004 % or 4 ppm. However, overshooting a test point by over 4 % may produce error sources that should be considered, and overshooting a test point by 6 % or more will produce a significant source of error for most force calibration laboratories using secondary standards.
Note: We are defining a significant error source as an error source that would account for more than 5 % of the overall uncertainty budget. Best wishes on your future calibrations, and hoping your setups allow you to control the forces and not overshoot by more than 2 % of the desired test points.
To learn more, watch our video Minimize your Force and Torque Measurement Risk.
If you enjoyed this article, check out our LinkedIn and YouTube channel for more helpful posts and videos.
Everything we do, we believe in changing how people think about force and torque calibration. Morehouse believes in thinking differently about force and torque calibration and equipment. We challenge the "just calibrate it" mentality by educating our customers on what matters, and what causes significant errors, and focus on reducing them.
Morehouse makes our products simple to use and user-friendly. And we happen to make great force equipment and provide unparalleled calibration services.
Wanna do business with a company that focuses on what matters most? Email us at info@mhforce.com.
# What Happens If You Overshoot a Test Point


