The Top 5 Costly Force Measurement Mistakes

#1 of 5 Costly force measurement mistakes
- Most calibration laboratories will say a device is "In Tolerance" without considering the uncertainty of their measurement process. This equates to you not using a calibration laboratory that has standards to meet your needs and accounts for measurement risk properly.
Most ISO/IEC 17025 accredited calibration labs that use secondary standards have a Calibration and Measurement Capability of 0.025 % to 0.050 % of the applied force, which will be listed on the certificate. Labs using primary standards typically have a Calibration and Measurement Capability of around 0.002 % to 0.005 % of the applied force.
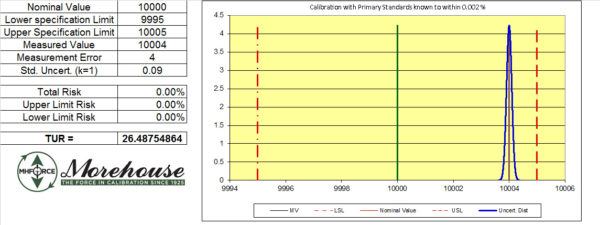
Example 1 A: A 10,000 lbf force measuring device is sent to two labs. One lab is Morehouse with a Calibration and Measurement Capability of 0.0016 % of the applied force. The resolution of the device is 0.01 lbf and the repeatability is 0.05 lbf. The manufacturer's stated accuracy is 0.05 % or ± 5 lbf. Morehouse applies 10,000 lbf and records the reading of the force-measuring device at 10,004 lbf. Morehouse says the instrument passes calibration.
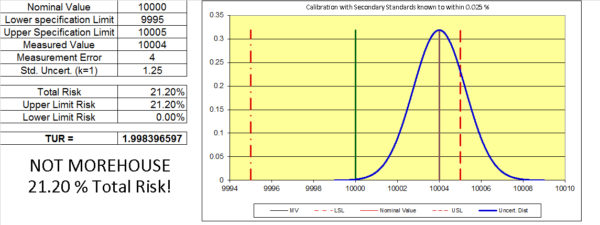
Example 1 B: A 10,000 lbf force measuring device is sent to two labs. The other lab is not Morehouse and is using Secondary Standards (Load Cells) with a Calibration and Measurement Capability of 0.025 % of the applied force. The resolution of the device is 0.01 lbf and the repeatability is 0.05 lbf. The manufacturer's stated accuracy is 0.05 % or ± 5 lbf. The Accredited Laboratory applies 10,000 lbf and records the reading of the force measuring device at 10,004 lbf. The accredited Secondary Lab says the instrument passes calibration.
The problem is when measurement risk and uncertainty of the calibration process are considered, the device has a 21.20 % chance of not meeting the manufacturer's specification.
Note: There are several ways to calculate measurement risk. In these examples, we are using Method 5 from ANSI Z540.3, which shifts the majority of the false reject risk to the calibration provider meaning we may adjust more instruments than if another less conservative method were used. Using method 5 lowers the risk for the end-user. Labs using a different risk method will shift the majority of the risk from their lab to yours.
Remember a smaller uncertainty of measurement will yield higher confidence in the actual measurements and in the assessment of compliance with the specification.
#2 of 5 Costly force measurement mistakes
- Not pairing a meter and load cell as a system. By using the calibration report and entering the mV/V values, there is an additional error that needs to be accounted for. This will require the lab to account for additional uncertainty contributors. These contributors include the meter and its calibration traceability, the load cell and all the contributors to it, and then the additional error from entering the mV/V values into the meter. If this error has not been quantified, all measurements made with this system are not traceable.
#3 of 5 Costly force measurement mistakes
- Loading through the top and bottom threads in compression and tension. If your standards are not set up this way, there is an additional error of about 0.012 % of the full scale. Several calibration providers use automated calibrating machines where it is much faster to load in both compression and tension through the threads. The problem is most load cells are not used or set up this way. Most are loaded against the base.
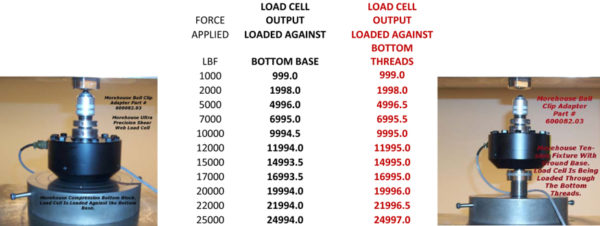
Example showing a 25,000 lbf load cell difference between loading through the top and bottom threads versus just the base.
#4 of 5 Costly force measurement mistakes
- Calibration adapter errors. If the laboratory calibrating your devices is not replicating how they are being used by using the same type of adapters you are using. There will be large unaccounted-for errors. The example below shows a 0.3 % error on a device that is required to be better than 0.25 % of the applied force. Simple math says 0.3 % is greater than the required 0.25 %.
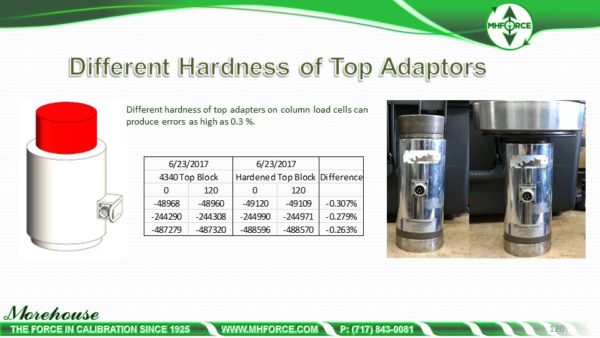
We wrote a top 5 errors blog detailing the errors with different adapters, and that can be found here.
#5 of 5 Costly force measurement mistakes
- The ASTM reports. Some labs report Class A values on the calibration reports that are not correct. The most common one we come across is reporting a Class A loading range that is below the first non-zero calibrated point. Zero cannot be used as the first test point which means the Class A loading range starts at the first non-zero test point.
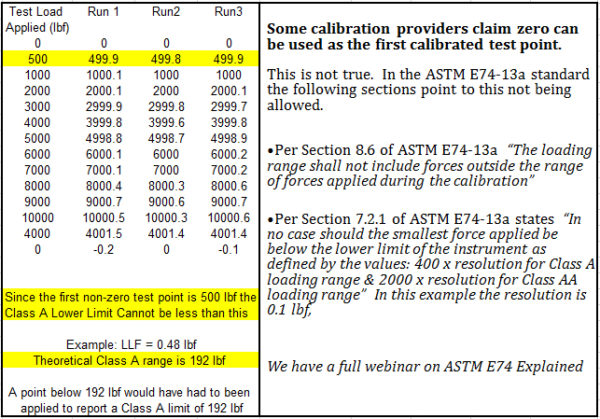
Read our article on Top 3 ASTM E74 mistakes here.
Top 5 costly force measurement mistakes - Conclusion
If you enjoyed this article, check out our LinkedIn and YouTube channels for more helpful posts and videos.
We believe in changing how people think about force and torque calibration in everything we do. Morehouse believes in thinking differently about force and torque calibration and equipment. We challenge the "just calibrate it" mentality by educating our customers on what matters and what causes significant errors and focus on reducing them.
Morehouse makes our products simple to use and user-friendly. We also happen to make great force equipment and provide unparalleled calibration services.
Do you want to do business with a company that focuses on what matters most? Email us at info@mhforce.com.
#Costly force measurement mistakes


