Avoid ASTM E74 Load Cell Calibration Mistakes
We are writing this post to clarify some common ASTM E74 misconceptions and discuss ASTM E74 Load Cell Calibration Mistakes. We have written two early blogs on the ASTM E74 standard: ASTM E74 Simplified and Calculating CMC using the ASTM E74 standard. We also have a slide share presentation detailing the ASTM E74 standard.
This blog post is to help clear the three top misconceptions commonly observed in the industry.

Misconception #1: Zero Can be Used as the First Calibrated Test Point.
This is not true in any way possible. In the ASTM E74 standard, the following sections point to this not being allowed.
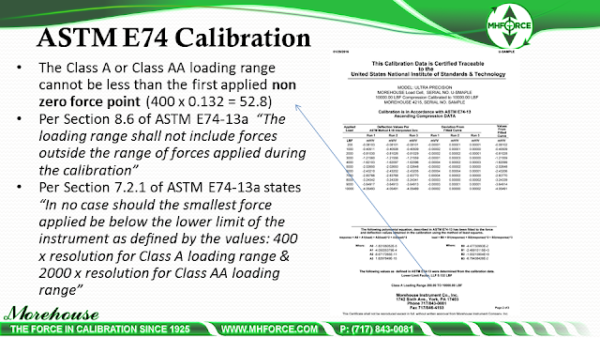
Do Not Assign a Class A or Class AA Range Below the First Non-Zero Force Point.
Note: We have observed numerous labs violating this rule! If your verified range of forces is less than the first non-zero test point, your calibration provider is not following ASTM E74.

Misconception #2: Designation of loading ranges.
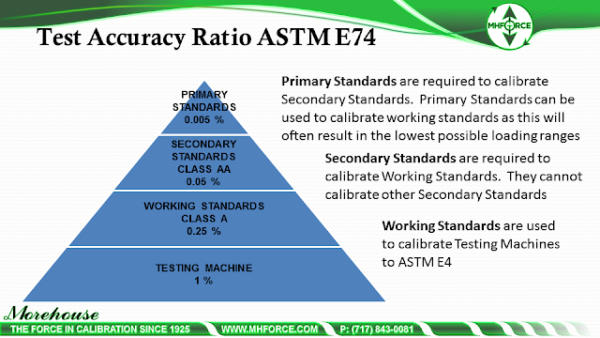
Some labs think a Class AA verified range of forces could be used to assign a Class AA range. This is not true.
A force measuring device with a Class AA verified range of forces cannot be another Class AA range; A force measuring device with a Class A verified range of forces cannot assign another Class A verified of forces.
Do Not Assign a Class AA verified Range of Forces Unless You are Calibrating with Primary Standards Accurate to Better than 0.005 %
Do Not Assign a Class A Verified Range of Forces Unless You are Calibrating the Device Using a Secondary Standard that was Calibrated Directly by Primary Standards.

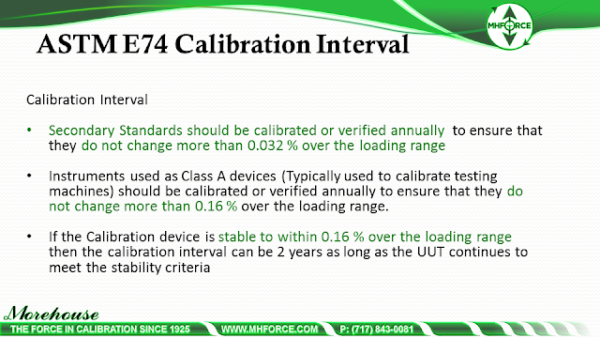
Misconception #3: A Calibration interval of one year is required for all force-measuring devices not meeting the stability criteria set forth in ASTM E74.
(Note: The maximum calibration interval is two years and this includes any force device)
Calibration Intervals Per ASTM E74:
New Devices are calibrated at a one-year interval per Section 11.2.1 "New devices shall be calibrated at an interval not exceeding 1 year to determine stability"
"The calibration intervals for force-measuring instruments and systems used as secondary force standards or for the verification of force indication of testing machines shall be calibrated at intervals not exceeding two years after demonstration of stability supporting the adopted recalibration interval"
If the force measuring instrument does not demonstrate changes in the calibration values over the range used during the calibration of more 0.032 % of reading for Class AA verified range of forces or 0.16 % of reading for a Class A range, A two-year calibration interval can be assigned.
Per Section 11.2.2 Devices not meeting the stability criteria of 11.2.1 shall be recalibrated at intervals that shall ensure the stability criteria are not exceeded during the recalibration interval. This means the user needs to shorten the calibration interval to ensure the device will meet the stability. This could mean 16 months, or it could mean 10 days. It all depends on the quality of the instrument.
For Class AA force measuring devices ASTM recommends in note 16 - " For secondary force standards, it is recommended that cross-checking be performed at periodic intervals using other standards to help ensure that standards are performing as expected." If you cannot cross-check your instrumentation, it may be best practice to have the force-measuring instrument calibrated on a periodic basis.
Top 3 ASTM E74 Load Cell Calibrations Mistakes - Conclusion
If you enjoyed this article, check out our LinkedIn and YouTube channels for more helpful posts and videos.
Do you want to do business with a company that focuses on what matters most? Email us at info@mhforce.com.


