Stain Gauge or Strain Gage?
There is a debate on how “strain Gauge” should be spelled. Should it be “Strain Gauge or Strain Gage.” The purpose of this post is to provide a little bit of research history on the advent of the strain gauge or strain gage. Through some research, it seems the proper terminology and spelling should be strain gauge, and maybe there was some industry “marketing” influence on this topic.
The strain gauge or strain gage was independently invented by two people in 1938:
Edward E. Simmons was a research assistant at the California Institute of Technology (Caltech).
Arthur C. Ruge, a professor at the Massachusetts Institute of Technology (MIT)
Key Points about the Invention of the Strain Gauge or Strain Gage:
Simmons developed the concept in 1936-1938 while researching the stress-strain behavior of metals under shock loads at Caltech.
Ruge had his "eureka moment" on April 3, 1938, while trying to measure stress on water tank models for earthquake engineering research at MIT.
Both men independently came up with the idea of using thin metallic wires or foils bonded to a surface to measure strain.
Simmons and Ruge are credited as the inventors who shared the original patent.
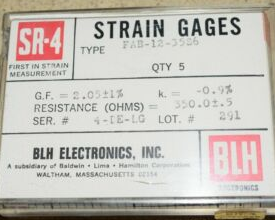
The device was initially called the SR-4 strain gauge, with "SR" standing for "Simmons-Ruge" and "4" representing the four people involved (Simmons, Ruge, and their respective assistants).
While Simmons appears to have developed the concept slightly earlier, both men are recognized as co-inventors due to their independent and nearly simultaneous work. Their invention in 1938 marked the beginning of modern electrical resistance strain measurement technology.
Ruge and his colleague Alfred de Forest founded Ruge Consulting in 1939 to manufacture and commercialize the SR-4 strain gauge.
Ruge Consulting produced the first commercial shipment of strain gauges or strain gages—a 50,000-piece order—in 1941.

Then, around 1955, Baldwin-Lima-Hamilton bought Ruge Consulting and the rights to the SR-4 strain gauge or strain gage, renaming the company BLH Electronics Inc

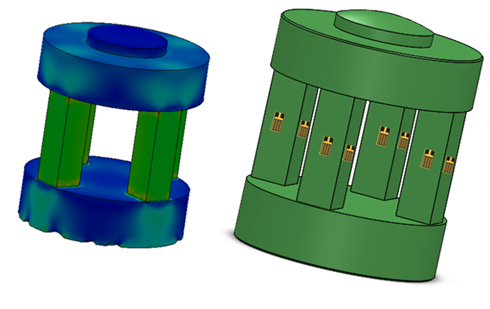
An example of strain gauges on a multi-column load cell.
Strain gauges (also spelled strain gages) are sensors used to measure strain or deformation in an object. Here are some critical points about strain gauges and their applications:
How the Strain Gauge or Strain Gage Works
Strain gauges consist of a thin metallic foil or wire attached to the surface of an object.
When the object deforms, the strain gauge deforms as well, changing its electrical resistance.
This change in resistance is proportional to the strain and can be measured using a Wheatstone bridge circuit.
Advantages of the Strain Gauge or Strain Gage
- Accurate and reliable for measuring small strains
- Versatile - can measure strains from micro to macro levels
- Easy to install using adhesive bonding
- Can be Cost-effective and durable
Applications of the Strain Gauge or Strain Gage
Strain gauges are used in many industries and applications, including:
- Structural testing and stress analysis in aerospace, automotive, and civil engineering
- Load cells and force sensors
- Torque and power measurements on rotating equipment
- Weighing systems in manufacturing and transportation
- Medical devices like dialysis machines and syringe pumps
- Monitoring bridges, buildings, dams, etc. for safety
- Aerospace testing to verify CAD and FEA simulations
Types of Strain Gauge or Strain Gage
There are several types based on construction and mounting:
- Foil strain gauges (most common)
- Semiconductor strain gauges
- Vibrating wire strain gauges
- Bonded and unbonded gauges
- And more
Considerations of the Strain Gage or Strain Gages
- Proper installation and calibration are critical for accurate measurements
- Environmental factors like temperature can affect readings
- Multiple gauges are often used to measure strain in different directions
Strain Gauge or Strain Gage Conclusion
If anyone has a more complete story of how Strain Guage is sometimes spelled strain gage, please email us and share it info@mhforce.com.
The Western Regional Strain Gage Committee (WRSGC), https://wrsgc.org/about/, has more information on the strain gage's history mentioned above, though they have a great website promoting strain measurement techniques.
In summary, strain gauges are versatile sensors that enable precise strain and stress measurements across many engineering and industrial applications. Their ability to convert tiny deformations into measurable electrical signals makes them invaluable for structural analysis, product testing, and safety monitoring.
Morehouse has a free weekly email series that provides a comprehensive guide on load cell design and strain gauge selection. The series covers topics such as spring element types, design considerations, strain-sensing alloys, backing materials, gage length, patterns, and excitation levels, with a focus on optimizing performance and accuracy in force measurement applications as well as many other topics relating to force measurement.
These short, insightful emails are designed for a practical 10 minutes of calibration training and metrology professional development from Tuesday through Thursday. Each email provides valuable insights that contribute to your metrology professional development and helps you learn more about metrology, empowering you to enhance your force and torque calibration expertise at your own pace. To sign up for these emails, click here.
More Information about Morehouse
We believe in changing how people think about force and torque calibration in everything we do.
This includes setting expectations and challenging the "just calibrate it" mentality by educating our customers on what matters and what causes significant errors.
We focus on reducing these errors and making our products simple and user-friendly.
This means your instruments will pass calibration more often and produce more precise measurements, giving you the confidence to focus on your business.
Companies around the globe rely on Morehouse for accuracy and speed.
Our measurement uncertainties are 10-50 times lower than the competition.
We turn around your equipment in 7-10 business days, so you can return to work quickly and save money.
When you choose Morehouse, you're not just paying for a calibration service or a load cell.
You're investing in peace of mind, knowing your equipment is calibrated accurately and on time.
Contact Morehouse at info@mhforce.com to learn more about our calibration services and load cell products.
Email us if you ever want to chat or have questions about a blog.
We love talking about this stuff.
Our YouTube channel has videos on various force and torque calibration topics here.


