Specifying a Tolerance, the Difference Between Percentage of Indicated Value vs % of Full-Scale Output - Intro
In looking at various equipment, it seems the force equipment in the test and measurement industry specifically specifies tolerances as a percent of full scale. When determining accuracy or tolerance, several crane scales, tension links, and hand-held force gauges follow this trend. There are a few manufacturers who use % Indicated Value (IV). My question is, why would a manufacturer choose one method versus the other? What is the manufacturer's reasoning for % of full scale versus % of Indicated Value(IV), and what does 0.01 % of full scale or IV mean? Do the manufacturers take resolution, repeatability, and reproducibility into account when providing this specification? I've heard of scale manufacturers that based the accuracy on the average of multiple measurements.
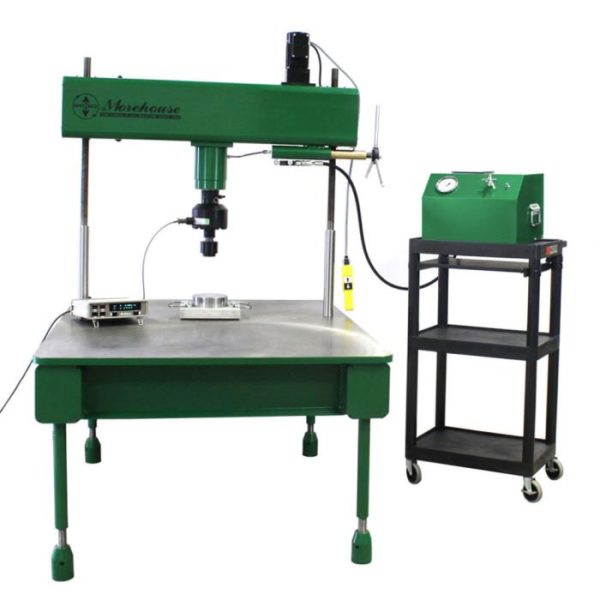
The issue is that multiple measurements can hide extremes, as one could have their head in an oven and feet in ice and, on average, feel fine (Famous saying by Dilip Shah). In practice, no truck is pulling onto a scale multiple times in the actual application, so this is a ridiculous and sloppy metrological practice. Most calibration labs are not even using an adapter that simulates the footprint of the rubber tire. Pictured below is a Morehouse scale calibrator, and the center is an adapter that simulates the footprint of the tire. We had written a paper for Cal Lab magazine and a blog on this very topic that can be found here.

When we discuss a tolerance or accuracy specification, we should be discussing the degree of the uncertainty inherent in a measurement made by a specific instrument under a specific set of environmental or other qualifying conditions; however, we do know that is often not the case. It also leads to more questions, as what is achieved during calibration does often not represent how the instrument is used. Aircraft scales are great examples as some manufacturers call for a specific size block and a flatness specification for the calibration service; however, in actual use, the instrument is loaded on uneven concrete.

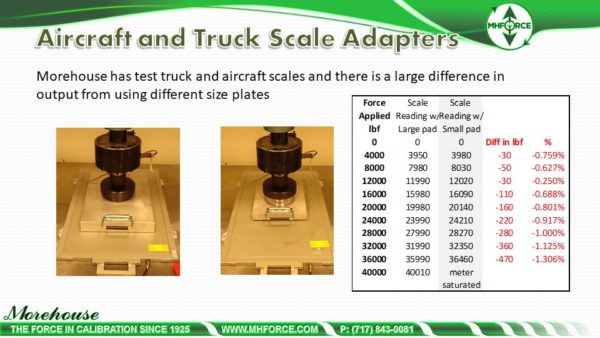
We can continue to debate manufacturers and their strange rationale for setting accuracies. However, these manufacturers should tell us how the instrument is tested and what the actual accuracy or tolerance is during normal use conditions. From the various testing we have done in our lab, we know many of these products simply do not perform to the same specification in the field. An example of this is shown in the above picture as different size pads produce drastically different results by as much as 1.3 %. We know adapters are absolutely critical, and not using the same adapters during calibration that are being used in the field, will definitely produce different results. Our paper on adapters can be found at Recommended Compression and Tension Adapters for Force Calibration.
An additional concern is that some companies use a linear regression across the full range in which the y-intercept is the floor specification, which makes simple taking ratios of % of percent of FS difficult. Companies like Fluke and Keysight are great at giving specifications that often use ppm of reading (relative specification) + ppm of the full scale(this is normally known as the floor spec, which is usually the y-intercept in the regression analysis). The ppm of full scale is typically the Y-intercept.

If we did know what was considered, we could pretty easily convert % of FS into % of IV. However, without knowing the contributors, we might assume a force measuring instrument with 0.01 % of full-scale accuracy will have an accuracy of 0.05 % at 50 % of capacity and 0.1 % at 10 %. That is simple math, though if we knew repeatability, stability, and resolution of the device were considered in the % of Full-Scale specification, we would need to follow a different formula. We would follow guidelines as outlined in JCGM-100 or A2LA G126 - Guidance on Uncertainty Budgets for Force Measuring Devices, as shown above. The uncertainties above look drastically different when following proper guidance documents. When we follow A2LA G126, we see that the 0.01 % of full scale is a bit higher than that, as resolution, repeatability, stability, and other contributors that exist during the measurement process are considered. We would need to figure out all of the different uncertainty contributors and the percentage value of 0.01 % of full scale, which could be something like 0.021 % at 10 % ((0.64/3000)x100). It all depends on the individual weighted value of all of the uncertainty contributors.

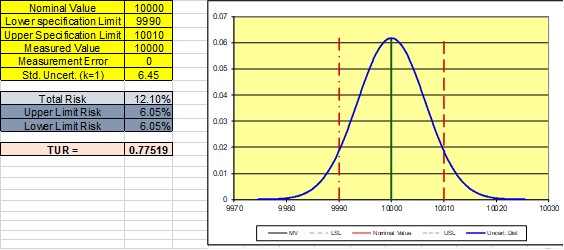
Finally, after we figure out what may have been used for the specification, we then deal with decision rules and the like, which may make many manufacturers' claims of accuracy not achievable. One scale company we know has a specification is 0.1 % of IV on several scales. With a resolution of 10 lbs, the resolution is equal to the tolerance, and it is almost impossible to call the device in tolerance when taking the measurement uncertainty into account. The above picture shows the best-case scenario in this example at 10,000 lbf with a 10 lbf resolution; the total risk is 12.10 %. That means there is a 12.10 % chance that the device is not in tolerance. This further leads to a discussion on TUR and risk, and we have a paper that can be found at Why a 4:1 TUR is not enough: The importance of analyzing the probability of false accept risk.
Specifying a Tolerance, the Difference Between Percentage of Indicated Value vs % of Full-Scale Output - Conclusion
I guess the answer to the question is and always will be, what is the equation for accuracy? If we knew that, we could always calculate the % of the indicated value following the proper guidelines outlined in G126.
Morehouse spec's our best load cells as 0.005 % of full scale when an ASTM E74 calibration is performed. This gives the end-user the expected performance of the device. This 0.005 % is 0.05 % at 10 % of capacity. Though it does not include other error sources observed on the customer's end like different adapters, and machines that are not as plumb, level, square, rigid, and have low torsion. It does not include repeatability between techs or truly captures the end user's process uncertainty. It does, however, capture the reproducibility condition of that load cell when rotated with the setup used at the time of calibration. One will often find that when adding other error sources like stability, R & R between techs, and environmental factors, will raise that overall expanded uncertainty.
Following the guidelines in A2LA's G126 is the right way to do budgets. Just blindly accepting a manufacturer's accuracy specification is most likely going to lead to underestimating the uncertainty of measurement, which will result in higher risk, and maybe catastrophic failures.
To learn more, watch our video Minimize your Force and Torque Measurement Risk.
I take great pride in our knowledgeable team at Morehouse, who will work with you to find the right solution. We have now been in business for over a century and have a focus on being the most recognized name in the force business. That vision comes from educating our customers on what matters most and having the right discussions. Morehouse will not commit to providing a system if we cannot meet your expectations.
If you enjoyed this article, check out our LinkedIn and YouTube channels for more helpful posts and videos.
We believe in changing how people think about force and torque calibration in everything we do. We challenge the "just calibrate it" mentality by educating our customers on what matters and what causes significant errors and focusing on reducing them. Morehouse makes simple-to-use calibration products.
We build awesome force equipment that is plumb, level, square, and rigid. We also provide unparalleled calibration service with lead times of less than two weeks.
Contact us at 717-843-0081 to speak to a live person or email info@mhforce.com for more information.


