Specific Force Measuring Instruments Introduction
At Morehouse, we have covered various sections of the ASTM E74 standard over numerous articles, papers, and posts. We have not covered specific force-measuring instruments for all of those various pieces.
Yet, we frequently perform many calibrations and have sold equipment designed specifically for this criteria.
Even though many customers have upgraded their force-measuring instruments to load cell systems, this article aims to discuss what a specific force-measuring instrument is, the calibration requirements, and why many have replaced their specific force-measuring instruments with load cells that are typically less expensive and more precise.
Specific Force-Measuring Instrument (s)
Specific force-measuring instruments are used in various force applications. Some include verification of forces for Brinell hardness testing, Rockwell hardness testing, soil testing, and more.
They are typically calibrated by the ASTM E74 standard (North America) and ISO 376 (Europe).

What is a Specific Force Measuring Instrument?
ASTM E74 section 3.2.9 defines a specific force-measuring instrument as an alternative class of instruments that cannot be calibrated using a calibration equation.
The previous term for a specific force measuring instrument was a specific force device or limited load device.
Specific force measuring instruments are only to be used at their calibrated forces.
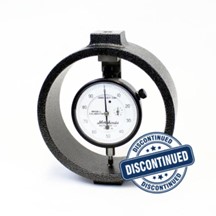
They typically consist of Amsler boxes, elastic rings, loop rings, and columns with dial indicators.
The gearing of the dial indicator often produces very nonlinear behavior, making it difficult to use an equation to predict the deflection at forces in which the instrument was not calibrated.
Thus, the lower limit factor tends to be quite large, and an adequate verified range of forces can often not be established.
This differs from continuous reading instruments, such as load cells, which are very linear compared to where a calibration equation can be used.
This equation is often a polynomial equation, which permits interpolation between forces.

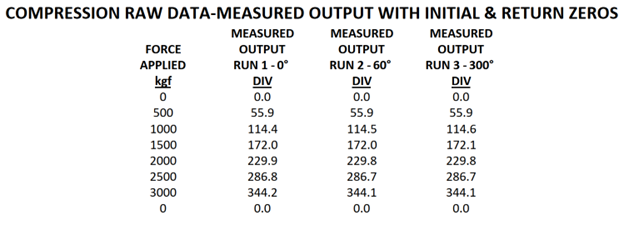
In the above figure, the specific force measuring instrument can only be used at 500, 1000, 1500, 2000, 2500, and 3000 kgf. These devices are often used in a set-to-force scenario. The end-user wants to apply 3000 kgf of force and knows that when the specific force measuring instrument reads 344.1, 500 kgf is applied.
Most of these devices are used for Brinell hardness testing at Morehouse. The Brinell hardness test for steel involves impressing a ball, 10 mm diameter of hard steel or tungsten carbide and loading 3000 kilograms into the steel surface. The hardness of the steel is then determined by measuring the indentation.
We calibrate the device to a standard such as ASTM E74, which is then used to verify the forces of the Brinell machine following the ASTM E10 standard.
Calibration following the ASTM E74 Standard.
For most specific force measuring instruments, the end-user will dictate what forces they need to calibrate, often the most useful in the service function.
The selection of forces can vary from six forces to upwards of thirty.
At this point, we often recommend a different instrument for calibration, such as a load cell. More on that later.
Requirement for calibration of specific force measuring instruments:
- The instrument must be exercised at least twice.
- Calibration forces must be applied thrice to provide sufficient data to calculate a standard deviation.
- Force points should be selected based on the end-user requirements.
- The use is restricted to those included in the verified range of forces as indicated in section 8.6.2.
This means that the calculated verified range of forces cannot be less than the LLF * 400.
ASTM E74 has one section that needs to be referenced regarding the lowest force at which the specific force-measuring instrument can be used.
ASTM E74-18 states in section 8.6.2, “The verified range of forces shall not include forces outside the range of forces applied during the calibration. If the lower force limit is less than the lowest non-zero calibration force applied, then the lower force limit of the verified range of forces is equal to the lowest calibration force applied.”
Section 8.7.4 states, “Precision Force—A specific force-measuring instrument does not have a verified range of forces as specified in 8.6, since it can be used only at the forces for which it was calibrated. The use is restricted, however, to those calibrated forces that would be included in a verified range of forces calculated in 8.6 – 8.6.3.2.”
Note that the LLF determines the valid points within the force point range selected. If the instrument is not repeatable, force points that cannot be used may exist.
An example, let’s assume the LLF is 2 kgf on a 3000 kgf instrument. This would mean the device cannot be used at less than 800 kgf.
Note: Nonspecific force-measuring instruments have an additional requirement in section 7.2.1: the verified range of forces cannot be less than the resolution.
ASTM E74-18 states in section states in section 7.2 “Selection of Calibration Forces, -A careful selection of the different forces to be applied in a calibration is essential to provide an adequate and unbiased sample of the full range of the deviations discussed in 7.1 and 7.1.1. For this reason, the selection of the calibration forces shall be made by the calibration laboratory. An exception to this, and to the recommendations of 7.2.1 and 7.2.4, is made for specific force-measuring instruments, where the selection of the forces is dictated by the needs of the user.”
Our experience at Morehouse shows that specific force-measuring instruments have many uses. Often, using a force-measuring instrument like a load cell throughout the calculated class A verified range of forces makes more sense.

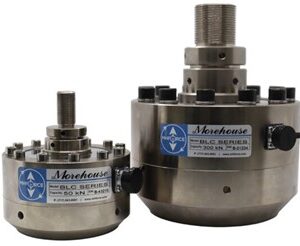
If a budget load cell is purchased with a Morehouse meter, it is very common to have a Class A verified range of forces of better than 100 kgf through 3,000 kgf. Meaning the ASTM E74 LLF would be better than 0.25 kgf. This option often turns out to be at least four times better than most specific force devices.
Because the load cell option is much more accurate and offers a much better useable range for multiple calibration values, the older Morehouse analog Brinell Calibrators are purchased so infrequently.
Even though we can make them on special request, we have discontinued them.
Specific Force Measuring Instrument: Conclusion
Specific force measuring instruments are vital in various force applications, providing accuracy and reliability within their calibrated range.
While specific force measuring instruments offer somewhat acceptable precision within their calibrated range, their nonlinear behavior restricts their utility beyond these limits.
In contrast, load cells are more versatile for broader force ranges due to their linear response and more comprehensive verified range of forces.
Choosing between specific force-measuring instruments and load cells depends on the precision required. Load cell solutions are typically less expensive and more precise.
They can be used at any force point in their class, have a verified range of forces, and offer lower measurement uncertainty.
Many times, a 10,000 lbf budget load cell calibrated to 6700 lbf (3039.07 kgf), with a C705P meter and a nice case with custom-cut foam, will provide a range of use of better than 100 kgf through 3039.07 kgf.
Specific Force Measuring Instruments: References
This document references various sections of the ASTM E74 standard.
ASTM E74-18a Standard Practices for Calibration and Verification for Force-Measuring Instruments
-Henry Zumbrun, President of Morehouse Instrument Company
Companies worldwide rely on Morehouse for accuracy and speed. The company turns around equipment in 7-10 business days so customers can return to work quickly and save money.
About Morehouse Instrument Company
Morehouse Instrument Company, a trusted and accredited provider of force and torque measurement services for over 100 years, offers measurement uncertainties 10-50 times lower than the competition.
Morehouse helps commercial labs, government labs, and other organizations lower their measurement risk by lowering equipment uncertainties for torque and force measurement. Contact Morehouse at info@mhforce.com.
More Information about Morehouse
We believe in changing how people think about force and torque calibration in everything we do.
This includes setting expectations on load cell reliability and challenging the "just calibrate it" mentality by educating our customers on what matters and what causes significant errors.
We focus on reducing these errors and making our products simple and user-friendly.
This means your instruments will pass calibration more often and produce more precise measurements, giving you the confidence to focus on your business.
Companies around the globe rely on Morehouse for accuracy and speed.
Our measurement uncertainties are 10-50 times lower than the competition.
We turn around your equipment in 7-10 business days so you can return to work quickly, saving you money.
When you choose Morehouse, you're not just paying for a calibration service or a load cell.
You're investing in peace of mind, knowing your equipment is calibrated accurately and on time.
Contact Morehouse at info@mhforce.com to learn more about our calibration services and load cell products.
Email us if you ever want to chat or have questions about a blog.
We love talking about this stuff.
Our YouTube channel has videos on various force and torque calibration topics here.
#Force Measuring Instruments


