Why the Location of the Measurement is More Important than You May Realize

Calling an instrument “In Tolerance” is about the location, location, and location of the measurement. It’s also about the uncertainty of the measurement, but a bad location will raise the Probability of False Accept (PFA) significantly. The Probability of False Accept is the likelihood of a lab calling a measurement “In Tolerance” when it is not. The location we are referring to is how close the measurement is to the nominal value. If the nominal value is 10,000 lbf and the instrument reads 10,004 lbf, the instrument bias is 4 lbf. The larger the bias, the worse the location of the measurement. In previous blogs, we have dealt with measurement risk, statements of compliance, and rules to lessen risk. This blog is a little different as we will focus primarily on the location of the measurement and what it means regarding making statements of compliance.
Why do we care about the location of the measurement if the device is within tolerance? If a device has a specification of 0.1 % of full scale and the calibrating laboratory reports a value within 0.1 %, the device is “In Tolerance,” right? The answer is and always will be it depends on what the uncertainty of the measurement is and if the lab performing the calibration followed the proper guidelines in determining the uncertainty of measurement (UOM) when making the statement of compliance or conformity.
For a refresher on why this matters, there is a standard called ISO/IEC 17025: 2005, wherein section 5.10.4.2 states, “When statements of compliance are made, the uncertainty of the measurement shall be taken into account.” Then ISO/IEC 17025: 2017 clarified this statement in section 7.8.6.1, which states, "When a statement of conformity to a specification or standard for test or calibration is provided, the laboratory shall document the decision rule employed, taking into account the level of risk (such as false accept and false reject and statistical assumptions) associated with the decision rule employed and apply the decision rule." Section 7.8.6.2 The laboratory shall report on the statement of conformity such that the statement identifies –a) to which results from the statement applies; and –b) which specifications, standards, or parts thereof are met or not met; –c) the decision rule applied (unless it is inherent in the requested specification or standard) If you need an accredited certificate, this statement can be a big deal, and If the uncertainty of the measurement is significant, the lab performing the calibration is going to have to be very concerned with the location of the measurement. If their uncertainty of measurement is too high, they may not even be able to perform the calibration at all. You may not even know you have an issue with your measurements until your next audit.
Why we care about risk and making statements of compliance:
- ANSI/NCSLI Z540.3-2006 defines Measurement decision risk as the probability that an incorrect decision will result from a measurement.
- ANSI/NCSLI Z540.3 -2006 Handbook Section 3.3 paragraph 2 states, "As used in the National Standard, a guard band is used to change the criteria for making a measurement decision, such as pass or fail, from some tolerance or specification limits to achieve a defined objective, such as a 2 % probability of false accept. The offset may either be added to or subtracted from the decision value to achieve this objective."
- We care because the probability of an incorrect decision being made about our measurement is quite high if we have a higher than 2 % probability of false accept.
In hopes of simplifying things, we will provide some examples of why the location of the measurement matters.
Note: Most of this discussion involves knowing the tolerance required and the standard uncertainty of the measurement process. The formula used for Standard Uncertainty is:

U = standard uncertainty
CMC = Calibration and Measurement Capability of the Laboratory Performing the Calibration or the Reference Laboratory
K = The Coverage Factor for 95 % confidence
Res = Resolution of the device being calibrated or the UUT (Unit Under Test)
Rep = Repeatability of the Unit Under Test
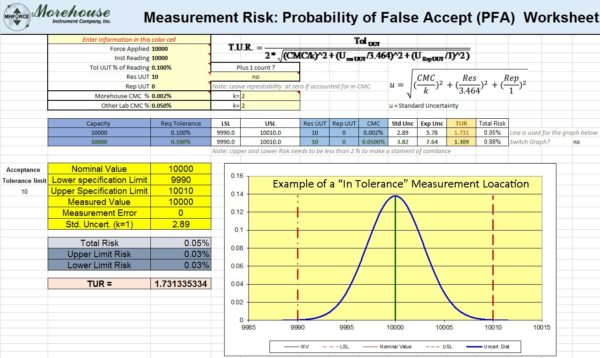
Example 1 above shows an instrument within the specified upper and lower specification limits when the uncertainty of the measurement is considered. A good location is often the key to ensuring your devices are within tolerance. In this example, the tolerance was ± 10 lbf, and the instrument read 10,000 lbf when 10,000 lbf was applied. The standard uncertainty for the calibration was 2.89 lbf. The calibration laboratory can say the instrument passes.
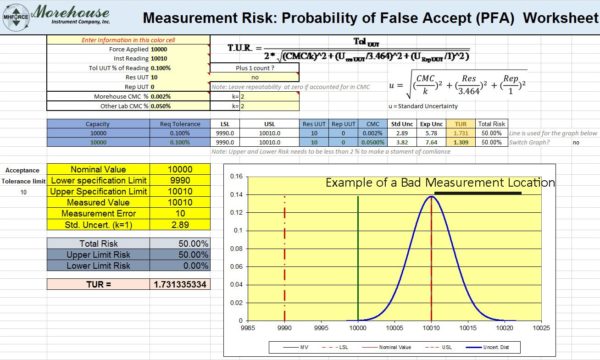
Example 2 above shows an instrument outside the upper specification limits when the uncertainty of the measurement is considered. A bad location is going to increase your measurement risk. The above graph shows this risk as 50 %. This means that 50 % of whatever this instrument measures will not be “In Tolerance.” In this example, the tolerance was ± 10 lbf and the instrument read 10,010 lbf when 10,000 lbf was applied. The standard uncertainty for the calibration was 2.89 lbf. The calibration laboratory cannot make a statement of compliance or pass the instrument.
These two examples are straightforward as both have the same Test Uncertainty Ratio (TUR), and we have just looked at the risk of moving the location from 10,000 lbf, which produced a 0.5 % risk, to 10,010 lbf, which produced a 0.05 % risk. In this scenario, almost any calibration laboratory must ensure the tested instrument reads as close to nominal. When calculating TUR, the instrument's resolution at 10 lbf becomes the dominant uncertainty contributor.
What happens if we compare two calibration laboratories with two very different Calibration and Measurement Capabilities (CMCs)?
We have a 10,000 lbf load cell with an accuracy specification of 0.05 % of full scale or ± 5 lbf. Two calibration laboratories calibrate the load cell and report the reading at 10,004 lbf. The load cell is within the manufacturer's specified tolerance when nothing else is considered. However, both laboratories are accredited and must comply with ISO/IEC 17025. Either the old 17025 from 2005 or the new ISO/IEC 17025 standard will require the UOM (Uncertainty of Measurement) to be considered. The new version of ISO/IEC 17025 calls out a decision rule as a rule that describes how measurement uncertainty will be considered when stating conformity with a specific requirement.
Let’s look at the risk when Morehouse performs the calibration with deadweight primary standards accurate to 0.0016 % of applied force.
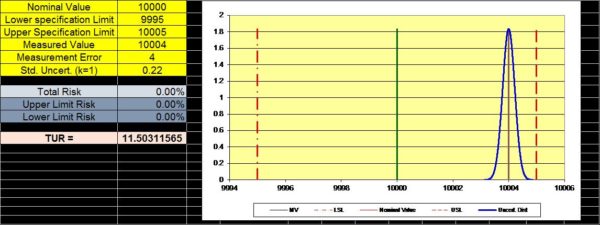
Example 3 Morehouse performs the calibration using deadweight primary standards accurate to 0.0016 %, or 0.16 lbf at 10,000 lbf. The specification is % 0.5 of applied force, and at 10,000 lbf this equates to ± 5 lbf. The measured value is 10,004.0 lbf, and the device has a resolution of 0.1 lbf. The repeatability was very good at 0.2 lbf as a Morehouse shear web load cell was used. The calibration laboratory can say the instrument passes.
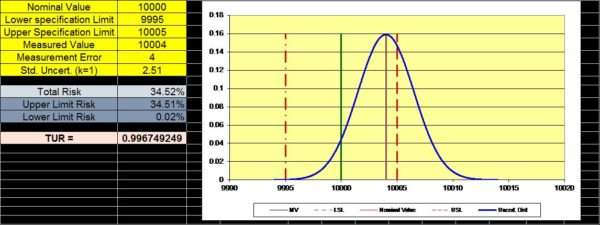
Example 4: A secondary standard or a different laboratory performs the same calibration using standards accurate to 0.05 %, or 5 lbf at 10,000 lbf. The specification is % 0.5 of applied force, and at 10,000 lbf, this equates to ± 5 lbf. The measured value is 10,004.0 lbf, and the device has a resolution of 0.1 lbf. The repeatability was very good at 0.2 lbf as a Morehouse shear web load cell was used. (Note: The lab with 0.05 % CMC is most likely going to have worse repeatability, but we are choosing to keep that constant for this example) The calibration laboratory cannot say the instrument passes.
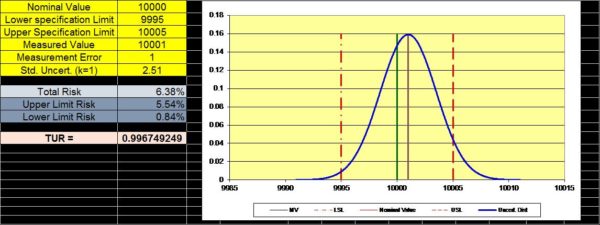
Example 5 The secondary calibration laboratory adjusts the reading, so the instrument reads 10,001.0 lbf.
In conclusion, when thoroughly analyzing measurement risk and making statements of compliance, the Total Risk is 0.00 % when using Morehouse and 34.52 % compared to most secondary laboratories. Even if the secondary lab adjusts the location of the measurement to 10,01.00 lbf, there is still a risk of 6.38 %. Several laboratories may report a measured value within manufacturers' tolerance specification, but not considering the uncertainty of the measurement will not allow them to make a statement of compliance. All laboratories must consider the measurement location and the measurement uncertainty before telling their end customers the device is “InTolerance.” Laboratories failing to properly report risk properly are propagating bad measurement practices and putting you and your tests or calibration at risk.
You can input your data into our PFA Calculator to calculate your actual risk. If you have any questions or would like us to review a calibration certificate, we would be happy to help. Morehouse is passionate about making good measurements and ensuring your needs are met.
Watch our video Minimize your Force and Torque Measurement Risk to learn more.
Location of the measurement - Conclusion
If you enjoyed this article, check out our LinkedIn and YouTube channels for more helpful posts and videos. Elevate your calibration skills with the Morehouse Metrology Mastery Series, a free weekly email calibration training campaign for metrology professional development. Whether you're a metrology novice or a seasoned professional, these short, insightful emails are designed for a practical 10 minutes of calibration training and metrology professional development from Tuesday through Thursday. Each email provides valuable insights that contribute to your metrology professional development and helps you learn more about metrology, empowering you to enhance your force and torque calibration expertise at your own pace.
We believe in changing how people think about force and torque calibration in everything we do. Morehouse believes in thinking differently about force and torque calibration and equipment. We challenge the "just calibrate it" mentality by educating our customers on what matters and what causes significant errors and focus on reducing them. Morehouse makes our products simple to use and user-friendly. And we happen to make great force equipment and provide unparalleled calibration services.
Wanna do business with a company that focuses on what matters most? Email us at info@mhforce.com.
#Location of the measurement


