What is My Load Cell Accuracy?
At Morehouse, we are frequently asked about Accuracy, with a question such as “What is the accuracy of this system you offer for sale?” or "What is the load cell accuracy?" At first glance, it should be an easy question to answer, and, indeed, we could simply give a glib answer of “Our load cell accuracy is 0.005 % of full scale.” However, there are so many variables to consider related to load cell accuracy that giving this throwaway answer sets the wrong expectations.
Morehouse recommends systems based on an understood requirement and where the end-user can control certain conditions. We must understand the application and know the customer’s expectations. Only when we know these parameters can we correctly provide a complete system with the right indicator and appropriate adapters. To further clarify, below is a detailed explanation based on these basic premises and ground rules:
- The definition of Accuracy per the VIM.
- You cannot have a system that is more accurate than the reference standard used to calibrate it.
- Agreement on the calibration method for portability of the data.
- Other manufacturers may overpromise and underdeliver.
The Definition of Accuracy per the VIM
The current draft of the International Vocabulary of Metrology (VIM) defines Measurement Accuracy as “the closeness of agreement between a measured value and a reference value of a measurand.”[1] The VIM then states that Accuracy can be interpreted as the combination of measurement trueness and measurement precision.
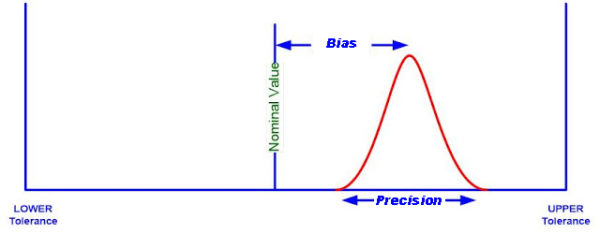
Figure 1: Measurement Accuracy Expressed Graphically
Simply put, Accuracy is how close the system is to the nominal value (measurement trueness) and how well the system repeats (measurement precision). The above graph gives a graphical representation of this explanation. For example, if we had a 10,000 lbf load cell and the accuracy specification was ± 0.05 % of full scale, then we should expect the system to read 10,000 ± 5 lbf when used under the same calibration conditions, and that specification should be repeatable.
Repeatability, or how well it repeats, is defined in the VIM as “it repeats when the same procedure, operators, system, operating conditions, location, and force machine are used.”[1] This definition is what makes defining Accuracy difficult. Force is mechanical, and the interactions of different equipment and different loading conditions can significantly affect the output and Accuracy of the force-measuring system. Therefore, we need to understand the application, know the expectations, and provide the complete system with the appropriate indicator and adapters.
You Cannot Have a System that is More Accurate than the Reference Standard Used to Calibrate it
Common sense says that the reference standard must be more accurate and repeatable than the system it is being used to calibrate. There are many international standards that document these calibration procedures and calculations, which subsequently allow the portability of test data, along with laboratory accreditation groups that keep everyone honest.
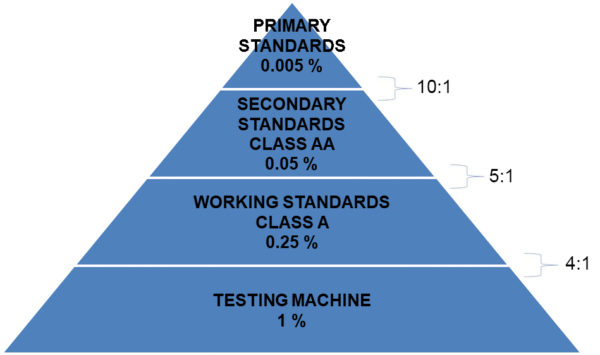
Figure 2: ASTM E74 Pyramid of Ratios
International calibration standards agree on the factors and levels of accuracy, which are depicted here. Any accredited calibration laboratory should have a scope, and their measurement capability should be listed using the classifications shown here.
However, things are not always what they appear to be, and you need to know what to look for in these certs and promises. For example, let us look at three labs:
- The way it should be - using an actual calibration laboratory as the example
- Barely acceptable - using a hypothetical laboratory
- Disaster - using a hypothetical laboratory
In these examples, we will demonstrate measurement risk taking into account the measurement uncertainty. The examples demonstrate why the reference standard uncertainty matters as far as capability is concerned.
Here are three examples of what happens at various levels of load cell accuracy from Morehouse at 0.0016 %, Calibrations “R” Us at 0.04 %, and Malarkey Calibration at 0.1 %.
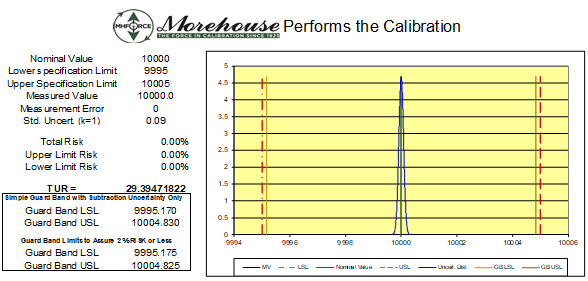
Figure 3: Load Cell Accuracy when Morehouse Does the Calibration with Primary Standards
When a 10,000 lbf force-measuring system has a specification of ± 5 lbf or 0.05 % of full scale, applying generally accepted compliance decisions, Morehouse can “pass” the instrument if the reading is between 9,995.170 and 10,004.825. This is a significantly larger window to say an instrument is good when compared with other calibration laboratories that use secondary standards. They use standards that are typically 10-20 times less accurate.
The second laboratory with the 0.04 % capability can only “pass” the instrument when it reads almost perfectly between 9,999.108 and 10,000.892.
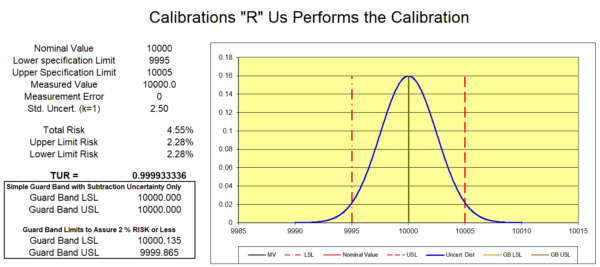
Figure 4: Load Cell Accuracy when a Lab Using Load Cells as Standards Does the Calibration
Lastly, we have the disaster when a device is submitted to a laboratory that does not have the capability. They “calibrate” the device where the expectation is ± 5 lbf, but the best they can do is ± 10 lbf. Their graph shows that 31.73 % of the curve will be outside of the specification limit at the absolute best case. This means the customer must accept an absurd amount of risk. The risk to the end-user of this equipment is high, as is the likelihood of future lawsuits, mass recalls, enormous amounts of rework or scrap, and worse still, a seriously tarnished reputation for quality.
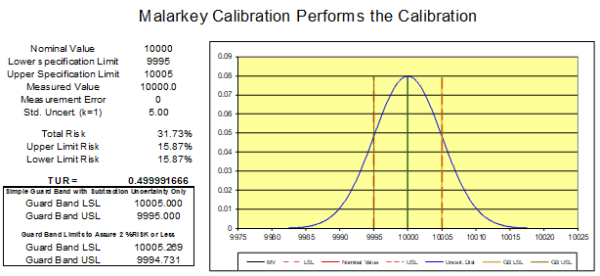
Figure 5: Load Cell Accuracy when a Lab Using Load Cells as Standards Calibrated by Other Load Cells Does the Calibration
Agreement on the Calibration Method for Portability of the Data
We will keep this simple by limiting our analysis to the two most common types of calibration:
- Calibration following ASTM (American Society for Testing & Materials) E74
- Commercial type of calibration consisting of a 5 to 10 pt. calibration, known as the non-ASTM method
Morehouse Load Cells and Accuracy with ASTM E74 Calibration (What Matters to Determine the Accuracy of My Load Cell)
The specifications of our Ultra-Precision Load Cell state that they are accurate to 0.005 % of full scale, meaning that the ASTM LLF (lower limit factor, which is the expected performance of the load cell) is better than 0.005 % of full scale. However, this is only one component to the much larger Calibration and Measurement Capability Uncertainty parameter (sometimes referred to as CMC). When the load cell is under the same conditions that Morehouse used for calibration (same adapters, application with a machine that is just as plumb, level, square, rigid, has low torsion, and other repeatability conditions), it is expected to perform better than 0.005 % of full scale.
On a 10,000 lbf load cell, the expected performance is better than 0.5 lbf (10,000 * 0.005 %). Therefore, at the time of calibration, the load cell’s expected performance will be better than 0.005 % or 50 parts per million. This is much different than calling it load cell accuracy.
Morehouse Load Cells and Accuracy with Non-ASTM Calibration
We know from the accreditation requirements that when we test a good force-measuring system in our machine, it will repeat. We have done countless tests and incorporated these into our CMC uncertainty parameter. When we perform calibrations, we report the measurement uncertainty and take it into account.
Thus, when we set the specification, it includes our measurement uncertainty at the time of calibration. That uncertainty captures the repeatability conditions well. The uncertainty is also quite low in almost all cases below 120,000 lbf of Force. The uncertainty is 0.002 % of applied Force or better because Morehouse Deadweight Primary Standards are the most accurate force machines.
Other Manufacturers May Overpromise and Underdeliver
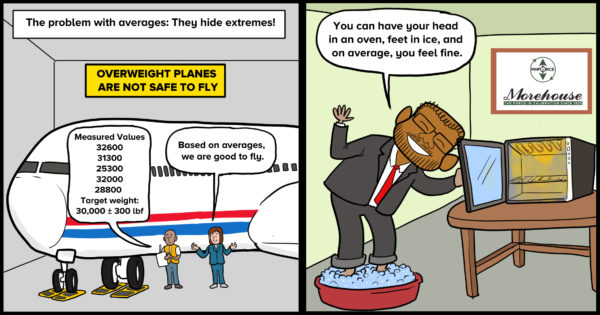
Figure 6: Averages Hide the Extremes
Morehouse will not overpromise and underdeliver a solution. However, other manufacturers have different methods to test their devices. Some are conservative, others not so much. Morehouse has been around long enough to hear and witness countless customer stories. Often it is too late because the end-user has bought a device and been promised an accuracy that no other calibration laboratory can meet. These over-promising suppliers simply do not understand metrology and consequently promote terrible, often impossible, measurement practices. Some notable examples include:
- Averages are used to specify a tolerance. Figure 6 above shows a plane being weighed. Not all the values are within the target weight, but based on the average (30,000 lbf), all is good since the target has not been breached.
- The simple, more economical way is easier than doing things the right way. It is easy to say you can do things, apply some force, and report results without clearly knowing its use. This is clearly an exploitation of the customer.
- The resolution is equal to Accuracy. This is a large complex issue with respect to conformity assessment and uncertainty. We have many published papers on Measurement Risk and TUR (Test Uncertainty Ratio).
- Using a specification of non-linearity for Accuracy. The problem is that this does not include critical factors such as the meter, reference standard, adapters, and everything that impacts the measurement results.
- Not considering the location of the measurement when making conformity assessment a “pass” or a “fail”.
What is My Load Cell Accuracy? - Conclusion
Morehouse believes in educating our customers and providing tools to help them improve their quality and reputation. We hope through this article on load cell accuracy that you can see that accuracy values and calculations are far more complex and involved, deserving of a more thorough explanation than “our system is accurate to 0.005 % of full scale.”
We want more people to start thinking about the meaning of Accuracy and start having their equipment calibrated using the ASTM E74 standard, with the appropriate adapters and indicators, and performed by labs such as Morehouse that can make the compliance decisions in line with ISO/IEC 17025. We want to provide equipment that exceeds expectations and educate you on why measurement accuracy is not as simple as some would like you to believe it to be. Once we all understand the issues, Morehouse will help you find the appropriate solution and help you answer "What is the accuracy of my load cell?".
References
[1] International vocabulary of metrology – Basic and general concepts and associated terms (VIM), section 3.15
#load cell accuracy


