

How to Get the Most Out of Your Load Cell with an ASTM E74 Calibration: A Simplified Guide for Novice and Maybe Experienced Users (Yikes).
First Things First: What Is a Load Cell?
Think of a load cell like a really precise digital scale built into a machine. When you push or pull on it, it measures that force and sends a number to a display. Engineers use load cells in everything from testing how strong a bridge bolt is to making sure an aircraft part won't break.
But here's the thing — if your load cell isn't calibrated correctly, the numbers it gives you could be wrong. And wrong numbers in engineering mean unsafe products, failed tests, and wasted money.
That's where ASTM E74 and Morehouse Instrument Company come in.
What Is ASTM E74 and Why Does It Matter?
ASTM E74 is the official standard for calibrating a load cell in North America. Think of it like the rules of a science fair; everyone follows the same process, so the results can be trusted and compared.
Other important standards that depend on ASTM E74 include:
- ASTM E4 – used to verify that testing machines (like the ones that crush concrete or stretch metal) are accurate
- ASTM C39 – testing concrete strength
- ASTM E18 – Rockwell hardness testing of metals
In short, if you want trustworthy test results in almost any industry, someone upstream had to follow ASTM E74 to calibrate the load cell used in that process.
The Calibration Pyramid: Who Calibrates What?
Imagine a pyramid of accuracy:
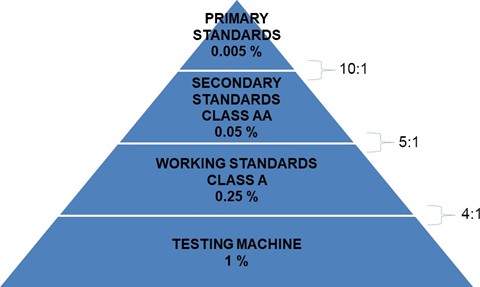
- Primary Standards are typically quite large and expensive, precisely known deadweights (actual physical weights). Morehouse uses a fully automated deadweight machine capable of uncertainty as low as 0.0008%. That's incredibly accurate, like measuring the length of a football field and being off by less than the width of a fingernail.
- Secondary Standards (Class AA) are load cells calibrated by those deadweights.
- Working Standards (Class A) are calibrated by Secondary Standards and are used to calibrate the machines in your lab.
- Testing Machines are what your engineers actually use day-to-day.
Important: Only labs that have deadweights (Primary Standards) can assign a Class AA range. If a lab only uses another load cell to calibrate yours, they cannot legally assign a Class AA rating. Watch out for this!
What Is the ASTM LLF and Why Should You Care?
The Lower Load Limit Factor (LLF) —a statistical estimate of the error in forces computed from the calibration equation of a force–measuring instrument when the instrument is calibrated in accordance with these practices.
Or simply, it is the number that determines the lowest force your load cell can reliably measure after calibration.
- Class A: usable range starts at 400 × LLF or Instrument Resolution, whichever is higher
- Class AA: usable range starts at 2,000 × LLF or Instrument Resolution, whichever is higher
Example: If your LLF = 0.05 lbf, then:
- Class A range starts at: 400 × 0.05 = 20 lbf
- Class AA range starts at: 2,000 × 0.05 = 100 lbf
The better (lower) the LLF, the wider the useful range of your load cell. A shear web load cell from Morehouse will typically have a much lower LLF than an S-beam cell, meaning it's more useful over a wider range of forces.
Before Calibration: Setting Up for Success
Getting the best calibration requires preparation. Here's what Morehouse recommends:
- Let Everything Stabilize
- Allow 24 hours for the load cell and room to reach a stable temperature
- Warm up your electronics for 15–30 minutes before taking readings
- The ideal temperature is 23°C (73°F). If you're not at that temp, corrections need to be applied
- Exercise the Load Cell First
- Before calibration, load the cell to its full capacity a few times (we find 3-5 times is sufficient, even though the standard only requires 2).
- Why? A load cell that hasn't been "warmed up" with force can show errors up to 0.01 % or more just from sitting idle
- Skipping this step is like sprinting without stretching; you likely won't perform your best, and if you're older like some of us, you may hurt yourself!
- Use Enough Calibration Points
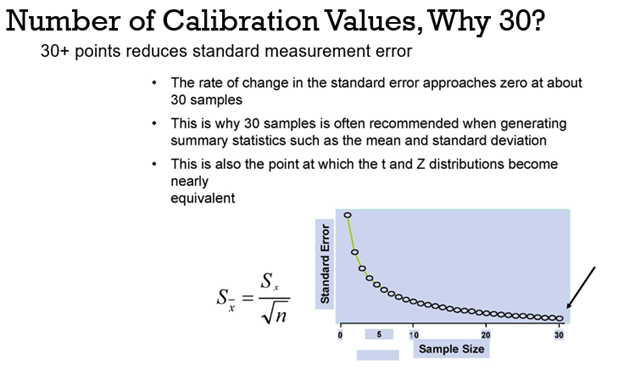
- ASTM E74 requires a minimum of 30 data points
- More points = a better mathematical fit = more trustworthy results
Ascending vs. Descending: Don't Skip the Down Direction
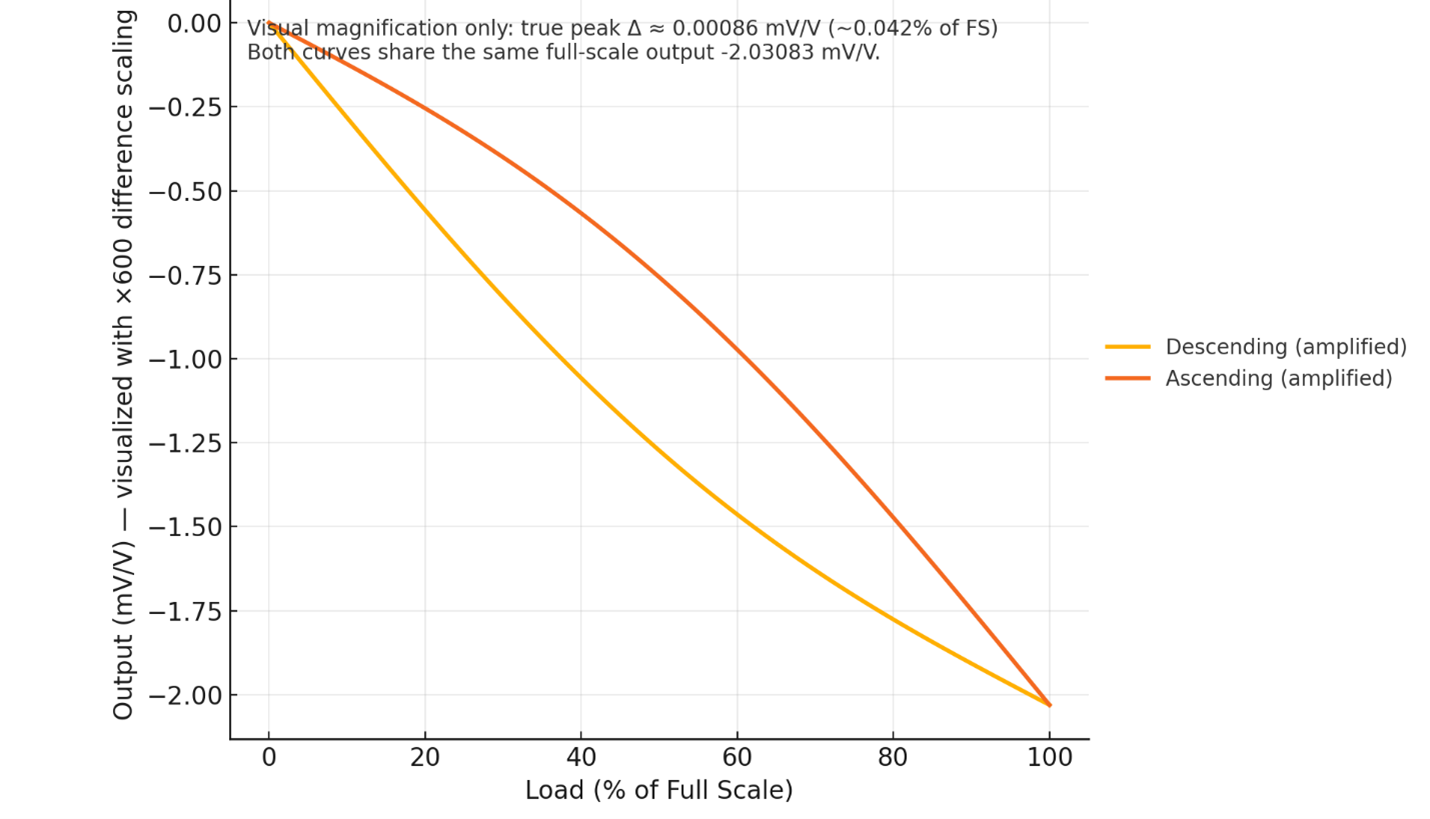
This is one of the most commonly overlooked mistakes in load cell calibration.
When you load a load cell going up (adding force), the reading can be slightly different than when you come back down (removing force). This is called hysteresis.
- If your application ever measures force while the load is decreasing, you must calibrate with a descending curve too
- A single ascending-only calibration can produce an error of up to 0.042% if you're using the cell in both directions
- Separate ascending and descending curves give you lower uncertainty; a combined curve gives you a higher (worse) standard deviation

Note: The difference in output on an ascending curve versus a descending curve can be significant. A particularly good 100K load cell had an output of -2.03040 on the ascending curve and -2.03126 on the descending curve. Using the ascending-only curve would result in an additional error of 0.042 %.
Load cells from five different manufacturers were sampled, and the results are recorded above. The numbers varied from 0.007 % (shear web type cell) to 0.120 %. On average, the difference was approximately 0.06 %.
Six of the seven tests were performed using deadweight primary standards, which are accurate within 0.0016 % of the applied force.
The conclusion from these tests is clear: If a load cell calibrates both ascending and descending forces, it must be calibrated in both modes.
Tell Morehouse how you plan to use the load cell. We will calibrate using the adapters and modes (ascending, descending, compression, tension, or any combination) that match your real-world application.
Alignment: Keep the Force Straight
Imagine trying to weigh something, but you're pushing the scale sideways instead of straight down. You'd get a wrong reading.
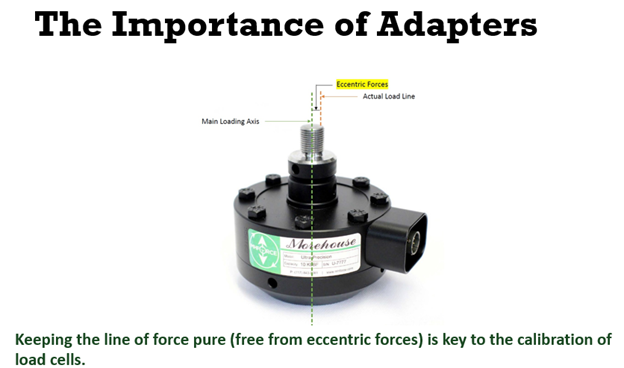
The same thing happens with load cells. Misalignment is a major source of error.
- For compression (pushing): use a flat load pad and make sure the surface is smooth and flat
- For tension (pulling): use adapters with a spherical seat to eliminate bending forces
- Morehouse found that a manually aligned setup had a standard deviation of 0.1 lbf with max deviation of 0.2 lbf, while a properly aligned setup using adapters had 0 deviation
Misalignment in an S-beam load cell can cause 0.75 % error. The same misalignment in a Morehouse Shear Web cell? Just 0.0022 %. That's roughly 340 times better.
Rotate the Load Cell During Calibration
Don't just push or pull straight down in one direction. Rotate the load cell to at least 3 positions (0°, 120°, 240°) during calibration. This:
- Randomizes the loading conditions, such as any uneven spots in the machine or load cell mounting
- Catches errors you'd miss with a single-direction test
- Is required by ASTM E74 for a proper calibration
Note: A load cell performs best when it is installed in a load path that is truly aligned and mechanically stable, meaning it is plumb, level, square, and rigid with minimal twisting. In that condition, the force is applied mainly along the intended axis, so the load cell output is more repeatable and accurate. If any of these conditions are compromised, the setup can introduce side loading, bending, or torque, which can increase variation and apparent error beyond what the load cell can achieve on its own.
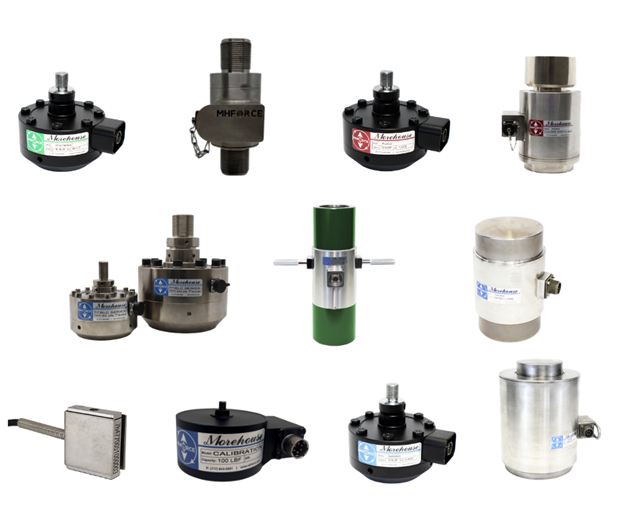
Use the Right Load Cell for the Job
Not all load cells are created equal. Here's a quick cheat sheet:
| Load Cell Type | Best For | Watch Out For |
| Shear Web | Lab and field standards, ASTM E74, Class A/AA calibrations | Gets heavy above 100,000 lbf |
| Column | Very high forces (millions of lbf), compact size | More sensitive to off-axis loading |
| S-Beam | General measurement, tension and compression | Very sensitive to misalignment |
| Button/Pancake | Tight spaces, compression only | Requires very flat, smooth surfaces |
For ASTM E74 calibration work, Morehouse recommends shear web load cells for 100 lbf through 100,000 lbf applications. They're more accurate, more stable, and less sensitive to side forces.
Keep Your Indicator (Display) Consistent
Your load cell talks to an indicator that displays the force reading. This is often overlooked, but it matters a lot.
- The easiest path is to always use the same indicator that was used during calibration
- If you swap indicators, you introduce additional measurement uncertainty
- The replacement indicator's uncertainty must be less than 1/3 of the total system uncertainty
Think of it like this: If you calibrate a thermometer using one voltmeter, but then measure with a different voltmeter, your readings might shift. Same principle here.
✅ The "Never Do" List
To avoid ruining your calibration, never:
- ❌ Assign Class AA ranges unless you used deadweight Primary Standards
- ❌ Start the verified range below your first non-zero calibration point
- ❌ Skip descending calibration if you measure forces in the decreasing direction
- ❌ Use only part of the calibrated range regularly without exercising to full capacity
- ❌ Re-zero a load cell after an overload and assume it's fine (overloading causes permanent damage)
- ❌ Swap out cables without verifying them with a transducer simulator
- ❌ Use mass weights (like gym weights) to calibrate a force device without converting to force units — the error can be up to 0.53%
What to Tell Morehouse Before Your Calibration
To get the best possible calibration from Morehouse, tell us:
- What forces you plan to measure (minimum and maximum)
- Whether you'll be loading up, down, or both (ascending only, or also descending)
- The indicator you'll use in the field (so they can calibrate the whole system together)
- How you load the cell, adapters matter!
- Whether you need Class A or Class AA (depends on your application)
Summary: Your "A+ Calibration" Checklist
| Step | What to Do |
| ✅ Warm-up | 24 hrs for temperature, 15–30 min electronics |
| ✅ Exercise | Load to full capacity several times before calibration |
| ✅ Points | Use 30+ calibration points |
| ✅ Direction | Tell Morehouse if you need ascending AND descending curves |
| ✅ Alignment | Use proper adapters; keep the force straight |
| ✅ Rotation | Rotate load cell to 0°, 120°, 240° during calibration |
| ✅ Indicator | Use the same indicator for calibration AND field use |
| ✅ Range | Don't use the load cell below the verified range |
| ✅ Standards | Make sure your lab uses Primary (deadweight) standards for Class AA |
Whether you're calibrating a 50-lbf force gauge or a 5,000,000-lbf universal calibrating machine, following ASTM E74 correctly and working with a qualified lab like Morehouse is the difference between a measurement you can trust and one that only looks right. And that one that doesn’t look right is eventually going to cost you a lot of money in rework or damaged reputation.
About Morehouse
We believe in changing how people think about Force and Torque calibration in everything we do, including how to get the most out of your load cell.
This includes setting expectations and challenging the "just calibrate it" mentality by educating our customers on what matters and what may cause significant errors.
We focus on reducing these errors and making our products simple and user-friendly.
This means your instruments will pass calibration more often and produce more precise measurements, giving you the confidence to focus on your business.
Companies around the globe rely on Morehouse for accuracy and speed.
Our measurement uncertainties are 10-50 times lower than the competition, providing you with more accuracy and precision in force measurement.
We turn around your equipment in 7-10 business days so you can return to work quickly and save money.
When you choose Morehouse, you're not just paying for a calibration service or a load cell.
You're investing in peace of mind, knowing your equipment is calibrated accurately and on time.
Through Great People, Great Leaders, and Great Equipment, we empower organizations to make Better Measurements that enhance quality, reduce risk, and drive innovation.
With over a century of experience, we're committed to raising industry standards, fostering collaboration, helping with understanding risk, and delivering exceptional calibration solutions that build a safer, more accurate future.
Contact Morehouse at info@mhforce.com to learn more about our calibration services and load cell products.
Email us if you ever want to chat or have questions about a blog.
We love talking about this stuff. We have many more topics other than how to get the most out of your load cell.
Our YouTube channel has videos on various force and torque calibration topics here.
# How to Get the Most Out of Your Load Cell

