What can happen when we use an accuracy specification and assume all the measurements are centered in relation to the specification limits? It is a typical problem in the metrology community, where many papers assume a centered process or Measurement.
When the Measurement deviates from the true value, it is said to have a bias (commonly called measurement error). More specifically, measurement bias refers to systematic errors in a measurement or measurement process that consistently cause the measured values to deviate from the true value of the measured quantity. In our examples, we are defining the difference from nominal as a known force measurement error.
Causes Of and Corrections For Measurement Bias
Force Measurement Error or Force Measurement bias can be caused by various factors, such as the design or calibration of the measurement equipment, the skill of the operator, or the conditions under which the Measurement is made. Measurement bias can lead to inaccurate or unreliable calibration and test results, affecting the quality and integrity of the data and leading to incorrect conformity assessments.
Making a conformity assessment might mean the measured value could be anywhere within the specification. In cases of simple acceptance, the measured value could even be at the tolerance limit.
The reason this matters is that when a known bias is ignored, meaning not corrected or not included in the Statement of Measurement Uncertainty on the Calibration Certificate, measurement traceability may not be fully achieved, and all subsequent measurements are suspect.
The location of the Measurement and the force measurement error
Why do we care about the location of the Measurement if the device is within tolerance? If a device has a specification of 0.1 % of full scale and the calibrating laboratory reports a value within 0.1 %, the device is "Within Tolerance," In reality, it depends on all parties being in agreement per contractual requirements (contract review) on how measurement uncertainty is being taken into account via an acceptable and agreed-upon decision rule.
It also depends on the uncertainty of the Measurement and whether the lab performing the calibration followed the proper calculations in evaluating the Uncertainty of Measurement (UOM) when making a statement of conformity.
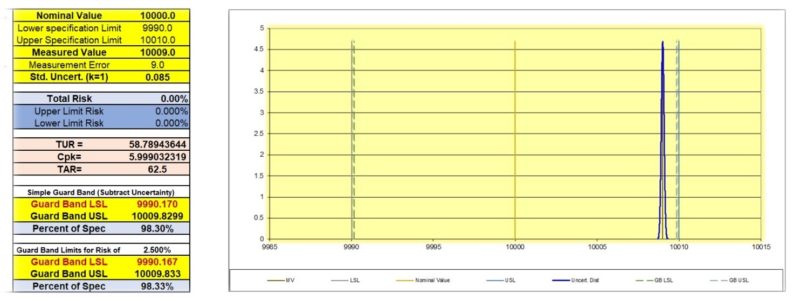
Figure 1: Graph Showing 10 009.0 as the measured value with a 58.789:1 TUR, which is achieved by using a lab with low uncertainties (Morehouse actual example)
Making a conformity assessment of "In Tolerance" is all about location, location, location of the Measurement. It's also about the Uncertainty of the Measurement because anything other than a nominal measurement will significantly raise the risk associated with the Probability of False Accept (PFA).
The probability of a false accept is the likelihood of a lab calling a measurement "In Tolerance" when it is not. PFA is also commonly referred to as consumers risk (β: Type II Error).
The measurement location we are referring to is how close the Measurement is to the nominal value. If the nominal value is 10 000.0 N and the instrument reads 10 009.0 N, the instrument bias is 9.0 N, as shown in Figure 1. The bias is 0.09 % of the measured value or 90 % of the overall tolerance.
The higher the measurement bias from the nominal, the higher the Measurement Uncertainty of subsequent measurements unless the force measurement error is corrected. In Figure 1, if the unit under test becomes the reference standard, and the measurement error is not corrected, future measurements made with this Reference Standard will introduce additional Measurement Risk that is not accounted for in the reported Measurement Uncertainty.
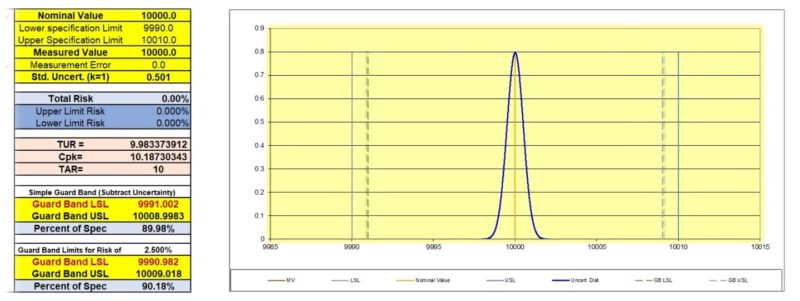
Figure 2: Graph Showing 10 000.0 as the measured value with a 9.98:1 TUR and a Centered Measurement
Introduction to Statistics in Metrology addresses bias (measurement bias) in section 5.2 by stating, "There are important assumptions associated with using TUR as a metric and the requirement of a TUR of 4 or 10. Using a TUR assumes that all measurement biases have been removed from the measurement process and the measurements involved follow a normal distribution. If there are significant biases that cannot be removed, the TUR will not account for the increased risk." [1]
When the process distribution is centered between the specification limits and does not overstate or understate the nominal value of the Measurement, higher TURs produce wider acceptance limits. In comparison, lower TURs, such as 1:1, will reduce acceptance limits.
When the measurement error is corrected, these limits can easily be calculated as a percentage of the specification when the Measurement Uncertainty is known. Acceptance Limits (with the appropriate guard band) based on the decision rule applied are covered in detail in The Metrology Handbook, 3rd edition, Chapter 30. [2]
When the reference standard measurement value is centered (nominal value), the calibration laboratory can still say the tested device is within tolerance. A laboratory's scope of accreditation indicates its best capability to call an instrument in tolerance when any measurement bias is observed in the measurand (quality being measured).
Note: The scope of accreditation does not take into account the measurement uncertainty contribution of the equipment submitted for calibration. The laboratory's scope of accreditation only includes the contribution from the best existing device to be calibrated and may not be what is used for the customer's device submitted for calibration.
In Figure 2, the measured value is centered (nominal value). With the measured value at the nominal, assuming a PFA of 2.5% (based on the decision rule employed), the measurement result is considered to be in conformance ("Pass") as long as it is within the acceptance limits. Please note that the acceptance limits are calculated, taking measurement uncertainty into account and implementing the appropriate decision rule.
Not Correcting for Force Measurement Error (Bias)

Figure 3: Randomly Generated Differences in correcting for Bias and Not Correcting
Figure 3 above shows what could happen when the reference laboratory does not correct for bias and applies 9 991.0 N (10,000.0 – 9.0) versus what could happen when Bias is Corrected.
Bias Not Corrected Measured values are generated using Upper and Lower Specification Limits that are modified by the 9.0 N bias taking into the Measurement Uncertainty at each tier.
Remember: When 10 000.0 N was applied, the device read 10,009 N. When the laboratory only loads the device to 10 000.0 N, 9 991.0 is the actual force applied.
In this scenario, not correcting for bias can result in making an incorrect conformity statement when stating conformity to the Tolerance/specification limit (e.g., pass/fail, in-tolerance/out-of-tolerance)
When the known systematic measurement error is not corrected, a conformity statement of "Fail" might result in the calibration laboratory adjusting an instrument that should have passed calibration to the wrong nominal value.
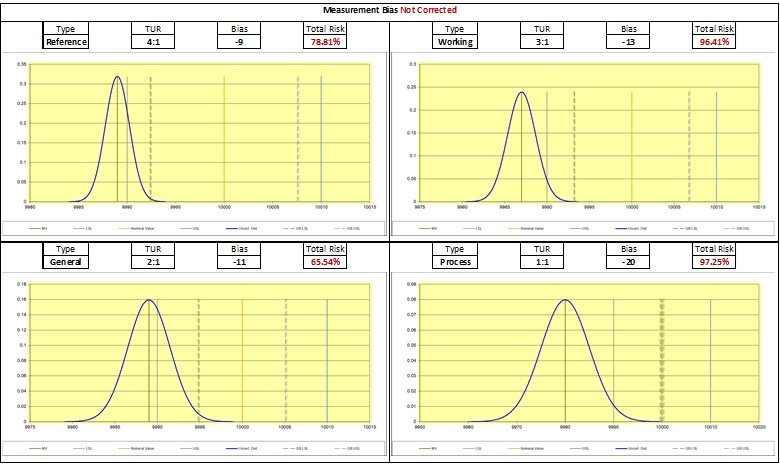
Figure 4: Randomly Generated Differences in not correcting for bias total risk graph
When we get to the process measurement, the device might have a bias of -20 N from nominal. In our simulation using the measurement uncertainty at each tier, a starting measured value of 9 991.0, and randomly generating numbers within the tolerance of 0.1 %, we prove that not correcting for the force measurement error at the 10 000.00 test point raises the total risk at each measurement tier.
When the bias is not corrected, the starting measured value is 9 991.0; the difference becomes 9 N or 9/10th of the specification limits of ± 10 we are trying to maintain throughout the process with our TUR ratios. (For these graphs, bias is the difference from the nominal value, measured value minus the nominal value)
If Primary Standards calibrate the Reference with a 58.79:1 TUR (Shown in Figure 1), the total risk is 0.0 %. When the next level uses this Reference, if they correct for bias, the risk with a 4:1 TUR is 0.0 %, as shown in Figure 5. If they do not correct the force measurement error, as shown in Figure 4, the risk is 78.81 %. Randomly generating numbers and not correcting for measurement error at a 2:1 TUR, the total risk becomes 65.54 %, compared to 0.0 % when measurement error is corrected in Figure 5.
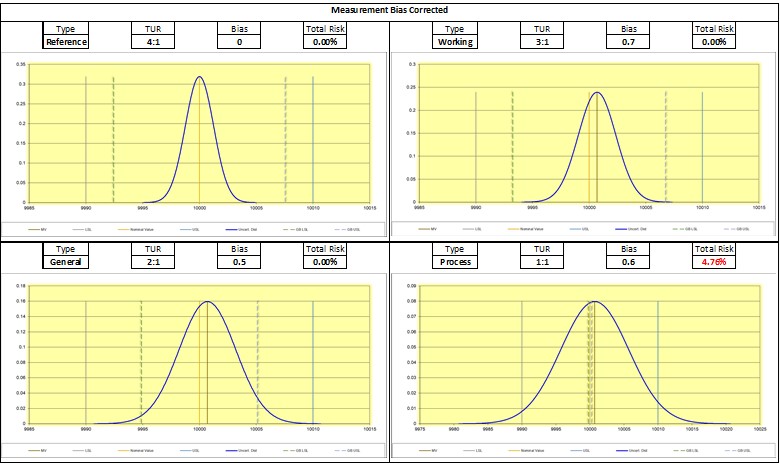
Figure 5: Randomly Generated Differences in correcting for Bias total risk graph
Figure 5 shows randomly generated numbers assuming each tier from the Reference tier to the General calibration tier is correcting for bias. In each scenario, the measurement risk is drastically different.
The larger the measurement uncertainty becomes, the greater the measurement risk. When the bias is corrected, the total risk can decrease drastically.
What happens when we switch calibration providers?
What if we switched calibration providers, for whatever reason, to someone with a higher calibration and measurement capability uncertainty parameter?
Switching calibration providers may make sense for several reasons. However, if one does not understand the relationship between measurement uncertainty, decision rules, and acceptance limits, shopping on price alone might mean more failed measurements.
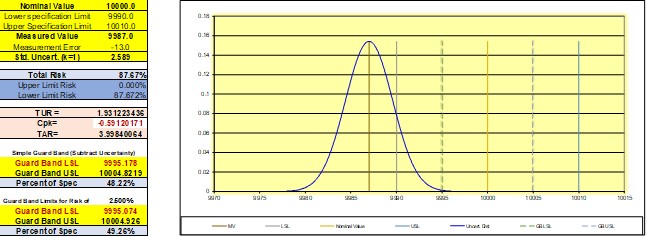
Figure 6: Graph Showing what happens if we do not correct for the + 9 N bias
If the new calibration provider does not correct for any known force measurement error and has a higher Measurement Uncertainty, the overall risk on the customer’s instrumentation submitted for calibration could be extremely high, as shown in Figure 6.
More failed Measurements often result in higher costs and increased risk to companies and their customers. These decisions should not be made without adequately evaluating the supplier's capabilities and reputation. The recommendation for overall risk reduction is to use accredited calibration suppliers with low uncertainties appropriate to the risk tolerance.
Force Measurement Error (Bias) Conclusion
Using the manufacturer's accuracy specification and not correcting for known force measurement errors can further increase Measurement Risk. Morehouse did the sampling by varying the TUR and using randomly generated values after the initial calibration by correcting for the measurement error and then by not correcting for the force measurement error, which showed a significant difference in Measurement Risk.
Not correcting for the force measurement error seems to be a problem many in the calibration deal with. Their unsuspecting customers are likely getting calibrations that carry too much overall Measurement Risk.
The risk of not correcting for this offset (Bias) should concern anyone making measurements.
In all cases, paying attention to the location of the Measurement and calculating Measurement Risk is imperative to making accurate measurements.
Anyone wanting more accurate measurements (with less Measurement Uncertainty) should have a defined process to account for and correct known force measurement errors. They should also examine their calibration providers' practices in handling and correcting their force measurement errors.
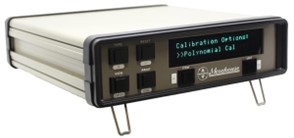
Figure 7: Morehouse 4215 Plus that Uses Coefficients to Reduce Force Measurement Error (Bias)
Morehouse has many options with our force calibrations systems that use coefficients generated during calibration. Our 4215 plus and C705P use coefficients programmed into the indicator to help correct and minimize force measurement errors.
The reason this is important is JCGM 106 references that when a measuring system is used in conformity assessment that, the measuring system has been corrected for all recognized significant systematic errors (Bias) [3]
When known force measurement errors are not corrected, the risk of making a measurement that does not correctly account for these measurement errors can result in an underestimation of measurement uncertainty and therefore disagrees with the metrologically traceability definition and undermines measurement confidence.
Contact Morehouse
If you have more questions about Morehouse products, need adapters, load cells, calibration, or other questions, don't hesitate to get in touch with us @ 717-843-0081 to talk to a live person or email mailto:info@mhforce.com. Visit us on the web at mhforce.com.
Do you want to read our complete paper on the risk of not correcting for Force Measurement Error? Please download our Measurement Bias Paper Here.
#Force Measurement Error
If you enjoyed this article, check out our LinkedIn and YouTube channel for more helpful posts and videos.
References
- Introduction to Statistics in Metrology Section 5.2
- The Metrology Handbook, 3rd edition, Chapter 30
- JCGM 106:2012_E clause A.4.3.3 "Evaluation of measurement data – The role of measurement uncertainty in conformity assessment."


