Guidance on Uncertainty Budgets for Force Measuring Devices Part 2. Calculating Uncertainty in Accordance with ASTM E74 Standard
Calculating Uncertainty in accordance with ASTM E74 Standard Background:
ASTM E74 Standard Practice of Calibration of Force-Measuring Instruments for Verifying the Force Indication of Testing Machines is the standard followed by many in North America for the calibration of Proving Rings, Load Cells, Limited Load Devices, and other force-measuring devices. The standard has an appendix X1 titled SAMPLE MEASUREMENT UNCERTAINTY ANALYSES FOR PRIMARY AND SECONDARY FORCE CALIBRATION METHODS.
The problem with the appendix is it is outdated in that it does not closely follow the “Guide to the Expression of Uncertainty in Measurement," JCGM 100:2008, and does not show the end-users how to calculate the appropriate coverage factor based on degrees of freedom. The ASTM E74 appendix does not align with ILAC Policy for Uncertainty in Calibration ILAC P-14 which can be a problem for any accredited calibration laboratory.
The purpose of this post is to combine the ASTM E74 calibration method, ILAC P-14, and JCGM 100:2008 together to help labs calculate measurement uncertainty per point throughout the loading range with the appropriate coverage factor k to meet their accreditation requirements.
Any accredited laboratory will have to calculate measurement uncertainty properly to correctly calculate their Calibration and Measurement Capability (CMC) f their scope of accreditation.
Note: Morehouse has created an Excel spreadsheet to help labs calculate their CMCs. This Excel sheet can be downloaded @ http://www.mhforce.com/Files/Support/249/CMC-CALCULATIONS-FOR-FORCE-MEASUREMENTS.xlsx
Types of Force Standards and Test Accuracy Requirements

Deadweight force standard machines – See Primary Standard. Reference Euramet cg-4 for uncertainty contributors and guidance on calculating uncertainties for deadweight force machines.
Lever amplification force standard machines - In a lever amplification machine, a deadweight force is amplified using one or more mechanical lever systems, increasing the force by a factor approximately equal to the ratio of the lever arm lengths. Where the traceability of this larger force is directly derived from SI units. Reference Euramet cg-4 for uncertainty contributors and guidance on calculating uncertainties for Lever amplification force standard machines
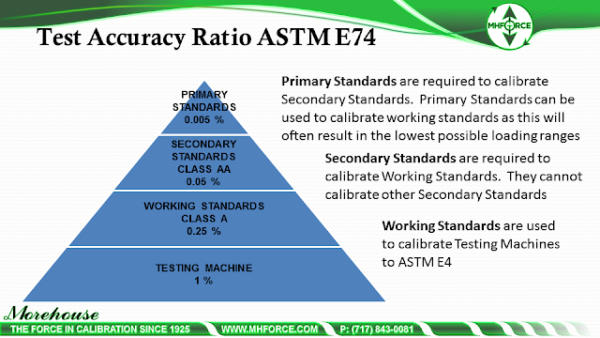
Primary Standard – Per ASTM E74 a deadweight force applied directly without intervening mechanisms such as levers, hydraulic multipliers, or the like, whose mass has been determined by comparison with reference standards traceable to national standards of mass. Note: Weights used for force measurement require the correction of the effects of Local Gravity, Air Buoyancy and must be adjusted to within 0.005 %.
The uncertainty budget for the machine also needs to consider possible force-generating mechanisms other than gravity and air buoyancy, including magnetic, electrostatic, and aerodynamic effects.
Secondary Standard – Per ASTM E74 an instrument or mechanism, the calibration of which has been established by comparison with primary force standards. These can be lever machines, hydraulic machines with load cells or proving rings used as the reference, or similar screw-type machines.
Common Misconceptions about the ASTM E74 Standard
Zero can be used as the first calibrated test point - If a lab is using zero as a calibrated test point, they are violating the standard. Refer to sections 8.6 and 7.2.1 of the ASTM E74 standard for requirements on the first calibrated test point.
A Class AA loading range can assign another Class AA loading range – Class AA devices can only assign a Class A verified range of forces. If a laboratory assigns Class A verified range of forces, their reference standard must be calibrated using deadweight primary standards. Likewise, a Class A device cannot be used to Assign another Class A verified range of forces.
A Calibration interval of more than two years is acceptable – ASTM specifically states two years will be the maximum interval and it will only be for devices meeting the stability criteria. Devices not meeting the stability criteria will have to have their intervals shortened to ensure they meet the criteria. This could be 16 months, 12 months, 5 months, or even 3 days if the device is just not stable to meet the criteria outlined in section 11.
Measurement Uncertainty

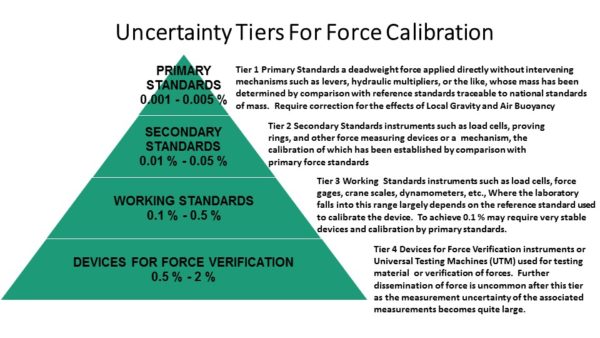
All force measurements are traceable to SI Units of time, length, and mass. The progression of traceability for force is primary deadweight standards which have the lowest uncertainties between 0.001 % to 0.005 % of the applied force.
Primary Standards are required to calibrate Secondary Standards such as load cells, proving rings, and other force-measuring devices. The uncertainties at this level are generally between 0.01 % to 0.05 % of the applied force. To achieve less than 0.025 % is extremely difficult and calls for the utmost control of environmental, adapters, and other loading conditions. Most labs will fall between 0.03 % to 0.05 % of the applied force.
Either Primary or Secondary Standards can be used to calibrate force-measuring devices referred to as working standards. The working standards can be force measuring devices such as load cells, force gages, crane scales, dynamometers, etc., Working standards typically have uncertainties of 0.1 % through 0.5 % of the applied force.
Where the laboratory falls into this range largely depends on the reference standard used to calibrate the device as well as calibration equipment, adapters, and environmental conditions. To achieve 0.1 % may require very stable devices and calibration by primary standards.
Devices for Force Verification – These devices typically have 0.5 % or higher uncertainties. They are used to verify the force applied. The most common example would be a force testing machine where material samples are tested with an uncertainty of 1 %. Further dissemination of forces after this tier is quite uncommon as the measurement uncertainties are often well above 2 %.
Note: Secondary standards cannot be used to calibrate other secondary standards, and working standards cannot be used to calibrate other working standards. The devices calibrated by working standards cannot further disseminate the unit of force for calibration purposes.
Published standards for force calibration can reference ASTM E-74
Documents referencing ASTM E74 directly or indirectly include:
AASHTO T22
AASHTO T68
ASTM E4
ASTM C39
ASTM E10
ASTM E18 – This document requires calibration by Primary Standards in accordance with ASTM E74. It is important as only calibration laboratories with deadweights calibrated in accordance with the ASTM E74 requirements can calibrate these devices and assign the Class AA loading range as required by section A2.6.2.1.
Devices Calibrated in Accordance with the ASTM E74 Standard
Note: This method can be used for the devices calibrated in accordance with ASTM E74 and used for ASTM E4 calibrations for the determination of the best CMC. The ASTM E4 Annex gives additional detail on how to calculate the uncertainty for the ASTM E4 verification.
Type A Uncertainty, Contributors
1) ASTM LLF reduced to 1 Standard Deviation (ASTM LLF is reported with k= 2.4)
2) Repeatability of the Best Existing Device
3) Repeatability and Reproducibility
Type B Uncertainty Contributors
1) Resolution of the Best Existing Device
2) Reference Standard Resolution* If Applicable
3) Reference Standard Uncertainty
4) Reference Standard Stability
5) Environmental Factors
6) Other Error Sources
Do not use SEB, Nonlinearity, or Hysteresis as they are not appropriate contributors when following the ASTM E74 standard.
All uncertainty contributors should be combined, and the Welch-Satterthwaite equation should be used to determine the effective degrees of freedom for the appropriate coverage factor for a 95 % confidence interval.
Table 1 Example of a Single Point Uncertainty Analysis for Devices Calibrated in Accordance with the ASTM E74 Standard
Note: Force Measuring Devices Calibrated in Accordance with the ASTM E74 standard are continuous reading devices, and any uncertainty analysis should be conducted on several test points used throughout the loading range. There are Excel spreadsheets available for calculating CMC from certain force calibration laboratories.
Data to Support Table 1
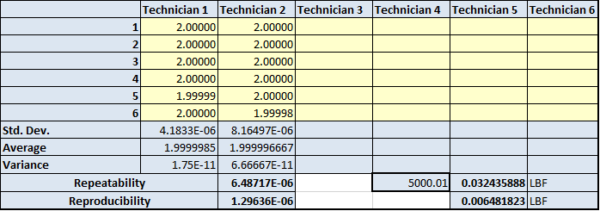
Repeatability and Reproducibility Between Technicians – Repeatability between technicians is found by taking the square root of the averages of the same test point taken multiple times. Reproducibility between technicians is found by taking the standard deviation of the averages of the same test point taken multiple times.
Repeatability and Reproducibility between technicians – This should only need to be performed once per every parameter on the scope of accreditation and be conducted amongst all technicians who perform calibrations using the equipment. This example uses two technicians recording readings at the same measurement point.
The readings were taken in mV/V and were then converted to force units. Repeatability between technicians is found by taking the square root of the averages. Reproducibility between technicians is found by taking the standard deviation of the averages.

Repeatability – Repeatability is defined as the standard deviation of a series of at least two measurements at the same test point. The purpose of this test is for the determination of the uncertainty of force generation in a force-calibrating machine or test frame. For laboratories testing multiple ranges, it is recommended that a repeatability point is taken for every ten percent of the ranges they calibrate. An example would be a lab performing calibrations from 10 N through 10,000 N.
The ranges calibrated may be 10 N - 100 N, 100 N - 1,000 N, and 1,000 N - 10,000 N. The recommended practice would be to take test points at 10, 20, 30, 40, 50, 60, 70, 80, 90, 100, 200, 300, 400, 500, 600, 700, 800, 900, 1,000, 2,000, 3,000, 4,000, 5,000, 6,000, 7,000, 8,000, 9,000, and 10,000 N.
Note: For this application, zero should never be considered as a first test point. A force-measuring device should not be used to calibrate other devices outside the range it was calibrated over. Example. A device calibrated from 10 % through 100 % of its range should not be capable of calibrating devices outside of this range.

ASTM LLF – ASTM E74 standard uses a method of least squares to fit a polynomial function to the data points. The standard deviation of all of the deviations from the predicted values by the fit function versus the observed values is found by taking the square root of the sum of all of the squared deviations divided by the number of samples minus the degree of polynomial fit used minus one. This number is then multiplied by a coverage factor (k) of 2.4 and then multiplied by the average ratio of force to deflection from the calibration data.
ASTM LLF = 0.25 FORCE UNITS (This is Divided by 2.4 to get 1 Standard Deviation) and is found in the calibration report.
Resolution – Smallest change in a quantity being measured that causes a perceptible change in the corresponding indication.
Best Existing Device - is defined as a device to be calibrated that is commercially or otherwise available for customers, even if it has a special performance (stability) or has a long history of calibration. For force calibrations, this is often a very stable load cell and indicator with enough resolution to observe differences in repeatability conditions.
Resolution of Unit Under Test (Best Existing Device) = 0.1 FORCE UNITS
Environmental Factors – Environmental conditions that influence the load cell output. The most common specification is temperature compensation found on the force measuring devices specification sheet. It is important to note that any deviation in environmental conditions from the temperature the device was calibrated needs to be accounted for.
Environmental Factors +/- 1-degree C was used, and this is found on the manufacturer's specification sheet. The temperature effect is 0.0015 percent per degree C. If the reference laboratory controls the temperature to within +/- 1 degree, the contribution formula is Force Applied * Temperature Specification per 1 degree = Environmental Error. 5,000 Force Units * 0.0015 % = 0.075 FORCE UNITS
- +/- 1-degree C was used, and this is found on the manufacturer's specification sheet. The temperature effect is 0.075 FORCE UNITS
Reference Standard Stability – The change in output from one calibration to another. This number is found by comparing multiple calibrations against one another over time. If the instrument is new, the suggestion is to contact the manufacturer for stability estimation on similar instruments.
Reference Standard Stability – This is calculated per point, and a 01 % change between the same 5000 FORCE UNITS calibration point was used which corresponded to 0.5 FORCE UNITS.
Other Error Sources – In this example the alignment of the force transfer machine 1/16th inch measured off the centerline of the load cell (From the specification sheet side load sensitivity 0.05 % * 0.0625 = 0.003 % = 0.15 FORCE UNITS). Other Error Sources could include geometric alignment, timing, and contributors associated with using different indicators if the device is calibrated with a different indicator that was used for calibration.
Reference Standard Calibration Uncertainty – This is usually the CMC of the reference standard used to calibrate the force-measuring device. It is the uncertainty of the calibration of the force-measuring device. The repeatability study done for the CMC can be removed if new repeatability with the unit currently being calibrated is conducted.
Reference Standard Calibration Uncertainty – The lab performing the calibration of this device used deadweight primary standards with a CMC of 0.002 % of applied. 5,000 FORCE UNITS * 0.002 % = 0.1 FORCE UNITS and this is then divided by the appropriate coverage factor to get the standard uncertainty.
Indicator Uncertainty – If the force measuring device is not used with the same indicator that was used for calibration and additional error source will need to be accounted for, and measurement traceability for the indicator will have to be verified. The recommended practice is to use the same indicating system at the time of calibration as this will reduce the overall measurement uncertainty by removing an additional uncertainty source.
Again, Morehouse has created a spreadsheet specifically to help laboratories calculate CMC. This sheet can be downloaded at http://www.mhforce.com/Files/Support/249/CMC-CALCULATIONS-FOR-FORCE-MEASUREMENTS.xlsx

Calculating Uncertainty in Accordance with ASTM e74 Standard - Conclusion
This concludes Part 2. Part 3 of this guidance series will cover devices not calibrated to a known standard, and then part 4 will cover devices calibrated in accordance with ISO 376.
If you enjoyed this article, check out our LinkedIn and YouTube channel for more helpful posts and videos.
Everything we do, we believe in changing how people think about force and torque calibration. Morehouse believes in thinking differently about force and torque calibration and equipment. We challenge the "just calibrate it" mentality by educating our customers on what matters and what causes significant errors, and focus on reducing them.
Morehouse makes our products simple to use and user-friendly. And we happen to make great force equipment and provide unparalleled calibration services.
Wanna do business with a company that focuses on what matters most? Email us at info@mhforce.com.
# calculating uncertainty in accordance with astm e74 standard # ASTM E74 # Repeatability and Reproducibility Between Technicians


