Reduce Beginning and Ending Zeros
At Morehouse, we generate calibration reports that follow the ASTM E74 standard. When customers try to replicate the data, they often ask how we reduced the zeros from the raw data. This blog explains Method A and Method B zero reduction per ASTM E74. Morehouse recommends Method B, which reduces both the beginning and ending zero. Follow the four easy steps below to interpolate the ending zero throughout the dataset.
Method A and B per ASTM E74
The current ASTM E74 standard allows for zero to be reduced, which best represents the anticipated usage of the equipment. Suppose the end-user ignores any trailing or ending zero. In that case, the zero reduction method that should be used is referred to as Method A. Per ASTM E74 section 8.1, “For method (a), the deflection is calculated as the difference between the deflection at the applied force and the initial deflection at zero force.” [1]
If the end-user does not ignore the trailing zero, then ASTM E74 states, “For Method (b), when it is elected to return to zero after each applied force, the average of the two zero values shall be used to determine the deflection. For Method (b) when a series of applied forces are applied before return to zero Force, a series of interpolated zero force readings may be used for the calculations.” [1]
Since it is impractical to return to zero after each force is applied, many in the calibration industry opt to use interpolated zero’s rather than using the average of the two zero values. Morehouse recommends that end-users reduce the ending zeros with Method B. This recommendation is based on an analysis we conducted with 46 different load cells, which shows that choosing method A increased the uncertainty of the force-measuring system.
Details of this analysis can be found in the paper Analyzing the Effects of Reducing the Ending Zero Vs. Ignoring the Trailing Zero on Measuring Instruments Used for Force Calibration.
Method B Interpolated Zero in 4 Easy Steps
You can use Method B Interpolated Zero in just four easy steps to reduce the beginning and ending zeros. To illustrate the steps, I am using data from a load cell calibration performed at Morehouse in one of our deadweight frames.
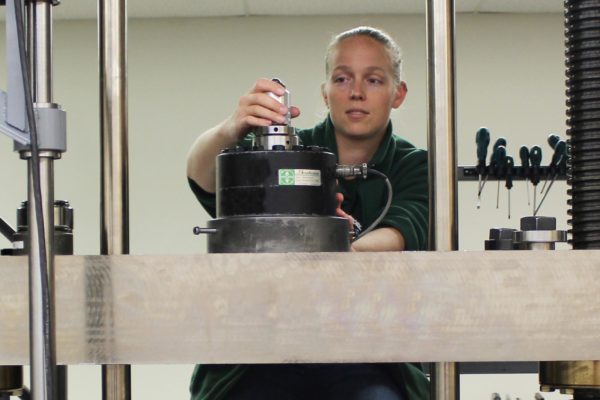
Figure 1: Load Cell Calibration in a Morehouse Deadweight Machine
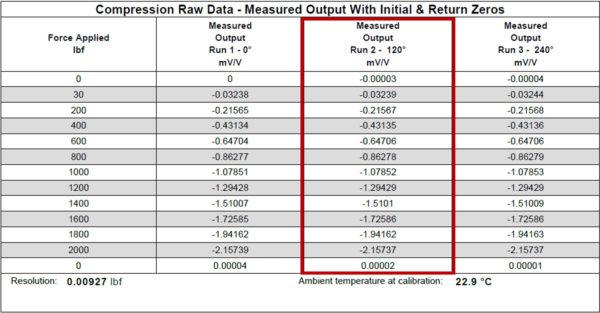
Figure 2: Raw Data from an ASTM E74 Calibration
Using the data from Run 2, the four steps below describe the zero reduction process.
1. Reduce the Beginning Zero
Reducing the beginning zero is the first step for calibrations using Method B and the only step for calibrations using Method A.
In our example, the beginning zero is -0.00003 mV/V is the Observed Output of the UUT column. In the Step 1 column, we subtract -0.00003 from each row of data, including the ending zero.
Example: -0.03239 - 0.00003 = -0.03236
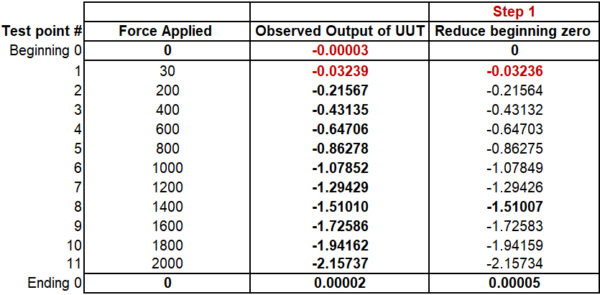
Figure 3: Step 1, Reduce the Beginning Zero
2. Interpolate the Ending Zero across all Non-Zero Force Points
This step is a little more complicated. After subtracting the beginning zero from the entire data set, we need to reduce the ending zero. Therefore, we first need to know the number of non-zero test points between zeros. To do this in Excel, use the COUNTIF function.
Example: There are 11 non-zero force points
After determining the number of points, take the ending zero and divide it by the number of points.
Example: 0.00005 ÷ 11 = 0.0000045455
Lastly, take this number and multiply it by the test point number to get the appropriate zero reduction throughout the range.
Example: 0.0000045455 x 8 = 0.000036
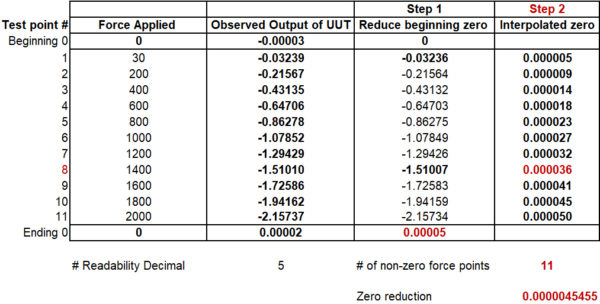
Figure 4: Step 2, Interpolated Zero
3. Reduce the Ending Zero Using the Interpolation Method
Next, we will use our Interpolated Zero from Step 2 and reduce that from the corresponding data from Step 1.
Example: -1.51007 - 0.000036 = -1.510106
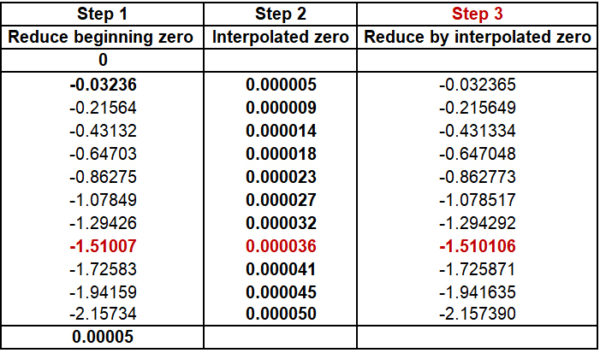
Figure 5: Step 3, Reduced by Interpolated Zero
4. Round to Readability
If the calculations are done in Excel, then so far they are not rounded. The last step is to round to the appropriate number of decimals. The Excel formula is =ROUND(number,num_digits). We are reading to 5 decimals in this example.
Example: =ROUND(1.510106,5) = -1.51011
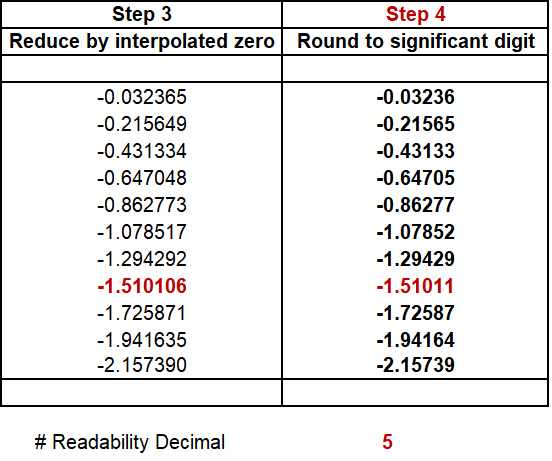
Figure 6: Step 4, Rounding
That’s it! There are more complex formulas that do the same math, which are more robust to handle any data set. However, I chose to simplify the formulas in order to explain the concept.
Those who have a good understanding of Excel will be able to code it. To download the Method B Interpolated Zero Excel file used in the examples above, click here.
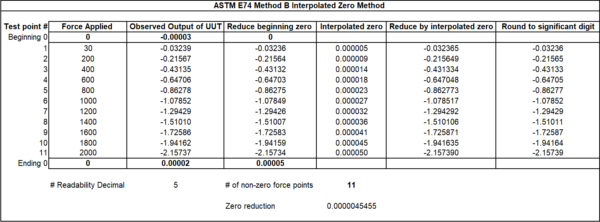
Figure 7: Method B Interpolated Zero Calculator
Simplifying the Interpolated Zero Reduction
Morehouse wants to educate our customer base and provide tools to help the industry. We hope this blog helps to simplify the interpolated zero reduction and helps end-users reduce the beginning and ending zeros.
If you enjoyed this article, check out our LinkedIn and YouTube channel for more helpful posts and videos.
I take great pride in our knowledgeable team at Morehouse, who will work with you to find the right solution. We have been in business for over a century and focus on being the most recognized name in the force business. That vision comes from educating our customers on what matters most, and having the proper discussions relating to force calibration concepts, so everyone uses the proper methods and math.
Everything we do, we believe in changing how people think about Force and torque calibration. We challenge the “just calibrate it” mentality by educating our customers on what matters, and what causes significant errors, and focus on reducing them.
In addition, Morehouse makes simple-to-use calibration products. We build fantastic force equipment that is plumb, level, square, rigid, and provide unparalleled calibration service with less than two-week lead times.
Contact us at 717-843-0081 to speak to a live person or email info@mhforce.com for more information.
[1] Standard Practices for Calibration and Verification for Force-Measuring Instruments is found at E74-18


