3 Rules to Reduce Your Measurement Risk
3 Rules to Reduce Your Measurement Risk Bad Measurements Happen! Technicians are Fallible! The Wrong Equipment is Used!
Almost everyone has had problems related to bad measurement practices—some of which have resulted in serious devastation. There was the BP oil refinery explosion in Texas, the Hubble telescope with improper focus, the Space Shuttle explosion, a Stealth Bomber crash, Cox Health’s overdosing of 152 cancer patients, and another BP oil rig disaster. All of these tragedies were the result of poor decision-making, and all of them were preventable.
I'd like to ask you to pause for a moment and take 20-30 seconds to think about measurement issues that may have affected you:
- Have you, or any of your technicians, ever overloaded a load cell?
- Have you, or someone you know, ever used the wrong equipment to try to accomplish a certain task?
- Have you signed a certificate you were unsure about?
- Do you know of any bad measurement practices in your organization that are not being corrected, or do complaints fall on deaf ears?
- How about your calibration provider: Have they ever admitted to making a mistake? If the problem was not corrected, did it just go away?
Let's face it: We are not perfect. And neither is any measurement practice. But if we aim for perfection, we can achieve excellence, which is what we do at Morehouse. We mitigate measurement risk by making better measurements and by replicating the use of all instruments to lessen the possibility of devastating errors. We educate our customers on best measurement practices. And when you send an instrument to our lab for calibration, we guarantee your satisfaction. If you still need another reason to come to Morehouse, remember: the alternative could be disastrous.
Our goal is to solve problems before failures occur. Solving measurement problems requires adherence to the three rules.
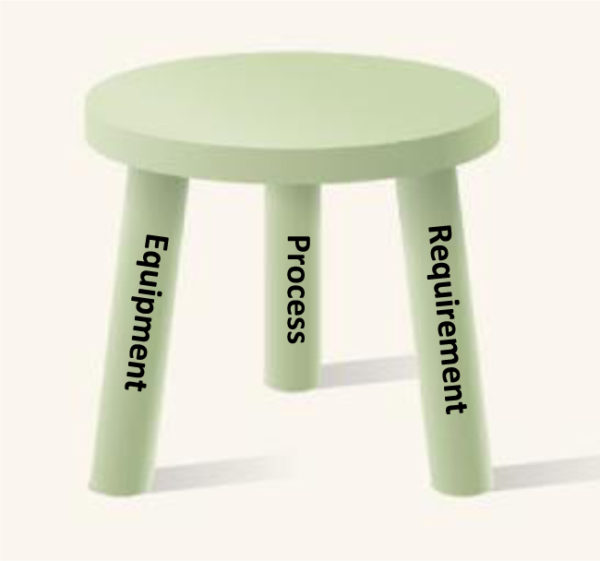
There are three essential rules to making better measurements and reducing measurement risk. These three rules are like a three-legged stool. If any one of them is missed or neglected, the stool will not function, and you will be left sitting on your posterior.
Rule #1. Know the Right Requirements - This first rule involves knowing what is needed to accomplish the task at hand. It should include the establishment of reasonable measurement tolerances that are based on system performance, as well as an understanding of what equipment or calibration provider is needed to ensure the proper Test Uncertainty Ratio (T.U.R.) and reduce measurement risk. The more accurate the system, the higher the costs will be to procure the equipment and have it calibrated. Maintenance may also be an issue. If the wrong equipment is chosen, more frequent calibration cycles may be required*.
*This is in reference to stability criteria. If the requirement is 0.1 % of applied, and the stability of the device is 0.2 % over a one-year period, the device would need to have the calibration interval shortened.
SAE AS9100 7.3.1 states, ”Design and development planning shall consider the ability to produce, inspect, test and maintain the product."
For most tests, a TUR of 4:1 will meet the guidelines set forth in ANSI Z540.1 to ensure that the total risk is less than 4 %. TUR is covered in greater detail in Rule #2.
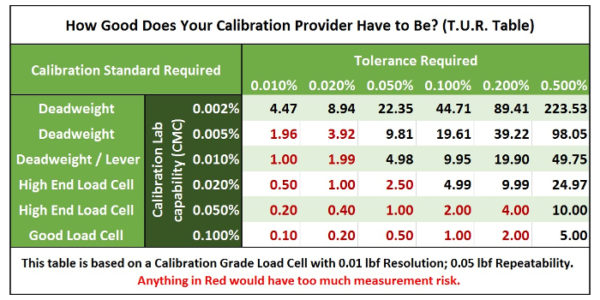
Below is a chart showing what Calibration and Measurement Capability is required to maintain a 4:1 TUR. If you are using a device with a tolerance of 0.1 % of applied force, the table indicates that you would need to choose a calibration provider with a CMC of about 0.02 % or better. A lab with a CMC of 0.05 % cannot meet a TUR. of 4:1 to calibrate a device with 0.1 % accuracy. A CMC of 0.05 % is what most secondary labs maintain.
Note: To maintain a CMC of better than 0.02 %, multiple transfer standards are often required.
This table shows that calibration with deadweight primary standards is often required to calibrate any instrument with tolerances of 0.1 % of applied or better. If the tolerance required is 0.05 % or better, some type of deadweight or lever system must be used.
Rule # 2. Choose the Right Equipment – Always choose Measuring and Test Equipment that is capable of achieving the measurement tolerance required. If you need to certify that an instrument is within a tolerance of 1 %, you cannot use a 1 % standard to perform the calibration. Measurement uncertainty must be considered, and the further away from an NMI (National Metrology Institute), the larger the uncertainty will become. This is where one may hear the phrase T.U.R (Test Uncertainty Ratio). In simplistic terms, T.U.R. = Tolerance Required / Uncertainty of the Measurement.
If the Uncertainty of the measurement is not less than the tolerance required, there will be a significant risk. This is often referred to as the Probability of False Accept (PFA). This means a lab may call a measurement good when it is not. In simplistic terms, a T.U.R. that produces less than +/- 2 % upper and lower risk would be required to ensure that the measurement is valid. This can be tricky since the Uncertainty of the Measurement often includes the resolution of the Unit Under Test (UUT).
Several manufacturers do not understand T.U.R. based on the accuracy claims they make. Thus, they do not include the instrument’s resolution or repeatability or the reference standard used to perform the calibration in their accuracy claims. Therefore, no reference standard in the world may lower the PFA if the instrument shows any bias.
Before we move on to rule #3, let’s do a quick recap:
From Rule #1: We need to choose the tolerance required and make sure we have the means to test it or choose a calibration provider that can offer a T.U.R. of better than 4:1.
We need to know if the instrument has enough resolution and if the repeatability is low enough, where the total risk will be less than 2 % if any bias is shown.
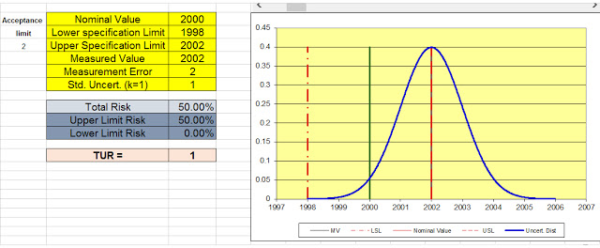
| Example #1. 2000 lbf test point, Instrument has a measurement value of 2002 with a Std. Uncertainty of 1 lbf |
The most frequent offenders are instruments with accuracy specifications of applied force, such as 0.1 % of the applied force with an instrument resolution that equals 0.1 % of the first test point. Example #1 above shows a 2,000 lbf test point with a 2 lbf resolution. In this example, 2000 lbf is the nominal force value, and the instrument reads 2002. The bias or measurement error is 2 lbf. The manufacturer would call this "In Tolerance.” However, when the uncertainty of the measurement is considered, the Total Risk, or PFA, becomes 50%.
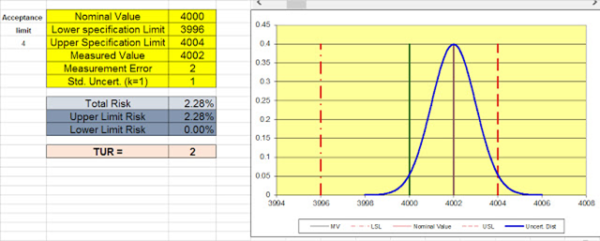
| Example #2 4000 lbf test point, Instrument has a measurement value of 4002 with a Std. Uncertainty of 1 lbf |
Example #2 shows a bias of 2 lbf at a 4000 lbf test point. The Total Risk is 2.28 %, which is above the 2 % that is generally accepted to "PASS." This scenario is a little bit different since the Std. Uncertainty is contributing to the risk.
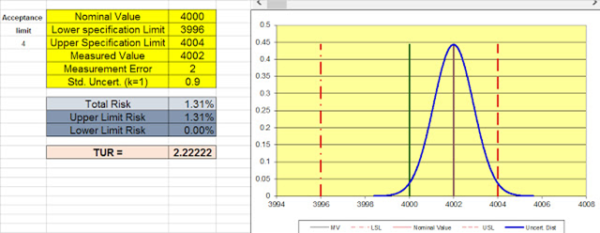
Example #3 4000 lbf test point, Instrument has a measurement value of 4002 with a Std. Uncertainty of 0.9 lbf
If a better reference standard were used, the risk could be lowered. Example #3 shows a Total Risk of 1.31 % from lowering the Standard Uncertainty by 10 %. This could be the difference between a deadweight machine accurate to 0.0016 % of applied versus a deadweight standard accurate to 0.005 % of applied. Remember: the UUT's resolution and repeatability contribute to the TUR ratio.
Rule # 3. Have the Right Processes – This last rule requires a training program and proof of training (records) to validate the individuals calibrating or using the equipment. In addition, it is important to maintain procedures that adequately support the end-product performance requirements.
Finally, be technically competent. If the laboratory technicians performing calibrations do not know how to calibrate a force or torque device are using improper adapters, are not aligning the Unit Under Test (UUT) properly, and/or use improper loading procedures, are they competent? Can there be confidence in the reported results? Moreover, if a standard calibration procedure is being referenced (e.g. ASTM or ISO standards), there should be a process in place that ensures all aspects of the standards are being carefully satisfied in the calibration process. Selective standard procedure implementation is another common mistake that often causes significant measurement errors.
Per ANSI/ISO/IEC 17025 - The laboratory shall use the appropriate methods and procedures for all tests and/or calibrations within its scope. The laboratory shall ensure the competence of all who operate specific equipment, perform tests and/ or calibrations, evaluate results, and sign test reports and calibration certificates.
The laboratory shall make sure their measurements are traceable to SI units. There is no such thing as traceable to NIST. Measurements can be traceable to SI units through NIST
What measurement traceability means.
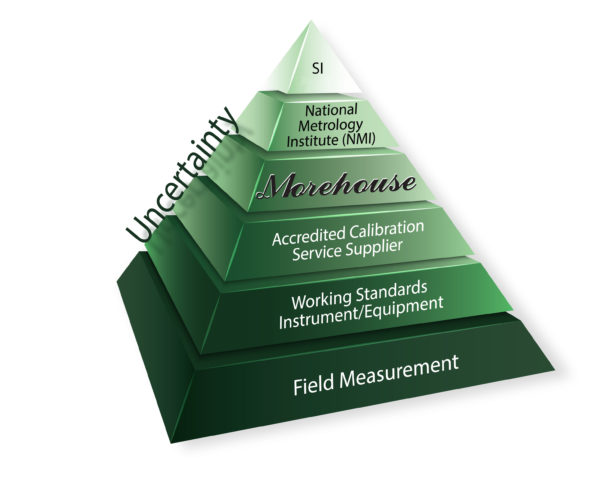
Several standards may require calibration or verification of measuring instruments with proof of traceability. The pyramid above shows uncertainties increasing with each calibration step or level.
From VIM 2.41: "Metrological Traceability - Property of a measurement result whereby the result can be related to a reference through a documented unbroken chain of calibrations, each contributing to the measurement uncertainty.” Thus, without careful consideration of calibration uncertainty, a proper chain of traceability cannot be established. So the further away from SI units, the larger the uncertainty becomes. A lab using working standards cannot calibrate an accredited calibration supplier's standards. This happens, and it is completely wrong. There are absolutely no alternative facts to justify this scenario. If you have read this, be sure to select the appropriate calibration supplier to meet your needs.
Let Morehouse help you meet these three requirements. We have force calibration equipment and processes to meet requirements from 0.0016 % of applied force and ensure tolerances are met with the lowest amount of measurement risk. Equipment is offered for all types of applications. We offer training courses to educate calibration technicians and inform participants about proper techniques and the common causes of measurement errors.
To learn more, watch our video Minimize your Force and Torque Measurement Risk.
Reduce Your Measurement Risk - Conclusion
If you enjoyed this article, check out our LinkedIn and YouTube channel for more helpful posts and videos.
Everything we do, we believe in changing how people think about force and torque calibration. Morehouse believes in thinking differently about force and torque calibration and equipment. We challenge the "just calibrate it" mentality by educating our customers on what matters and what causes significant errors, and focus on reducing them.
Morehouse makes our products simple to use and user-friendly. And we happen to make great force equipment and provide unparalleled calibration services.
Wanna do business with a company that focuses on what matters most? Email us at info@mhforce.com.
# Reduce Your Measurement Risk # Measurement Risk # Risk Reduction Methods # Measures to reduce risk


