How to Calculate Load Cell Specific Risk Step-by-Step Instructions
Many people struggle with decision rules and how to calculate risk. This article provides step-by-step instructions to calculate Measurement Uncertainty, Guard Band Acceptance Limits, and Probability of False Acceptance (PFA).
Load Cell Specific Risk Example Calculation:

To Calculate PFA, the Excel function is NORM.DIST.
Risk upper = NORM.DIST(Measured value, Upper Tolerance Limit, Standard Uncertainty, TRUE)
Risk Lower = 1- NORM.DIST(Measured value, Lower Tolerance Limit, Standard Uncertainty, TRUE)
PFA = Risk upper +Risk Lower
Load Cell Specific Risk Example
Morehouse with the help of others created an extensive document on decision rules. This example of Load Cell Specific Risk.
A customer sent their 10,000 N load cell in for calibration. The purchase order indicates calibration to the manufacturer’s specification.
Since the purchase order is incomplete regarding pass/fail criteria and how measurement uncertainty is taken into account, the customer is contacted and presented with several options based on their risk requirements.
The customer decides to rewrite the order. The new purchase order reads calibrate using a tolerance of 0.1 % of full scale (± 10 N), taking measurement uncertainty (U95.45 %) into account using specific risk calculations. Fail if the PFA for either side > 2.5 %, otherwise pass.
Step 1 Calibrate the equipment we will need to determine the Standard Uncertainty (k =1) of the Measurement Process for this calibration.
For simplistic sake, we will look at the 10,000 N point.
10,000 N force was applied three times, and the instrument read 10,000 10,002 10,001.
Taking the standard deviation of these numbers =stdev(10,000 10,002 10,001) we get 1
The resolution of the equipment is 1 N.
The CMC of the reference standard is 0.2 N.

Thus, the formula for Standard Uncertainty of the Measurement Process becomes.

We now have everything we need to calculate Guard Banded Acceptance Limits and PFA
A 10,000 N load cell has a tolerance of ± 0.1 % of full scale.
Measured Value = 10,000 N.
Upper Tolerance = 10,010 N.
Lower Tolerance = 9,990 N.
ResolutionUUT = 1 N.
RepeatabilityUUT = 1 N
Measured Value = 10,001 N.
Standard Uncertainty = 1.04563 N.
Step 2 Calculate Acceptance Limits
We are calculating our Conformance probability for 97.50 % Confidence for symmetrical tolerances. We calculate the Guard band Multiplier by using the formula in Excel of NORM.S.INV (0.975)/2.
We then use this number of 0.98 as our GB Multiplier as follows.
For the Guard band upper limit, we have 10010 – (GB Multiplier * Coverage Factor * Standard Measurement Uncertainty)
10010 – (0.980 * (2 *1.04563)) = 10007.9506
For the Guard band lower limit, we have 9990 + (GB Multiplier * Coverage Factor *Standard Measurement Uncertainty)
9990 + (0.980 * (2 * 0.125)) = 9992.0494

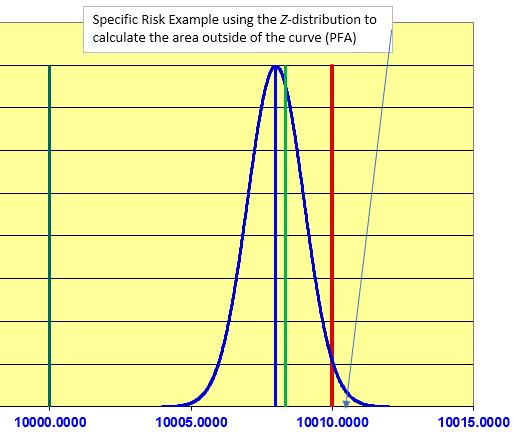
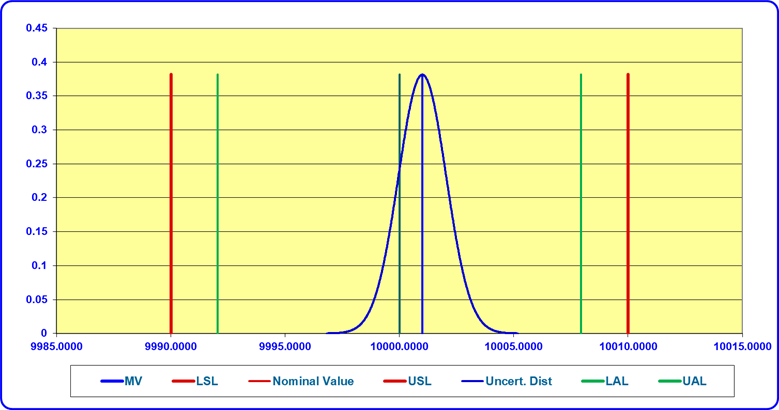
Thus, our acceptance limit is between 9992.0494 and 10007.9506 as any measured value between these two values will have less than 2.5 % PFA.
Step 3 Calculate PFA
Risk Upper = NORM.DIST(10001, 10010, 1.04563, TRUE) = 0 %
Risk Lower = 1- NORM.DIST(10001, 9990, 1.04563, TRUE)) = 0 %
Total Risk = 0 %
Additional Proof
One can use the Upper or Lower GB Acceptance Limit to verify the GB acceptance limits.
Risk Upper = NORM.DIST(10007.950603, 10010, 1.04563, TRUE) = 2.5 %
Load Cell Specific Risk Example Conclusion
This Load Cell Specific Risk Example has provided a step-by-step guide to calculating Measurement Uncertainty, Guard Band Acceptance Limits, and Probability of False Acceptance (PFA). By following these steps, you can ensure that your measurements meet the criteria of ISO/IEC 17025:2017 and that your pass/fail criteria takes measurement uncertainty into account.
The 10,000 N load cell calibration example demonstrates how these calculations can be applied in a real-world scenario.
--Henry Zumbrun, President of Morehouse Instrument Company
About Morehouse Instrument Company
Companies worldwide rely on Morehouse for accuracy and speed. The company turns around equipment in 7-10 business days so customers can return to work quickly and save money.
The York, PA-based company provides force and torque measurement products and services worldwide.
Morehouse Instrument Company, a trusted and accredited provider of force and torque measurement services for over 100 years, offers measurement uncertainties 10-50 times lower than the competition.
Morehouse helps commercial labs, government labs, and other organizations lower their measurement risk by lowering equipment uncertainties for torque and force measurement. Contact Morehouse at info@mhforce.com .
More Information from Morehouse
We believe in changing how people think about force and torque calibration in everything we do.
This includes explaining how to calculate Load Cell Specific Risk on load cell reliability and challenging the "just calibrate it" mentality by educating our customers on what matters and what causes significant errors.
We focus on reducing these errors and making our products simple and user-friendly.
This means your instruments will pass calibration more often and produce more precise measurements, giving you the confidence to focus on your business.
Companies around the globe rely on Morehouse for accuracy and speed.
Our measurement uncertainties are 10-50 times lower than the competition.
We turn around your equipment in 7-10 business days so you can return to work quickly, saving you money.
When you choose Morehouse, you're not just paying for a calibration service or a load cell.
You're investing in peace of mind, knowing your equipment is calibrated accurately and on time.
Contact Morehouse at info@mhforce.com to learn more about our calibration services and load cell products.
Email us if you ever want to chat or have questions about a blog.
We love talking about this stuff.
Our YouTube channel has videos on various force and torque calibration topics here.


